RangeMax WiFi Range Extender Setup Manual NETGEAR, Inc. 4500 Great America Parkway Santa Clara, CA 95054 USA March 2008 208-10158-02 v1.
Trademarks NETGEAR and the NETGEAR logo are registered trademarks, and RangeMax and Smart Wizard are trademarks of NETGEAR. Inc. Microsoft, Windows, and Windows NT are registered trademarks of Microsoft Corporation. Other brand and product names are registered trademarks or trademarks of their respective holders.
Contents Getting to Know Your WiFi Range Extender ....................................................................... 1 Unpacking Your New WiFi Range Extender ...................................................................... 1 Extender Front Panel ......................................................................................................... 3 Extender Back Panel ......................................................................................................... 4 Bottom Label .....
iv Contents
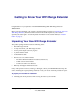
Getting to Know Your WiFi Range Extender Congratulations on your purchase of the NETGEAR® RangeMax WiFi Range Extender WPN824EXT. Before you begin installing your extender, check the package contents (see Unpacking Your New WiFi Range Extender). Become familiar with the front and back panels of your extender— especially the status lights—and the important information on the extender label (see “Bottom Label” on page 5).
RangeMax WiFi Range Extender Setup Manual 2. Set up your WiFi range extender by inserting the extender into the stand supplied with your extender. Figure 1 3. Place your extender in an area suitable for installation (near an AC power outlet and accessible to the Ethernet cables for your wired computers). 2 Getting to Know Your WiFi Range Extender v1.
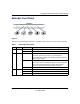
RangeMax WiFi Range Extender Setup Manual Extender Front Panel Figure 2 You can use the status lights on the front of the WiFi range extender to verify various conditions. Table 1. Status Light Descriptions Item Function Activity Description 1 Power On green solid Power is supplied to the extender. Off Power is not supplied to the extender. On One of the following is occurring: 2 Test • The unit is performing the power-on self-test diagnostic.
RangeMax WiFi Range Extender Setup Manual Table 1. Status Light Descriptions (continued) Item Function Activity Description 4 Internet Amber off No Ethernet cable is connected from the extender to the gateway/ router. Amber on The Ethernet cable is connected from the extender to the gateway/ router, but no IP address has been received. Green on IP address has been received. Green blinking IP address has been received, and data is being transmitted and received.
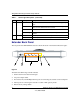
RangeMax WiFi Range Extender Setup Manual Top Panel Figure 4 The top of the WiFi range extender includes a dome with status lights that identify which of the seven internal antennas are active. The lights flash according to the direction of the wireless signal. These status lights are off by default but can be turned on using the on/off switch (see “Extender Back Panel” on page 4).
RangeMax WiFi Range Extender Setup Manual 6 Getting to Know Your WiFi Range Extender v1.
Installing Your WiFi Range Extender Using the Resource CD The setup procedure using the Resource CD takes about 15 minutes to complete. Before using the Smart Wizard™ on the Resource CD to set up your WiFi range extender, ensure the following: • You have a PC with Windows Vista, or Windows 2000 or Windows XP with Service Pack 2. • You have an Internet service connection through a gateway/router.
RangeMax WiFi Range Extender Setup Manual • Connecting the extender to the gateway/router. • Connecting your computer to the extender. • Selecting one of these options for your wireless network: • – Whether the Smart Wizard guides you in setting up your wireless network. – Whether you set up your wireless network in the extender’s browser interface. Selecting one of these options for your wireless security: – Whether the Smart Wizard guides you in setting up your wireless security.
RangeMax WiFi Range Extender Setup Manual You are now connected to the Internet. If you need to configure any settings at a later time, refer to “Accessing Your RangeMax WiFi Range Extender after Installation” on page 17. Optimizing Performance after Installation The following procedures will ensure that you get optimum performance from your high-speed WiFi range extender.
RangeMax WiFi Range Extender Setup Manual 10 Installing Your WiFi Range Extender Using the Resource CD v1.
Installing Your WiFi Range Extender Manually Before manually installing and connecting your WiFi range extender, make sure that you have an Internet service connection through a gateway/router that is capable of providing a DHCP IP address (for more information, see “Make sure that the connection to your gateway/router is correct: ” on page 26). Use these manual procedures if you are an advanced user, or a user of Macintosh or Linux systems.
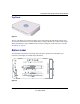
To connect the WiFi range extender, the computer, and the gateway/router: 1. Power on the WiFi range extender (as illustrated in Figure 6): a. Connect the power adapter cord to the back of the WiFi range extender (1). b. Plug the power adapter into a power socket (2). Your power socket may differ from the illustration (2), according to your region.
2. Connect the WiFi range extender to the gateway/router (as illustrated in Figure 7): • Wired connection. If you have a wired connection between your computer and your gateway/router: – Locate the Ethernet cable that connects your computer to the gateway/router, and then disconnect the cable at the computer end only (1). – Connect the free end of the cable into the yellow Internet port on the back of the WiFi range extender (2).
• Wireless connection. If you do not have a wired connection between your computer and your gateway/router (as illustrated in Figure 8): – Locate the yellow Ethernet cable that was included in your WiFi range extender package, and connect it to the yellow Internet port on the extender (2). – Connect it to the Internet port on your gateway/router (1).
3. Connect the WiFi range extender to your desktop or laptop computer (as illustrated in Figure 9): If you have a wireless connection to your computer, you need to temporarily connect your system to the WiFi range extender in order to set up your extender and configure your wireless connection. This cable can be removed once the setup is complete. a. Locate the blue Ethernet cable that was included in your extender package, and connect the cable to a LAN port on the extender, for example, Port 4 (1). b.
Verifying Your Connection Verify that your extender is connected correctly by checking the WiFi range extender status lights, as described in Figure 10 and the following steps. Figure 10 To verify that your extender is connected correctly, check the following: 1. Power. The Power light should be lit. 2. Test. The Test light should be blinking (this indicates that there is no wireless device connected yet). 3. Wireless. The Wireless light should be blinking (wireless capability is enabled).
Accessing Your RangeMax WiFi Range Extender after Installation After installing your WiFi range extender manually, you must open a browser window and log in to the extender to complete your wireless setup. If you installed using the Resource CD, you still need to log in to the WiFi range extender any time you wish to change settings. Logging In To access the extender using its login name and password: 1. Type http://www.mywifiext.net or http://www.mywifiext.
If you have problems logging in, see “I Am Unable to Log In to the WiFi Range Extender” on page 28. Setting Up Wireless Connectivity and Enabling Wireless Security The Wireless Settings screen lets you set your wireless network connections and select the appropriate and optimum security options for your network and WiFi range extender. The WiFi range extender provides highly effective security options.
The Smart Wizard configuration assistant displays. Figure 12 2. Select Yes, guide me through the options to allow the Smart Wizard to assist you with configuring your WiFi range extender to access the Internet. If you select No to set up the connection yourself, see the procedures under “To manually set up wireless connectivity and enable wireless security:” on page 19. The Smart Wizard guides you through the steps for selecting a wireless security type and then presents your settings. 3.
3. Select a security option: • WPA-PSK (TKIP) + WPA2-PSK (AES) or Mixed Mode. This provides the most reliable security, and is easiest to implement, but it might not be compatible with older adapters. • WPA2-PSK (AES). This provides the most reliable security compatible with my equipment. • WPA-PSK (TKIP). This provides the most reliable security compatible with my equipment. • WEP. This provides security compatible with my equipment (not recommended as reliable). • No security.
2. The extender automatically checks the NETGEAR database for a new firmware image file. If no new firmware version is available, the message “No New Firmware Version Available” displays. If you select Cancel, you can check for new firmware later; see “To manually check for new extender firmware:” on page 21. 3. If new firmware is available, you are directed to the new firmware version on the NETGEAR website. Click Right-click and Save to Download, and save the file to a location on your hard disk.
2. Select WiFi Range Extender Status under Management on the main menu on your extender interface. When the WiFi Range Extender Status screen displays, note the version number of your extender firmware. 3. Go to http://kbserver.netgear.com/products/WPN824EXT.asp and select Downloads from the menu bar. 4. From the Product Selection drop-down menu, select WPN824EXT. The Product Support page for your extender displays. 5.
To ensure optimum performance of your high-speed WiFi range extender, NETGEAR recommends that the wireless adapter card for each computer in your network supports the same settings as your extender (see the online User Manual for more information). 3. Check that the security settings on each wireless device match the security settings of the extender. For example, if you selected a security option requiring a passphrase, then the same passphrase must be used for each wireless computer. 4.
24 Accessing Your RangeMax WiFi Range Extender after Installation
Help with Troubleshooting This chapter gives information about troubleshooting your WiFi range extender.
RangeMax WiFi Range Extender Setup Manual Make sure that the connection to your gateway/router is correct: 1. Verify that you have located the correct Ethernet port for your gateway/router. 2. Verify that a DHCP server is activated for your gateway/router. 3. Verify that you have deactivated the Wi-Fi function on your gateway/router, so you can use the Wi-Fi function of the WiFi range extender. For help with deactivation, go to http:// kbserver.netgear.com/products/WPN824EXT.
RangeMax WiFi Range Extender Setup Manual If the Test light does not turn off but instead blinks continuously, and there is no wireless client associated to the extender, this is normal. However, it should not blink continuously if at least one wireless device (such as a computer) is supposed to be associated with the extender.
RangeMax WiFi Range Extender Setup Manual 5. Make sure that your gateway/router is functional and has Internet access. I Am Unable to Log In to the WiFi Range Extender If you are unable to log in to the WiFi range extender, check the following: • If you are using an Ethernet-connected computer, check the Ethernet connection between the computer and the extender as described in the previous section.
RangeMax WiFi Range Extender Setup Manual To check that the Internet connection is working: 1. Internet connection. First verify that your gateway/router has a successful connection. The gateway/router status lights indicate if the gateway/router connection is successful or not. Check your gateway/router documentation, or call your Internet Service Provider for help with verifying that the gateway/router has a successful connection. 2. Wireless range extender Internet light is off.
RangeMax WiFi Range Extender Setup Manual 3. Verify that the WiFi range extender address (192.168.1.250) is listed by your computer as the default gateway/router address. The factory default WiFi range extender address is 192.168.1.250. However, if the extender detects a conflict with the address it gets from your gateway/router, it automatically picks a different address for itself. In this case, you can log in to the extender using www.mywifiext.net to verify its LAN IP address.
RangeMax WiFi Range Extender Setup Manual Troubleshooting Connectivity Using the Ping Utility Most computers and extenders have a diagnostic utility called ping that sends a request to a target device. The device then replies. The ping utility makes it easy to troubleshoot a network. This section includes advanced troubleshooting techniques. Testing the Path from a PC to Your Extender You can ping the WiFi range extender to verify that the LAN path from your computer to your extender is set up correctly.
RangeMax WiFi Range Extender Setup Manual – Verify that the Ethernet card driver software and TCP/IP software are both installed and configured on your computer. – Verify that the IP address for your extender and your computer are correct and that the addresses on both begin with 192.168.1. Testing the Path from a PC to the Internet After verifying that the path between your computer and the WiFi range extender works correctly, test the path from your PC to the Internet. 1.
Default Configuration Default Configuration Settings This section provides factory default settings and technical specifications for the RangeMax WiFi Range Extender WPN824EXT. Table 2. RangeMax WiFi Range Extender Default Configuration Settings Feature Default Setting Smart Wizard Enabled Extender Login Extender Login URL http://www. mywifiext.net or http://www.mywifiext.
RangeMax WiFi Range Extender Setup Manual Table 2. RangeMax WiFi Range Extender Default Configuration Settings (continued) Feature Default Setting Wireless Wireless Communication Enabled SSID Name NETGEAR_EXT Security Disabled Broadcast SSID Enabled Transmission Speed Autoa Country/Region United States in the U.S., otherwise varies by region RF Channel Auto Operating Mode 802.11 g/b Data Rate Best Output Power Full a. Maximum wireless signal rate derived from IEEE Standard 802.
RangeMax WiFi Range Extender Setup Manual Table 2. RangeMax WiFi Range Extender Default Configuration Settings (continued) Feature Default Setting Electromagnetic Emissions Meets requirements of FCC Part 15 Class B VCCI Class B EN 55 022 (CISPR 22), Class B C-Tick N10947 Interface Specifications LAN 10BASE-T or 100BASE-Tx, RJ-45 Internet 10BASE-T or 100BASE-Tx, RJ-45 Wireless Maximum wireless signal rate complies with the IEEE 802.11 standard. Actual throughput will vary.
RangeMax WiFi Range Extender Setup Manual Restoring the Default User Name and Password You can restore the factory default configuration settings that reset the extender’s user name to admin, the password to password, and the IP address to 192.168.1.250. This procedure erases your current configuration, including your wireless security settings, and restores the factory defaults. When you log in after resetting, the Smart Wizard configuration assistant prompts you to configure these settings.
Related Documents This table provides links to reference documents you can use to gain a more complete understanding of the technologies used in your NETGEAR product. Table 3. Reference Documents Document Link TCP/IP Networking Basics http://documentation.netgear.com/reference/enu/tcpip/index.htm Preparing Your Network http://documentation.netgear.com/reference/enu/wsdhcp/index.htm Glossary http://documentation.netgear.com/reference/enu/glossary/index.htm Related Documents 37 v1.
RangeMax WiFi Range Extender Setup Manual 38 Related Documents v1.
Registration and Certifications Product Registration, Support, and Documentation Register your product at http://www.NETGEAR.com/register. You must register before you can use our telephone support service. Product updates and Web support are always available by going to: http://www.NETGEAR.com/support. Setup documentation is available on the CD, on the support website, and on the documentation website.
40