
User's Manual

Wireless Broadband Router User Manual
Page 7 of 40
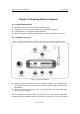
devices.
Step 1 Connecting your computer to the LAN port.
Attach one end of the Ethernet cable with RJ-45 connector to your hub, switch or a
computer’s Ethernet port, and the other end to one of the LAN ports of your Wireless
Broadband Router.
Step 2 Connecting Cable/ADSL Modem to the WAN port.
Connect the Ethernet cable attaching to your Cable/ADSL modem to the WAN port of your
Wireless Broadband Router.
Step 3 Connecting the power adapter.
Connect the single DC output connector of the power adapter to the power jack on the side of
the Wireless Broadband Router. Then plug the Power Adapter into an AC outlet,
Step 4 Power on the following devices in this order:
Cable/ADSL modem, Router, and PCs
2.3 Configuring Local PC to Access the Wireless Router
You can manage the Wireless Broadband Router through the Web browser-based
configuration utility. To configure the device via Web browser, at least one properly
configured computer must be connected to the device via Ethernet or wireless network. The
Wireless Broadband Router is configured with the default IP address of 192.168.1.1 and
subnet mask of 255.255.255.0 and its DHCP server is enabled by default. Before setting up
the Router, make sure your PCs are configured to obtain an IP (or TCP/IP) address
automatically from the Router by the steps below.
2.3.1 Setting up TCP/IP
2.3.1.1 Windows 98/Me
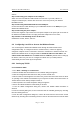
1. Go to Start Æ Settings Æ Control Panel.
2. Find and double-click the Network icon. The Network dialog box appears.
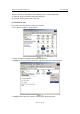
3. Click the Configuration label and ensure that you have network card.
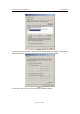
4. Select TCP/IP. If TCP/IP appears more than once, please select the item that has an arrow
“Æ” pointing to the network card installed on your computer. DO NOT choose the instance of
TCP/IP with the words “Dial Up Adapter” beside it.
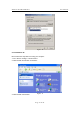
5. Click Properties. The TCP/IP Properties dialog box appears.
6. Ensure the Obtain IP Address Automatically is checked.
7. From the WINS Configuration dialog box, Ensure that Disable WINS Resolution is
checked.
8. From the Gateway dialog box, remove all entries from the Installed gateways by selecting
them and clicking Remove.
9. From the DNS Configuration dialog box, remove all entries from the DNS Server Search
Order box by selecting them and clicking Remove. Remove all entries from the Domain Suffix