WF-2116 User Manual V1.
WF-2116 User Manual Certification FCC CE FCC Statement This equipment has been tested and found to comply with the limits for a Class B digital device, pursuant to part 15 of the FCC rules. These limits are designed to provide reasonable protection against harmful interference in a residential installation. This equipment generates, uses and can radiate radio frequency energy and, if not installed and used in accordance with the instructions, may cause harmful interference to radio communications.
WF-2116 User Manual Package Contents The following items should be found in your package: ¾ WF-2116 USB Adapter ¾ CD -ROM ¾ Quick Installation Guides Make sure that the package contains above items. If any of the listed items is damaged or missing, please contact with your distributor.
Content 1 2 3 4 5 INTRODUCTION ......................................................................................................................... ‐ 1 ‐ 1.1 PRODUCT OVERVIEW ........................................................................................................................ ‐ 1 ‐ 1.2 MAIN FEATURES .............................................................................................................................. ‐ 1 ‐ 1.3 STANDARDS ..............................
WF-2116 User Manual 1 Introduction Thank you for choosing this Wireless 11N 300Mbps USB Adapter 1.1 Product Overview WF-2116 is a powerful 300Mbps USB 2.0 Adapter that installs quickly and easily into PCs. The Adapter can be used in Ad-Hoc mode to connect directly with other cards for peer-to-peer file sharing or in Infrastructure mode to connect with a wireless access point or router for access to the Internet in your office or home network. The Wireless 11N 300Mbps USB Adapter connects with 802.
WF-2116 User Manual ¾ 5% to 90% non-condensing (storage) 1.5 System Requirement You must have the following at least ¾ A laptop computer/desktop PC with an available USB slot ¾ At least a 300MHz processor and 32MB of memory ¾ A CD-ROM Drive ¾ USB controller properly installed and working in the computer ¾ A 802.11n 、802.11g or 802.11b Access Point (for infrastructure Mode) or another 802.11n、 802.11g or 802.11b wireless adapter (for Ad-Hoc; Peer-to-Peer networking mode).
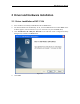
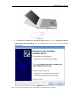
WF-2116 User Manual 2 Driver and Hardware Installation 2.1 Driver installation of WF2116 ¾ ¾ ¾ Insert the Driver and Utility CD-ROM into the CD-ROM driver. The Wizard should run automatically. If not, click the Start button and choose Run. In the field that appears, enter D:\autorun.exe (if ‘’D’’ is the letter of your CD-ROM drive). Click Install Driver & Utility for WF-2116 on the Wireless Client Configuration Utility dialogue box, and then click Next button.
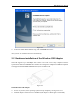
WF-2116 User Manual Figure 2‐2 ¾ Follow the Install Shield Wizard steps, and click Finish when done. Now your PC or notebook will restart automatically. 2.2 Hardware installation of the Wireless USB Adapter WF-2116 supports up to 300 Mbps data transfer rates. This card is fully compliant with the specifications defined in IEEE802.11n standard. It is designed to complement USB2.0 computers and supports Windows98/Me/2000/XP/Vista/7,linux and MAC OS.
WF-2116 User Manual Figure 2‐4 ¾ If the Welcome to Found New Hardware Wizard displays, choose install the software automatically (Recommended), and click Next button. The driver will be installed automatically. Figure 2‐5 Now you have completed the driver and hardware installation for the adapter.
WF-2116 User Manual 3 System Configuration This Wireless 11N 300Mbps USB Adapter provides two modes: Station mode and Access Point mode, the default is Station mode. You can select remote wireless AP to connect to Internet in station mode.
WF-2116 User Manual Figure 3‐2 General Information ¾ Status: Wireless network Associated, Ad-hoc Mode or Not Associated. ¾ Speed: The data Tx rate and Rx rate of the current connection. ¾ Type: The type of the current wireless connection, Infrastructures or ad hoc ¾ Encryption: Current encryption. ¾ SSID: The unique name of the wireless network to which the wireless adapter is connecting ¾ Signal Strength: The signal quality of the current connection.
WF-2116 User Manual 3.2 Profile Using the Profile tab (the following picture), you can add, remove, edit, duplicate, and set default a profile. Figure 3‐3 3.2.1 Add ¾ Create a new Infrastructure mode profile If you want your wireless computers to communicate with other computers on your wired network via a wireless access point. Click the Add button to create a new infrastructure profile.
WF-2116 User Manual Figure 3‐4 When the Network Info dialog box appears (the former picture), enter a name for the new profile. Enter the Network SSID. Choose the Network Authentication Mode and Data encryption from the drop-down menu and import the network key. Then click OK button. ¾ Create a new ad-hoc mode profile If you want your wireless computers communicate with each other directly, click the Add button to create a new ad-hoc profile.
WF-2116 User Manual Figure 3‐6 Choose the Network Authentication Mode and Data encryption from the drop-down menu. And import the network key. Then click OK button. You have successfully created a profile. 3.2.2 Remove Select a profile and click Remove button to delete this profile (the following picture).
WF-2116 User Manual Figure 3‐7 3.2.3 Edit Select a profile and click Edit button to edit this profile (the following picture).
WF-2116 User Manual Figure 3‐8
WF-2116 User Manual Figure 3‐9 Modify the profile information according to your demand. 3.2.
WF-2116 User Manual Figure 3‐10 Import the new profile name in the popup window blank (the following picture) Figure 3‐11 3.2.5 Set default When you want to make one profile as a default wireless connection, you should select the profile and click Set default button. The wireless adapter will use this profile to connect to wireless network automatically when the utility running next time.
WF-2116 User Manual Figure 3‐12 3.
WF-2116 User Manual Figure 3‐13 Double-click the network to which you wish to connect.
WF-2116 User Manual Figure 3‐14 Refer to the former picture choose the Authorization modes and Encryption modes in the drop-down box. If the wireless network uses a Passphrase, enter the Passphrase in the Passphrase field. If the wireless network uses a WEP key, enter the WEP key in the Key field. Click the OK button to complete the network connection. 3.4 Status The Status tab displays the detailed information of current device and wireless connection.
WF-2116 User Manual Figure 3‐15 3.5 WiFi Protect Setup Wi-Fi Protect Setup (WPS) function can let you create a safety network easily. You can through ‘PIN Input Config (PIN)’ or ’Push Button (PBC)’to encrypt your network.
WF-2116 User Manual Figure 3‐16 WPS can connect the wireless adapter and the router in a safe way.
WF-2116 User Manual Figure 3‐18 ¾ Click the ‘PIN Input Config (PIN)’ in the Wi-Fi protect setup of the adapter Figure 3‐19 ¾ Select the AP that you want to connect in the pop-up window, and then click ‘Select’ ¾ The connection will be established automatically.
WF-2116 User Manual 4 The Access Point mode We can use the wireless 11N 300Mbps USB adapter to build an access point apart from the station mode. The wireless client can connect to it if the wireless USB adapter is set to access point mode, then you can share an Internet connection with others Click Mode in the menu bar and select Access Point, then it will change to Access Point mode automatically 4.
WF-2116 User Manual Figure 4‐2 z z z z Profile name: The default is Access Point Mode and can’t be modified Network name (SSID): The name of this AP and can be modified Channel: You can select channel 1 to 14, which provides a choice of avoiding interference Network authentication: It contains open system, shared key, WPA-PSK and WPA2-PSK. You can configure safe encryption mode for this AP.
WF-2116 User Manual 4.2 Advanced Figure 4‐3 ¾ ¾ ¾ ¾ ¾ Beacon Interval: This represents the amount of time between beacon transmissions. Before a station enters power save mode, the station needs the beacon interval to know when to wake up to receive the beacon (and learn whether there are buffered frames at the access point) DTIM period: The DTIM period is set on the TIM information element on the DTIM period field.
WF-2116 User Manual 4.3 ICS Figure 4‐4 You can set internet connecting sharing (ICS), select the network you want to share in the list, then click ‘apply’, the following picture appears.
WF-2116 User Manual 5 FAQ This chapter provides solutions to problems that may occur during the installation and operation of the Wireless 11N 300Mbps USB Adapter. Read the descriptions below to solve your problems. 1. The Wireless 11N 300Mbps USB Adapter does not work properly. Reinsert the Wireless 11N 300Mbps USB Adapter into your PC’s USB slot. Right click My Computer and select Properties. Select the device manager and click on the Network Adapter.
WF-2116 User Manual If Security is enabled, make sure that the correct encryption keys are entered on both the Adapter and the access point.