Netopia® 3-D Reach Utility User Guide Netopia® 3-D Reach Wireless Adapters April 2007
Copyright Copyright © 2007 Netopia, Inc. Netopia and the Netopia logo are registered trademarks belonging to Netopia, Inc., registered U.S. Patent and Trademark Office. Broadband Without Boundaries and 3-D Reach are trademarks belonging to Netopia, Inc. All other trademarks are the property of their respective owners. All rights reserved. Netopia, Inc.
Table of Contents Table of Contents Copyright . . . . . . . . . . . . . . . . . . . . . . . . . . . . . . . . . . . . . . . . . . 2 Netopia 3D Reach Utility Installation . . . . . . . . . . . . . . . . . . . . . 3 For Microsoft Windows 98SE, ME, 2000. . . . . . . . . . . . . . . . . . . . . . . . 3 For Microsoft Windows XP . . . . . . . . . . . . . . . . . . . . . . . . . . . . . . . . . . 3 Macintosh Mac OS X 10.2 and higher and Linux drivers . . . . . . . . . . . 3 Start the Netopia 3D REACH Utility . .
Table of Contents 2
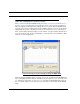
Netopia 3D Reach Utility Installation Netopia 3D Reach Utility Installation For Microsoft Windows 98SE, ME, 2000 1. Insert the CD. The Setup utility will run automatically and load the driver for the Netopia 3D Reach Wireless PC Card. When the installation is complete, a new Wireless communication icon will appear in your system tray in the Windows toolbar. 2. Click the Wireless icon to start the Netopia WLAN Utility. See “Start the Netopia 3D REACH Utility” on page 4. For Microsoft Windows XP 1.
Start the Netopia 3D REACH Utility When you start the Netopia 3D REACH Utility and select “Use Netopia 3D REACH as Configuration utility” for the first time, the system will connect to the Access Point with best signal strength and matching security setting. When you start the Netopia 3D REACH Utility, it will issue a scan command to the wireless adapter. After two seconds, the list will be updated with the results of the BSS list scan.
Start the Netopia 3D REACH Utility [Windows XP users only, Note:] When the Netopia 3D REACH Utility exits from the system, it will restore WZC to its initial state before starting Netopia 3D REACH Utility, for example, if WZC is stopped before the Netopia 3D REACH Utility started. WZC will stay stopped after the Netopia 3D REACH Utility terminated. If WZC is running before the Netopia 3D REACH Utility is started, it will be re-enabled after the Netopia 3D REACH Utility exited.
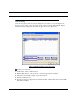
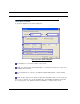
Site Survey Under the Site Survey tab, the system displays the information of surrounding Access Points from the results of the last scan. List information includes SSID, BSSID, Signal, Channel, Encryption Algorithm, and Network Type as shown in Figure 3-1. Figure 3-1 Detail information of site survey page Definition of each field 1. 2. 3. 4. 5. 6 SSID: Name of BSS or IBSS network. BSSID: MAC address of Access Point or randomly generated from IBSS. Signal: Received signal strength of specified network.
Site Survey 6. Authentication: Authentication mode used within the network, including Open, WEP-Key, WPA-PSK and WPA. 7. Network Type: Network type in use, Infrastructure for BSS, Ad-Hoc for IBSS network. Connected network: 1. When the Netopia 3D REACH Utility is running, it will automatically select the best Access Point to which to connect. 2. If you want to connect to another Access Point, you can double click on the desired Access Point to make the connection. 3.
ADD/EDIT Profile 1. System Configuration as shown in figure 3-2. Figure 3-2_Profile system configuration Profile Name: You can enter a name for this profile. SSID: You can input the intended SSID name or use the pull down menu to select from the available Access Points. Power Save Mode: You can choose CAM (Constantly Awake Mode) or Power Saving Mode. Network Type: There are two types, infrastructure and 802.11 ad-hoc mode. Under adhoc mode, you can also choose the preamble type.
ADD/EDIT Profile RTS Threshold: You can adjust the RTS threshold number by sliding the bar or key directly to a value. The default value is 2347. Fragment Threshold: You can adjust the Fragment threshold number by sliding the bar or key directly to a value. The default value is 2346. Channel: Only available for setting under ad-hoc mode. You can choose the channel frequency for your ad-hoc network. 2. Authentication and Security settings are shown in figure 3-3.
Encryption Setting WEP/TKIP/AES Authentication and Security settings, shown in figure 4-1. Figure 4-1 Authentication and Security setting Authentication Type: Three types of authentication modes are supported by the Netopia 3D REACH Utility: Open, Shared, WPA-PSK and WPA system. Encryption Type: For Open and Shared authentication mode, the selections of encryption type are None and WEP. For WPA and WPA-PSK authentication mode, the encryption types that are supported are TKIP and AES.
Encryption Setting WEP/TKIP/AES WEP Key: Only valid when using WEP encryption algorithm. The key must match the Access Point's key. There are several formats to enter the keys. 1. 2. 3. 4. Hexadecimal`40bits: 10 Hex characters. Hexadecimal`128bits: 32Hex characters. ASCII`40bits: 5 ASCII characters. ASCII`128bits: 13 ASCII characters. **See the examples in “Configure connection with WEP ON” on page 39, “Configure connection with WPA-PSK” on page 43, and “Configure connection with WPA by 802.
802.1x Setting 802.1x is an authentication protocol for a “WPA” certificate to an authentication server. Shown as figure 14-14 Authentication type: 1. PEAP: Protect Extensible Authentication Protocol. PEAP transport securely authenticates data by using tunneling between PEAP clients and an authentication server. PEAP can authenticate wireless LAN clients using only server-side certificates, thus simplifying the implementation and administration of a secure wireless LAN. 2.
802.1x Setting 3. TTLS: Tunneled Transport Layer Security. This security method provides for certificatebased, mutual authentication of the client and network through an encrypted channel. Unlike EAP-TLS, EAP-TTLS requires only server-side certificates. 4. LEAP: Light Extensible Authentication Protocol. It is an EAP authentication type used primarily in Cisco Aironet WLANs. It encrypts data transmissions using dynamically generated WEP keys, and supports mutual authentication. 5.
CA Server Depending on the EAP in use, only the server or both the server and client may be authenticated and require a certificate. Server certificates identify a server, usually an authentication or RADIUS server to clients. Most EAPs require a certificate issued by a root authority or a trusted commercial Certificate Authority. Shown as the figure below. Certificate issuer: Choose the server that issues certificates.
Profile Profile You can save your favorite wireless setting among your home, office, and other public hotspots in a Profile. You can save multiple profiles, and activate the correct one at your preference. Figure 5-1 shows the Profile page setting. Figure 5-1 Profile page Definition of each field: 1. 2. 3. 4. 5. 6. Profile: Name of profile, default preset to PROF* (* indicates 1, 2, 3, etc.). SSID: Access Point's or Ad-hoc's name. Channel: Channel in use. Authentication: Authentication mode.
Connection status Indicates connection is successful on current activated profile. Indicates connection failed on current activated profile. Add a new profile. Delete an existing profile. Edit a Profile. Activate selected profile.
Link Status Link Status Figure 6-1 is the Link Status page; it displays detailed information about the current connection. Figure 6-1 Link Status information Status: Current connection status. If there is no connection, it will show Disconnected. Otherwise, the connected SSID and BSSID will be shown here. Extra Info: Display link status and current channel in use. Link Speed: Display current transmit rate and receive rate.
Signal Strength: Reception signal strength; you can choose to display as a percentage or dBm format. Displays wireless card's TCP/IP and physical address information.
Advanced Advanced Figure 8-1 shows Advanced setting page of the Netopia 3D REACH Utility. Figure 8-1 Advanced setting Wireless mode: Select wireless mode. “802.11b only” and “802.11 B/G mix” modes are supported. Ad hoc wireless mode: Select Ad hoc wireless mode. “802.11b only”, “802.11 B/G mixed”, and “802.11 G only” modes are supported. B/G Protection: ERP protection mode of 802.11G definition. You can choose from Auto, On or Off. 1. Auto: STA will dynamically change as Access Point announcement. 2.
3. Off: Always send frames without protection. TX Rate: Manually force the Transmit using selected rate. Default is auto. Tx Burst: Netopia 3D REACH Utility's proprietary frame burst mode. Fast Roaming at: fast to roaming, setup by transmit power. Turn radio ON/OFF for FAA requirement. Radio On: Indicate to turn on radio. Radio Off: Indicate to turn off radio. Apply the above changes.
Country Channel List Country Channel List Country channel list, channel classification and range.
Country Name 22 Classification Range Croatia 2 CH1~13 Cyprus 2 CH1~13 Czech Republic 2 CH1~13 Denmark 2 CH1~13 Ecuador 2 CH1~13 Egypt 2 CH1~13 Estonia 2 CH1~13 Finland 2 CH1~13 France 4 CH10~13 France2 2 CH1~13 Germany 2 CH1~13 Greece 2 CH1~13 Hong Kong 2 CH1~13 Hungary 2 CH1~13 Iceland 2 CH1~13 India 2 CH1~13 Indonesia 2 CH1~13 Ireland 2 CH1~13 Israel 7 CH3~9 Italy 2 CH1~13 Japan 6 CH1~14 Japan2 5 CH14~14 Japan3 2 CH1~13 Jordan 4 CH1
Country Channel List Country Name Classification Range Luxembourg 2 CH1~13 Macedonia 2 CH1~13 Malaysia 2 CH1~13 Mexico 0 CH1~11 Morocco 2 CH1~13 Netherlands 2 CH1~13 New Zealand 2 CH1~13 Nigeria 2 CH1~13 Norway 2 CH1~13 Panama 2 CH1~13 Paraguay 2 CH1~13 Peru 2 CH1~13 Philippines 2 CH1~13 Poland 2 CH1~13 Portugal 2 CH1~13 Puerto Rico 2 CH1~13 Romania 2 CH1~13 Russia 2 CH1~13 Saudi Arabia 2 CH1~13 Singapore 2 CH1~13 Slovakia 2 CH1~13 Slovenia
Country Name 24 Classification Range United Kingdom 2 CH1~13 United States of America 0 CH1~11 Uruguay 2 CH1~13 Venezuela 2 CH1~13 Yugoslavia 0 CH1~11
About About The About page displays the wireless card and driver version information as shown in figure 9-1. Figure 9-1 About Page It displays the Configuration Utility Version, Driver Version, and EEPROM Version information.
Example: Adding a profile in the site survey page 1. Select the desired network from the site survey list.
Example: Adding a profile in the site survey page 2. Click the Add to Profile button.
3. The Add Profile window appears.
Example: Adding a profile in the site survey page 4. Change the Profile Name to your preference (optional). 5. Click the OK button without changing any other values.
6. Follow the examples in the section “Configure connection with WEP ON” on page 39, the section “Configure connection with WPA-PSK” on page 43 or the section “Configure connection with WPA by 802.1x setting” on page 47 to set the authentication and security page.
Example: Adding a profile in the Profile page Example: Adding a profile in the Profile page 1. Click the Add button in the Profile page.
2. The Add Profile page appears.
Example: Adding a profile in the Profile page 3. Change the Profile Name to your preference (optional).
4. From the SSID pull-down menu select your desired Access Point. The Access Point list is generated from the results of the site survey.
Example: Adding a profile in the Profile page 5. Set the desired Power Saving Mode (optional). 6. Click the Authentication and Security tab.
The Authentication and Security page appears. 7. Click the OK button.
Example: Adding a profile in the Profile page The created profile appears in the Profile List. 8. Click the Connect button to activate the profile setting.
9. Follow the examples in the section “Configure connection with WEP ON” on page 39, the section “Configure connection with WPA-PSK” on page 43 or the section “Configure connection with WPA by 802.1x setting” on page 47 to set the authentication and security page.
Configure connection with WEP ON Configure connection with WEP ON 1. Select an Access Point with WEP encryption.
2. Click the Connect button or double-click on the intended network.
Configure connection with WEP ON 3. The Authentication and Security page appears. 4. Enter the proper key setting that matches your Access Point's.
5. Click the OK button. An established connection will look like the figure below.
Configure connection with WPA-PSK Configure connection with WPA-PSK 1. Select an Access Point with WPA-PSK authentication mode.
2. Click the Connect button or double click the intended network.
Configure connection with WPA-PSK The Authentication and Security page appears. 3. The Authentication Type is WPA-PSK.
Select the correct encryption (TKIP or AES). Enter the WPA Preshared Key. 4. Click the OK button. ☛ Warning: If the WPA Preshared Key is entered incorrectly, the Access Point will be shown as connected, but you won't be able to exchange any data.
Configure connection with WPA by 802.1x setting Configure connection with WPA by 802.1x setting 1. Select an Access Point with WPA authentication mode.
2. Click the Connect button or double-click the desired network.
Configure connection with WPA by 802.1x setting 3. The Authentication and Security page appears. 4. Click the 802.1x Setting button.
5. The 802.1x Setting page appears. 6. Authentication Type and setting method: PEAP: 1. Authentication Type: choose PEAP, enter your identity (example: Netopia) in the Identity field. Tunneled Authentication: Protocol: choose EAP-MSCHAP v2, tunnel Identity is Netopia and tunnel Password is test. The setting is an example.
Configure connection with WPA by 802.1x setting 2. Click the OK button. The result will look like the figure below. TLS / Smart Card: 1. Authentication Type: choose TLS / Smart Card, TLS only needs an Identity that is Netopia for server authentication. The setting is an example.
52
Configure connection with WPA by 802.1x setting 2. TLS must use a client certificate. Click the More button to choose a certificate.
3. The Certificate Selection page appears. Choose a certificate for server authentication. 4. To display certificate information in use see the client Certification page.
Configure connection with WPA by 802.1x setting 5. Click the OK button. The result will look like the figure below.
56
Configure connection with WPA by 802.1x setting TTLS: 1. Authentication Type: choose TTLS; Identity is Netopia. For Tunnel Authentication Protocol choose CHAP, tunnel Identity is Netopia and tunnel Password is test. The setting is an example. 2. Click the OK button.
The result will look like the figure below.
Configure connection with WPA by 802.1x setting MD5: 1. Authentication Type: choose MD5; MD5 only needs identity and password - Netopia and test - for server authentication. The setting is an example. 2. Click the OK button.
The result will look like the figure below.
Configure connection with WPA by 802.1x setting Excursuses The above setting is a test platform by Netopia, inc. You can set the functions in accordance with the Access Point. Acknowledgements: “This product includes software developed by MDC and its licensors. This product includes software developed by the OpenSSL Project for use in the OpenSSL Toolkit (http:// www.openssl.org/)”. This product includes cryptographic software written by Eric Young (eay@cryptsoft.com).
62