
User Manual


SRU Installation
2-8 SRU Inst allat ion Manual 17286-1000 Rev. B 03/14/01
2.3 .4
2.3 .42.3 .4
2.3 .4
Inst alling t he 10 GHz SRU Mount
Inst alling t he 10 GHz SRU MountInst alling t he 10 GHz SRU Mount
Inst alling t he 10 GHz SRU Mount
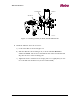
Install the 10 GHz SRU mount onto the mounting plate as follows:
1.
Put anti-seize compound on 25mm bolts and start them into the holes, leaving
about ¼ inch space on the bolts for the 10 GHz SRU mounting.
2.
Slide the 10 GHz SRU mount over (3) bolt heads, and then slide it down so the
bolts are within the small part of the mounting holes.
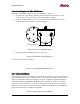
NTR98-1017
M10 Mounting Holes
Figure 2-4 Reverse of 10 G Hz SRU Mount
3.
Tighten the M10 x 25mm bolts to the torque spec.
Figure 2-5 Installing the 10 GHz SRU Mount
The result should look like Figure 2-6:
Figure 2-6 10 GHz SRU Mount Installed on Pole
2.3 .5
2.3 .52.3 .5
2.3 .5
Universal M ount
Universal M ountUniversal M ount
Universal M ount
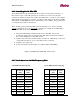
The Universal mount is new in Release 2.2.2. It has been designed so as to make changes in
radio apparatus easier. In case a radio breaks down, the operator can slide the radio out and
replace it with another without any change in elevation or azimuth. The Universal Mount
can be used with the 10GHz SRU. The Mount can be rotated 180° on the pole so that the
radio can be connected in two ways. It can be connected with an elevation of 10° up and
30°down or an elevation of 30°up and 10°down. Installation Instructions are included with
the mount and can also be found in the Appendix.
Figure 2-7 Universal Mount with 10GHz SRU