NTI R 1275 Danner Dr Tel:330-562-7070 NETWORK TECHNOLOGIES Aurora, OH 44202 Fax:330-562-1999 www.networktechinc.
TRADEMARK RACKMUX is a registered trademark of Network Technologies Inc in the U.S. and other countries. COPYRIGHT Copyright © 2003-2007 by Network Technologies Inc. All rights reserved. No part of this publication may be reproduced, stored in a retrieval system, or transmitted, in any form or by any means, electronic, mechanical, photocopying, recording, or otherwise, without the prior written consent of Network Technologies Inc, 1275 Danner Drive, Aurora, Ohio 44202.
TABLE OF CONTENTS INTRODUCTION............................................................................................................................................................. 1 Console Terminal......................................................................................................................................................... 1 Console Switch .......................................................................................................................................
F7- FKeys SET-UP Definition Setup Menu ............................................................................................................ 35 F8- Ansbk SET-UP Menu ....................................................................................................................................... 36 F9- Lan Setup Menu ............................................................................................................................................... 36 F10- Colr1 Set-up Menu ...........
TABLE OF FIGURES Figure 1- Mount RACKMUX to rack ................................................................................................................................................... 5 Figure 2- Distinction of connections between TERMINAL and SERIMUX ......................................................................................... 6 Figure 3- Connect serial devices, printer, and power supply ...............................................................................................
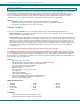
NTI RACK MOUNT CONSOLE TERMINAL WITH CONSOLE SWITCH INTRODUCTION The RACKMUX-T15-RS16 Rackmount Console Terminal Drawer with 16 port Console Switch (RACKMUX) places a VT100/ANSI Terminal and a Console Switch right in the rack for space-saving, convenient control of SUN or PC-based headless servers, routers, and firewalls. The LCD monitor terminal drawer eliminates the need for an external laptop or table-top dumb terminal.
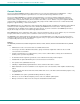
NTI RACK MOUNT CONSOLE TERMINAL WITH CONSOLE SWITCH Console Switch The Console Switch (SERIMUX) includes a text-based menu for easy connection management for administrators. Using a terminal emulator the menu provides a quick means for user serial connection changes and device control. The Console Switch (SERIMUX) is a serial port router that allows links (or connections) between multiple pairs of RS-232 asynchronous serial ports.
NTI RACK MOUNT CONSOLE TERMINAL WITH CONSOLE SWITCH MATERIALS Materials Supplied with the NTI RACKMUX-T15-RS16 Rackmount Console Terminal Drawer with Console Switch: 110-240VAC, 50 or 60Hz-12VDC/4A AC Adapter DB25M-RJ45F-C Modem Adapter DB9F-RJ45F Serial Adapter +6 RJ45F-T – DB25M Console Adapter CD and Quick Start Guide DB25F- RJ45F Console Adapter 2 rear mounting brackets w/ 4 nuts 2 Keys for Lock 8- #10-32x¾” screws and cage nuts Materials Not Supplied, but REQUIRED: Serial cable with at leas
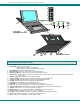
NTI RACK MOUNT CONSOLE TERMINAL WITH CONSOLE SWITCH 1 2 3 4 5 6 14 12 11 Front View RACKMUX-T15-RS16 1 A 7 8 Fn 9 10 13 15 16 17 19 18 20 Rear View RACKMUX-T15-RS16 FEATURES AND FUNCTIONS 1. 2. 3. 4. 5. 6. 7. 8. 9. 10. 11. 12. 13. 14. 15. 16. 17. 18. 19. 20.
NTI RACK MOUNT CONSOLE TERMINAL WITH CONSOLE SWITCH 1. INSTALLATION 1.1 Rack Mounting Instructions The RACKMUX was designed to be mounted to a rack and includes mounting flanges to make attachment easy. 1. Determine the mounting height in the rack for the drawer. It should be a height comfortable to use the keyboard and see the LCD display. Mark holes in each of the 4 corner cabinet rails at points all level with each other. 2.
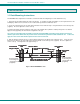
NTI RACK MOUNT CONSOLE TERMINAL WITH CONSOLE SWITCH 1.2 TERMINAL vs. SERIMUX Cable Connections The connectors on the rear of the RACKMUX are split between those for the TERMINAL connections, and those for the SERIMUX connections (see Fig. 2). Rear View of RACKMUX PARALLEL ETHERNE Console Switch Console Terminal SERIAL RESET (SERIMUX) 16 15 14 13 12 11 10 8 9 7 6 5 4 3 (TERMINAL) 2 1 12VDC + + + - + Figure 2- Distinction of connections between TERMINAL and SERIMUX 1.
NTI RACK MOUNT CONSOLE TERMINAL WITH CONSOLE SWITCH 1.4 Connect the SERIMUX and TERMINAL to a Network To control the SERIMUX and TERMINAL through a network connected PC, connect a CAT5 Ethernet network cable to the connector marked "ETHERNET". Then connect the other end of the Ethernet cable to a Local Area Network (LAN) through a 10/100 BaseT switch or hub. (See Fig. 4.
NTI RACK MOUNT CONSOLE TERMINAL WITH CONSOLE SWITCH 2. GETTING STARTED Introduction This chapter covers basic configuration topics. Included is information on setting up the TERMINAL to control the SERIMUX. 1. Using the instruction under “Setup The Terminal” below (or more detailed instruction on page 31), setup the TERMINAL to make connection to the SERIMUX.
NTI RACK MOUNT CONSOLE TERMINAL WITH CONSOLE SWITCH The following lists only what is necessary to connect to SERIMUX. For a complete list of features, see page 30. F2- Genrl SETUP Menu Personality set to Digital Equipment VT-100 or Console ANSI F4- Comm SETUP Menu Baud Rate set to 9600 Ethernet Mode set to OFF to set the communication routing by Serial Port. Data / Stop Bits set to send and receive 8-bits data with one stop bit Xmt Handshake set to None Parity set to none 2.1.
NTI RACK MOUNT CONSOLE TERMINAL WITH CONSOLE SWITCH 2. To connect to an attached CPU, enter the number of the port the CPU is connected to and press [Enter].
NTI RACK MOUNT CONSOLE TERMINAL WITH CONSOLE SWITCH 3. USING THE SERIMUX CONSOLE SWITCH The SERIMUX Console Switch is controlled using the TERMINAL and menu-driven integrated software. The SERIMUX can be easily configured using the TERMINAL with a keyboard-controlled menu to modify various parameters and options for each port to be connected to a device.
NTI RACK MOUNT CONSOLE TERMINAL WITH CONSOLE SWITCH 3.1 Administrator Controls 3.1 1 Login as the administrator 1. The TERMINAL must first be configured (and is typically delivered preconfigured) as described on page 8 under "Getting Started”. Note: The administrator can only login from the TERMINAL connection (serially). Be sure that the Ethernet Mode is set to OFF (page 9) before trying to login as administrator. 2.
NTI RACK MOUNT CONSOLE TERMINAL WITH CONSOLE SWITCH 3.1.2 Port List From the Administrator main menu, press [1] to display the Port List. Figure 8- The Port list displays the status of all ports The Port list displays the following information: Column Heading Port Log Con U/H Mdm BaudRate Serial Flow Xon/Xoff Discon DscTime Description Port number and name Index number of the user logged in at the port The number of another port (Pxx) connected to that port .
NTI RACK MOUNT CONSOLE TERMINAL WITH CONSOLE SWITCH FYI: RE: DscTime ( Disconnect Time) The value shown in the Port list is derived from various sources depending on the type of connection active at the time. - If a user is logged into a port as just a user, the time shown will be the remaining time based on the user's timeout setting.
NTI RACK MOUNT CONSOLE TERMINAL WITH CONSOLE SWITCH From the Port settings menu, the configuration of each port can be viewed and changed.
NTI RACK MOUNT CONSOLE TERMINAL WITH CONSOLE SWITCH 3.1.3.1 Port serial settings From the "Port settings" menu, press [5] to display the "Port serial settings" menu. Using this menu, the administrator can adjust the serial settings of each port, or copy the current port serial settings and paste them to another port or to all ports. Figure 11- Port serial settings menu 3.1.3.1.1 Baud rate Any baud rate (serial speed) between 50 bps - 128Kbps can be selected, (except for port 0, between 300 bps - 115.
NTI RACK MOUNT CONSOLE TERMINAL WITH CONSOLE SWITCH Flow control None RTS/CTS (hardware) Xon/Xoff (software) Both disable flow control (not necessary) Command 1 – &K3 &K4 &K6 &K0 Command 2 – \Q3 \Q1 \Q0 Consult your modem user manual or the modem AT command manual to find the suitable command. 3.1.3.1.6 Xon or Xoff Characters Any non-printable character (ASCII codes between 0 and 31) can be used as flow control Xon or Xoff character.
NTI RACK MOUNT CONSOLE TERMINAL WITH CONSOLE SWITCH 3.1.3.1.10 Copy Port Serial Settings – Press [+] to select the current port as source in a port settings copy-paste process (except port 0). – Then, press [*] to paste the port settings. – Press [Y] to paste the selected port settings to the current port, [A] to paste to all ports, [S] to specify the destination port, or press any other key to cancel. 3.1.3.1.
NTI RACK MOUNT CONSOLE TERMINAL WITH CONSOLE SWITCH Display modem settings for different port number Press [>] (greater than symbol) to display the next port (next higher port index) modem settings, or press [<] (less than symbol) to display the previous port modem settings. Press [Esc] or [Space] to return to the "Port settings " menu. 3.1.3.3 Port data buffer From the "Port settings" menu, press [7] to view the port data buffer.
NTI RACK MOUNT CONSOLE TERMINAL WITH CONSOLE SWITCH 3.1.4 User List From the administrator main menu, press [4] to display the User list.
NTI RACK MOUNT CONSOLE TERMINAL WITH CONSOLE SWITCH 3.1.5 User Settings From the "Administrator main menu", press [5], enter the user index number, then press [Enter].
NTI RACK MOUNT CONSOLE TERMINAL WITH CONSOLE SWITCH Figure 16- Port access list for User 01 3.1.5.1 Port access To quickly grant/deny user access to multiple ports, the use of a dash (-) and/or comma may be used in conjunction with the [1] (to grant) or [0] (to deny) command. i.e. [1] - [1-4,7,9,15] will grant access to ports 1 through 4, 7, 9, and 15, all in one command string 3.1.5.
NTI RACK MOUNT CONSOLE TERMINAL WITH CONSOLE SWITCH 3.1.6 Advanced Settings From the "Administrator main menu", press [7] to display the “Advanced settings” menu.
NTI RACK MOUNT CONSOLE TERMINAL WITH CONSOLE SWITCH 3.1.6.2 Firmware From the Advanced settings menu, press [6] to display the Firmware menu. (From Administrator main menu press [7]-[6]) Figure 18- Firmware menu The Firmware menu has three possible functions: Function 1. About Firmware 2. Load new firmware 3.
NTI RACK MOUNT CONSOLE TERMINAL WITH CONSOLE SWITCH Figure 19- The SERIMUX is waiting to save its firmware Using the terminal program, configured for Xmodem protocol, receive the binary file (for example the HyperTerminal for Windows Transfer -> Receive File command) to transfer the SERIMUX firmware to a binary file. When saving the file, choose a directory to place the file in and a name that will identify it with the extension " .bin" (i.e. SERIMUX1_8.bin).
NTI RACK MOUNT CONSOLE TERMINAL WITH CONSOLE SWITCH 3.2. User Controls Users can connect only to accessible ports as defined by the administrator. A list of those ports will be displayed with a successful login. Connection can be made using the TERMINAL, or a serial terminal with an emulator (e.g. Windows HyperTerminal) connected to the SERIMUX at an allowed user port To login, press the [Spacebar] or [Enter] key. Users can login by entering a valid name and password, assigned by the administrator.
NTI RACK MOUNT CONSOLE TERMINAL WITH CONSOLE SWITCH 3.2.
NTI RACK MOUNT CONSOLE TERMINAL WITH CONSOLE SWITCH 3.2.3 Port List screen From the "User main menu", press [3] to display the list of user accessible ports and information about these ports. Only the administrator can change the communication settings.
NTI RACK MOUNT CONSOLE TERMINAL WITH CONSOLE SWITCH 3.2.4 User Terse mode This mode is especially useful when the SERIMUX is directly controlled by external software from a serial console (as a user without administrative privileges), rather than being controlled by a user from a keyboard interface. Entering short command strings performs functions similar to the user main menu commands. A [CR] – [LF] sequence ends every string.
NTI RACK MOUNT CONSOLE TERMINAL WITH CONSOLE SWITCH ¾ Verbose mode Send or type in: [V] [Enter] The answer will be: OK [CR][LF] and the Terse mode will be terminated. The “Accessible host list” or the “User main menu” will be displayed. Note: Once a user configured for Terse mode login exits Terse mode to enter Verbose mode, Terse mode login will no longer be available at login. To return to Terse mode, the administrator must re-configure the user settings to enter Terse mode at login.
NTI RACK MOUNT CONSOLE TERMINAL WITH CONSOLE SWITCH Every port is defined through the following parameters: Table 2- SERIMUX Port Characteristics Description Number Name Type – port 0 Type – except port 0 Baud rate – port 0 Baud rate – except port 0 Data bits per character – port 0 Data bits per character – except port 0 Stop bits – port 0 Stop bits – except port 0 Parity Handshake mode (flow control) Xon character Xoff character Inter-character delay – except port 0 (no delay allowed on port 0) Line brea
NTI RACK MOUNT CONSOLE TERMINAL WITH CONSOLE SWITCH 4. USING THE TERMINAL 4.1 How To Setup The TERMINAL The TERMINAL is compatible with most CPUs and application packages. A menu driven setup system is provided to select and save the settings required by the CPU and application. To control the CPU, or in this case the SERIMUX, a user must be familiar with the requirements of the SERIMUX in order to setup the TERMINAL. 4.1.
NTI RACK MOUNT CONSOLE TERMINAL WITH CONSOLE SWITCH 4.2 Changing The TERMINAL Operating Parameters To select one of the setup menus shown, press the indicated function key. - The screen for that menu appears with the name highlighted. - The fields at the middle of the screen indicate the parameters that can be changed in that menu. - The top line identifies the keys to press to highlight the parameter fields and change the settings.
NTI RACK MOUNT CONSOLE TERMINAL WITH CONSOLE SWITCH Monitor causes the terminal to display symbols for escape sequences and control codes without acting on them (test feature). Status Line sets the top line of the screen as the status line. End of Line Wrap causes the cursor to move to the start of the next line when additional characters are entered at the end of a line.
NTI RACK MOUNT CONSOLE TERMINAL WITH CONSOLE SWITCH Multiple Sessions defines whether an Ethernet connection supports multiple sessions function. ON : indicates the terminal supports multiple sessions. Each session only has one display page. In 80 or 132 column mode, 8 simultaneous sessions are supported. In Econ-80 column mode, 12 simultaneous sessions are supported. OFF : indicates the terminal only has single session. In this mode page length greater than one page can be defined.
NTI RACK MOUNT CONSOLE TERMINAL WITH CONSOLE SWITCH Table 4- Programmable Keys Enhanced PC-Style Keyboard F1 through F12 (UP ARROW) (DOWN ARROW) (LEFT ARROW) (RIGHT ARROW) BACKSPACE DELETE END Enhanced PC-Style Keyboard ENTER (Both ENTER keys are programmable) ESCAPE HOME INSERT PAGE DOWN PAGE UP PRINT SCREEN TAB F8- Ansbk SET-UP Menu A message of up to 20 characters can be programmed to identify the terminal to the CPU. Enter the message at the cursor position.
NTI RACK MOUNT CONSOLE TERMINAL WITH CONSOLE SWITCH F11- Colr2 Set-up Menu The color functionality differs with emulation. In general VT100, VT220 and ANSI Console work with applications, which control the color directly. The remaining personalities associate colors based on existing monochrome video attributes. This section will define parameter selection based on personality selected. Background = Will determine the color of the background screen under some conditions (16 colors). Normal F.G. \ Normal B.
NTI RACK MOUNT CONSOLE TERMINAL WITH CONSOLE SWITCH Table 6- Color Palettes Palette Display Attribute Normal 0 Reverse (or blank)*1 Intensity*2 Intensity*2 and reverse (or blank)*1 Underline Underline and reverse(or blank)*1 Underline and intensity*2,*3 Underline, intensity, *2 and reverse (or blank)*1 Normal 1 Reverse (or blank)*1 Intensity*2 Intensity*2 and reverse (or blank)*1 Underline Underline and reverse (or blank)*1 Underline and intensity*2,*3 Underline, intensity, *2 and reverse (or blank)*1 Norm
NTI RACK MOUNT CONSOLE TERMINAL WITH CONSOLE SWITCH Table 6- Color Palettes (Cont'd) Palette Display Attribute Normal 6 Reverse (or blank)*1 Intensity*2 Intensity*2 and reverse (or blank)*1 Underline Underline and reverse (or blank)*1 Underline and intensity*2,*3 Underline, intensity, *2 and reverse (or blank)*1 Normal 7 Reverse (or blank)*1 Intensity*2 Intensity*2 and reverse (or blank) *1 Underline Underline and reverse (or blank)*1 Underline and intensity*2,*3 Underline, intensity, *2 and reverse (or bl
NTI RACK MOUNT CONSOLE TERMINAL WITH CONSOLE SWITCH 4.3 Local Keyboard Commands Table 7 lists local keyboard commands in the terminal's native mode.
NTI RACK MOUNT CONSOLE TERMINAL WITH CONSOLE SWITCH 4.4 TERMINAL Command Guide 4.4.1 Commands Supported in ASCII Personalities Table 8 lists all the ASCII commands recognized by the terminal. The native mode code for the command is given in the second column. (The native mode includes WY-325,WY-120 and WY-60.
NTI RACK MOUNT CONSOLE TERMINAL WITH CONSOLE SWITCH Table 8- Commands Supported in ASCII Personalities (Cont'd) ----------------------------------------------------------------------------------------------------------------------------------------------------------Command ------------------------------------------------------------------------------------------------------------------Native Wyse ADDS TVI PC FUNCTION Mode WY-50+ VP A2 910+/925 Term ----------------------------------------------------------
NTI RACK MOUNT CONSOLE TERMINAL WITH CONSOLE SWITCH Table 8- Commands Supported in ASCII Personalities (Cont'd) ----------------------------------------------------------------------------------------------------------------------------------------------------------Command -------------------------------------------------------------------------------------------------------------------Native Wyse ADDS TVI PC FUNCTION Mode WY-50+ VP A2 910+/925 Term ---------------------------------------------------------
NTI RACK MOUNT CONSOLE TERMINAL WITH CONSOLE SWITCH Table 8- Commands Supported in ASCII Personalities (Cont'd) ----------------------------------------------------------------------------------------------------------------------------------------------------------Command -------------------------------------------------------------------------------------------------------------------Native Wyse ADDS TVI PC FUNCTION Mode WY-50+ VP A2 910+/925 Term ---------------------------------------------------------
NTI RACK MOUNT CONSOLE TERMINAL WITH CONSOLE SWITCH Table 8- Commands Supported in ASCII Personalities (Cont'd) ----------------------------------------------------------------------------------------------------------------------------------------------------------Command -------------------------------------------------------------------------------------------------------------------Native Wyse ADDS TVI PC FUNCTION Mode WY-50+ VP A2 910+/925 Term ---------------------------------------------------------
NTI RACK MOUNT CONSOLE TERMINAL WITH CONSOLE SWITCH Table 8- Commands Supported in ASCII Personalities (Cont'd) ----------------------------------------------------------------------------------------------------------------------------------------------------------Command -------------------------------------------------------------------------------------------------------------------Native Wyse ADDS TVI PC FUNCTION Mode WY-50+ VP A2 910+/925 Term ---------------------------------------------------------
NTI RACK MOUNT CONSOLE TERMINAL WITH CONSOLE SWITCH Table 8- Commands Supported in ASCII Personalities (Cont'd) --------------------------------------------------------------------------------------------------------------------------------------------------Command -------------------------------------------------------------------------------------------------------------------Native Wyse ADDS TVI PC FUNCTION Mode WY-50+ VP A2 910+/925 Term -----------------------------------------------------------------
NTI RACK MOUNT CONSOLE TERMINAL WITH CONSOLE SWITCH 5.4.
NTI RACK MOUNT CONSOLE TERMINAL WITH CONSOLE SWITCH ----------------------------------------------------------------------------------------------------------------------------------------------------- Variable Values for Table 8 Commands (Cont'd) -----------------------------------------------------------------------------------------------------------------------------------------------------fcolor Foreground Color fcolor Foreground Color 1 Black 5 Red 2 Blue 6 Magenta 3 Green 7 Yellow 4 Cyan 8 White Ke
NTI RACK MOUNT CONSOLE TERMINAL WITH CONSOLE SWITCH ------------------------------------------------------------------------------------------------------------------------------------------------------ Variable Values for Table 8 Commands (Cont'd) -----------------------------------------------------------------------------------------------------------------------------------------------------length G H I*b Multiple 1xlines 2xlines 4xlines Length of Page Equal to the number of data lines Double the num
NTI RACK MOUNT CONSOLE TERMINAL WITH CONSOLE SWITCH ------------------------------------------------------------------------------------------------------------------------------------------------------ Variable Values for Table 8 Commands (Cont'd) -----------------------------------------------------------------------------------------------------------------------------------------------------p1 1 2 3 4 5 Function Key F1 F2 F3 F4 F5 p1 6 7 8 9 0 Function Key F6 F7 F8 F9 F10 p2 Direction 1 Remote 2 Lo
NTI RACK MOUNT CONSOLE TERMINAL WITH CONSOLE SWITCH ------------------------------------------------------------------------------------------------------------------------------------------------------ Variable Values for Table 8 Commands (Cont'd) -----------------------------------------------------------------------------------------------------------------------------------------------------wnd/page 0 1 Window or Page Page 0 or upper window Page 1 or lower window word 0 1 Data Word 7 bits 8 bits wp
NTI RACK MOUNT CONSOLE TERMINAL WITH CONSOLE SWITCH ------------------------------------------------------------------------------------------------------------------------------------------------------ Table 9- Supported VT100, VT220 and Console ANSI Commands, Cont'd -----------------------------------------------------------------------------------------------------------------------------------------------------Command ---------------------------------------------------------------------FUNCTION VT100,
NTI RACK MOUNT CONSOLE TERMINAL WITH CONSOLE SWITCH ------------------------------------------------------------------------------------------------------------------------------------------------------ Table 9- Supported VT100, VT220 and Console ANSI Commands, Cont'd -----------------------------------------------------------------------------------------------------------------------------------------------------final Final character final Final character A Designating UK ANSI character set < Designating
NTI RACK MOUNT CONSOLE TERMINAL WITH CONSOLE SWITCH ------------------------------------------------------------------------------------------------------------------------------------------------------ Table 9- Supported VT100, VT220 and Console ANSI Commands, Cont'd -----------------------------------------------------------------------------------------------------------------------------------------------------Command ---------------------------------------------------------------------FUNCTION VT100,
NTI RACK MOUNT CONSOLE TERMINAL WITH CONSOLE SWITCH ------------------------------------------------------------------------------------------------------------------------------------------------------ Table 9- Supported VT100, VT220 and Console ANSI Commands, Cont'd -----------------------------------------------------------------------------------------------------------------------------------------------------Command ---------------------------------------------------------------------FUNCTION VT100,
NTI RACK MOUNT CONSOLE TERMINAL WITH CONSOLE SWITCH ------------------------------------------------------------------------------------------------------------------------------------------------------ Table 9- Supported VT100, VT220 and Console ANSI Commands, Cont'd -----------------------------------------------------------------------------------------------------------------------------------------------------Command ---------------------------------------------------------------------FUNCTION VT100,
NTI RACK MOUNT CONSOLE TERMINAL WITH CONSOLE SWITCH ------------------------------------------------------------------------------------------------------------------------------------------------------ Table 9- Supported VT100, VT220 and Console ANSI Commands, Cont'd -----------------------------------------------------------------------------------------------------------------------------------------------------Command ---------------------------------------------------------------------FUNCTION VT100,
NTI RACK MOUNT CONSOLE TERMINAL WITH CONSOLE SWITCH ------------------------------------------------------------------------------------------------------------------------------------------------------ Table 9- Supported VT100, VT220 and Console ANSI Commands, Cont'd -----------------------------------------------------------------------------------------------------------------------------------------------------Command ---------------------------------------------------------------------FUNCTION VT100,
NTI RACK MOUNT CONSOLE TERMINAL WITH CONSOLE SWITCH 4.6 Using Printer Server via Ethernet Connection Introduction In order to send print jobs to a network-based printer, the Ethernet Print Terminal function in the TERMINAL must be used. To use this function, the Telnet Terminal communication option described on page 1 is available. For this option to work, an Ethernet cable must be connected as described on page 6.
NTI RACK MOUNT CONSOLE TERMINAL WITH CONSOLE SWITCH 4.6.2 Setup for LPD Follow those steps from step 1 to step 2 described in Basic Setup. The following steps are dependent on the operating system. Please refer to the UNIX administration guide. The following illustrated steps are under BSD system. Step 3. Create a spooling directory Use mkdir command to create a directory for spooling. e.g. mkdir/usr/spool/ETPS1 Step 4.
NTI RACK MOUNT CONSOLE TERMINAL WITH CONSOLE SWITCH 4.6.3 LPD printing LPD protocol is built-in to most of the UNIX system. However, detailed implementation of LPD differs among UNIX systems. Please refer to the UNIX administration guide for reference. The following illustrated printing command is under BSD system or System V version. For BSD system: lpr -P For System V version: lp -d This command is to print selected file to the selected printer. e.g.
NTI RACK MOUNT CONSOLE TERMINAL WITH CONSOLE SWITCH 4.7 On-Screen Display (OSD) 4.7.1 Standard Controls The RACKMUX LCD has 5 standard control buttons and a power LED. The 5 standard control buttons operate as follows: • The Power button turns the RACKMUX LCD and backlight ON and OFF as desired. • The Power LED located immediately below the Power button is a dual color LED. It will illuminate with a green color when the RACKMUX is powered Power ON and working properly.
NTI RACK MOUNT CONSOLE TERMINAL WITH CONSOLE SWITCH 4.7.2.2 Brightness/Contrast Menu Selecting the Brightness/Contrast menu will bring up a screen in which the user can adjust the brightness and contrast levels of the LCD display. With either the BRIGHTNESS or CONTRAST sections highlighted, (use the Up or Down arrow to move between them), press the Select button to choose the option to adjust. Then use the Up or Down Arrow to adjust the setting. Select EXIT when finished to return to the Main Menu. 4.7.2.
NTI RACK MOUNT CONSOLE TERMINAL WITH CONSOLE SWITCH 4.7.2.
NTI RACK MOUNT CONSOLE TERMINAL WITH CONSOLE SWITCH 4.8 Keyboard Functions The keyboard on the RACKMUX has a standard condensed Windows format. To reduce the keyboard size, some keys have been assigned multiple functions, accessible via the "Fn" key. This section will describe which keys have multiple functions and how to enable them.
NTI RACK MOUNT CONSOLE TERMINAL WITH CONSOLE SWITCH 4.8.1 Number Pad The functionality of a Number Pad on a standard Windows keyboard has been incorporated into this keyboard. To substitute the keys of the Number Pad 1. 2. 1 ) will illuminate. Press the "NumLock" key. The NumLock LED ( Press the "Fn" key. This will lock the "Fn" key (until pressed again). The "Fn" LED will illuminate.
NTI RACK MOUNT CONSOLE TERMINAL WITH CONSOLE SWITCH 5. HARDWARE INFORMATION Introduction This chapter provides information on hardware specifications, pinouts for the Ethernet cable, pinouts for port connectors, and pinouts for the cable adapters. 5.1 Hardware Specifications: TERMINAL Physical Size (In.
NTI RACK MOUNT CONSOLE TERMINAL WITH CONSOLE SWITCH 5.3 CPU-to-RACKMUX Ethernet Crossover Cable In order to make a direct connection between a CPU and the ETHERNET connector of the RACKMUX, a crossover cable must be used. The cable is made with CAT5 cable terminated with RJ45 connectors and wired according to the chart below.
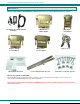
NTI RACK MOUNT CONSOLE TERMINAL WITH CONSOLE SWITCH 5.6 Cable Adapters The SERIMUX comes with four cable adapters. The following illustrations show cable adapter pin outs. Additional adapters can be purchased from NTI.
NTI RACK MOUNT CONSOLE TERMINAL WITH CONSOLE SWITCH DB-25 Female Console Adapter (NTI P/N DB25F-RJ45F) DB-25 Female to RJ45 Pin Assignments RJ45 Signal 1 CTS Connected to 2 DSR Connected to 5 DCD 3 RxD Connected to 4 GND Connected to 6 TxD Connected to 7 DTR Connected to 8 RTS Connected to DB-25F 4 Signal RTS 20 DTR 2 7 3 6 8 5 TxD GND RxD DCD DSR CTS DB-25 Male Modem Adapter (NTI P/N DB25M-RJ45F-C) DB-25 Male Modem to RJ45 Pin Assignment RJ45 Signal 1 CTS Connected to 2 DSR Connected to 3 RxD
NTI RACK MOUNT CONSOLE TERMINAL WITH CONSOLE SWITCH 5.
NTI RACK MOUNT CONSOLE TERMINAL WITH CONSOLE SWITCH 5.9 Dimensional Drawings Overhead View of RACKMUX-T15-RS16 15" LCD Display 2 1 .9 IN . Keyboard Wristpad ETHERNET 12VDC CONNECTOR PARALLEL Lock SERIAL RJ45 SERIAL DEVICE CONNECTORS Rear View of RACKMUX-T15-RS16 1 9 .0 0 IN . Front View of RACKMUX-T15-RS16 Slotted holes for securing terminal drawer to rack Side View of RACKMUX-T15-RS16 73 1 . 7 5 IN .
NTI RACK MOUNT CONSOLE TERMINAL WITH CONSOLE SWITCH INDEX access to ports, 22 Administrator password, 23 ASCII commands, 41 BSD UNIX system, 62 cable adapters, 70 cabling, 69 change administrator password, 23 Configure the terminal, 8 connect to SERIMUX.