NTI R 1275 Danner Dr Tel:330-562-7070 NETWORK TECHNOLOGIES Aurora, OH 44202 Fax:330-562-1999 www.networktechinc.
Warranty Information The warranty period on this product (parts and labor) is two (2) years from the date of purchase. Please contact Network Technologies Inc at (800) 742-8324 (800-RGB-TECH) or (330) 562-7070 or visit our website at http://www.networktechinc.com for information regarding repairs and/or returns. A return authorization number is required for all repairs/returns. COPYRIGHT Copyright © 2003-2007 by Network Technologies Inc. All rights reserved.
TABLE OF CONTENTS INTRODUCTION............................................................................................................................................................. 1 Available Options ...................................................................................................................................................... 1 Types of CPUs Supported ...............................................................................................................................
TABLE OF FIGURES Figure 1- Mount RACKMUX to rack ................................................................................................................................................... 4 Figure 2- Connect each CPU............................................................................................................................................................. 5 Figure 3- Connect the power cord and AC adapter ...............................................................................
NTI RACKMUX Console Drawer with UNIMUX Switch INTRODUCTION The RACKMUX-UW15-8USB (formerly referred to as RACKMUX-15-USBV-8) is a KVM Drawer with USB KVM Switch (RACKMUX) that combines a rackmount 15" TFT/ LCD monitor, keyboard, trackball mouse, and USB KVM switch (UNIMUX) in a space-saving 1RU industrial strength drawer. The RACKMUX is equipped with a built-in switch function, which allows control of up to eight USB-enabled computers with a single keyboard, mouse and monitor.
NTI RACKMUX Console Drawer with UNIMUX Switch MATERIALS Materials supplied with this kit: • • • • • NTI RACKMUX-UW15/17-4/8 KVM Drawer with USB KVM Switch 2-Line cords, country specific 110-240VAC, 50 or 60Hz-12VDC/4A AC Adapter set of keys for keylock This manual Materials Not supplied but REQUIRED: A USBVEXT-xx-MM cable for each USB CPU being connected to the switch must be used for monitor, keyboard and mouse interface.
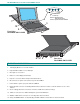
NTI RACKMUX Console Drawer with UNIMUX Switch S e le c t = s c ro + = s c ro S e le c t = d s P o w e r = p 4 1 + P o w e r ll d ll u is p e le o w o w n p la y m e n u / c t m e n u ite m e r m o n ito r O N /O F F 3 1 2 2 F r o n t V ie w R A C K M U X -U W 1 5 -8 U S B 5 - 1 2 V D C 9 6 7 8 1 0 + 1 1 R e a r V ie w R A C K M U X -U W 1 5 -8 U S B FEATURES AND FUNCTIONS 1. LCD Display Monitor- for user video interface 2. Keyboard with Trackball- for user data input 3.
NTI RACKMUX Console Drawer with UNIMUX Switch INSTALLATION Rack Mounting Instructions The RACKMUX was designed to be mounted to a rack and includes mounting flanges to make attachment easy. 1. Determine the mounting height in the rack for the drawer. It should be a height comfortable to use the keyboard and see the LCD display. Mark holes in each of the 4 corner cabinet rails at points all level with each other. 2. Secure the rear brackets to the rear rack cabinet rails.
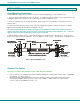
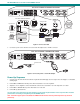
NTI RACKMUX Console Drawer with UNIMUX Switch R e a r V ie w C P U N T I C P U C P U 6 C P U 5 C P U 2 C P U 1 o f U N IM U X in R A C K M U X -U W 1 5 -8 U S B - C P U 4 C P U 1 2 7 5 D a n n e r D r, A u ro ra , O H T E C H N O L O G IE S IN C 7 R 1 2 7 5 D a n n e r D r A u ro ra , O H 4 4 2 0 2 w w w .n ti1 .
NTI RACKMUX Console Drawer with UNIMUX Switch USING THE RACKMUX Once the RACKMUX is properly connected, the UNIMUX switch will enable a connection to be made between the attached CPUs and the monitor, keyboard, and mouse.
NTI RACKMUX Console Drawer with UNIMUX Switch Once logged-in, follow the instructions on pages 8 and 9 for setting up users and changing the password. Within the Administration Mode the administrator can setup each of the users and the limitations of their use of the individual CPUs attached to the switch. Figure 4- Administrator Login screen When a standard user powers up the system a security screen will appear if security has been enabled by the administrator.
NTI RACKMUX Console Drawer with UNIMUX Switch ADDITIONAL MODES AVAILABLE WITH SECURITY The three modes that follow are only available if the administrator is logged in. Administration Mode To enter the Administration Mode menu press from the Maintenance Mode menu (page 17).
NTI RACKMUX Console Drawer with UNIMUX Switch Function: Add character to password string or verify password string Delete previous character in edited string Save new password.
NTI RACKMUX Console Drawer with UNIMUX Switch Edit user To enter the Edit User mode press from the User Name List after selecting a user or an empty record. The Edit User mode (see Fig. 9) enables the administrator to: add a new user remove an existing user edit the settings for an existing user The Edit User mode contains three edit boxes and a check box list of up to 32 check boxes representing the User Access List (list of the CPU port(s) the user has access rights to).
NTI RACKMUX Console Drawer with UNIMUX Switch Alternate Command Hot Key To enable the administrator to assign a key in addition to the <`> (accent key) to use with to enter into OSD Command Mode, an Alternate Command Hot Key option is provided. The default factory setting for this option is <`> (disabling the option). To select an Alternate Command Hot Key, press from Administration Mode menu (page 8). A window will open and the administrator will be prompted to press a key.
NTI RACKMUX Console Drawer with UNIMUX Switch Command Mode (Cont'd) Function: Keystroke: Selects a specific port Enters Search Mode and adds a character to search string and selects the CPU’s name that matches best. A-Z 0-9 Selects the first port on the switch Home Selects the last port on the switch End Display Help Menu F1 Switch to a selected port Update Configuration Display port information Exit OSD Command Mode + P - Ctrl (0-9) x - (0-9) x (Pxx would be P01, P02, etc.
NTI RACKMUX Console Drawer with UNIMUX Switch Broadcast Mode To activate Broadcast Mode press + from the Command Mode menu. Broadcast Mode enables the user to type characters to more computers simultaneously. From the Change Settings menu (see page 13) the user can edit the list of ports that receive data in Broadcast Mode.
NTI RACKMUX Console Drawer with UNIMUX Switch Edit Mode (Con'td) Function: Erase current character Keystroke: Delete Erase previous character Backspace When finished making changes in Edit Mode, press and a prompt will appear to press either to save the changes or to continue making changes without saving the changes just made. If the key is pressed instead of , all changes made will be ignored and the display will return to the previous menu.
NTI RACKMUX Console Drawer with UNIMUX Switch Select Ports For Broadcast To Select Ports For Broadcasting, press from the Change Settings menu (see Fig. 13). The Select Ports For Broadcast menu (see Fig. 14) enables the user to select specific ports to be active in Broadcast Mode. Only the selected ports will receive keyboard messages in Broadcast Mode. A check list with all the port numbers will be displayed in the window.
NTI RACKMUX Console Drawer with UNIMUX Switch Language Selection NOTE: The LANGUAGE SELECTION option will only be accessible if the administrator is logged in. To enter the Select Language menu press from the Change Settings menu described on page 14. The Language Selection menu enables the user to manually configure the UNIMUX to emulate a specific international Sun keyboard regardless of what actual keyboard is connected. This is recommended when the CPU needs the layout code (i.e.
NTI RACKMUX Console Drawer with UNIMUX Switch Search Mode To enter Search Mode, type any alphabetical or numeric character when the Command Mode menu is on the monitor. Search Mode enables the user to enter and maneuver through a list of CPU names. The CPU name best matching the characters typed is selected. The list of CPUs may also be searched for a specific (or similar) name. The following commands are valid when the search option has been invoked from Command Mode.
NTI RACKMUX Console Drawer with UNIMUX Switch Maintenance Mode (Cont'd) Function: Keystroke: Move OSD menu to the left Make OSD menu taller T Make OSD menu shorter S Change user password. (Present only when a standard user is logged in.) P Log current user out and return to User Login Mode. Q Activate security features. Present only when security is available but not active. A Enter Administration Mode. Option present only when Administrator is logged in.
NTI RACKMUX Console Drawer with UNIMUX Switch F3- Display Information To display information about a selected port, pressing the key from within the Command Mode main menu will cause a window to open. The window will show the name of the port and its position in the system structure, level by level. This is most useful when cascading switches (for Cascading see page 20).
NTI RACKMUX Console Drawer with UNIMUX Switch CASCADING The UNIMUX can be cascaded as shown in Fig. 21 below. Single user or multi-user UNIMUX switches may be connected downstream (see Figs. 23 and 24). The first switch in a cascaded system is referred to as the "master", while all downstream switches are referred to as "slaves". The only additional hardware required to cascade switches is a set of device and monitor cables for each “SLAVE UNIT” (USB-VEXT-xx-MM).
NTI RACKMUX Console Drawer with UNIMUX Switch USER 1 USER 2 USER 3 USER 4 USER PORT UNIMUX-1X4 MASTER USER PORT UNIMUX-1X4 MASTER USER PORT UNIMUX-1X4 MASTER USER PORT UNIMUX-1X4 MASTER CPU PORTS CPU PORTS CPU PORTS CPU PORTS (TO USER PORT 2 ON SLAVES 1-4) (TO USER PORT 3 ON SLAVES 1-4) Users 5-8 only have access to CPUs 25-40.
NTI RACKMUX Console Drawer with UNIMUX Switch R e a r V ie w N T I T E C H N O L O G IE S IN C 8 C P U 7 C P U 6 C P U 5 C P U 4 C P U 3 C P U 2 C P U 1 R 1 2 V D C 1 2 7 5 D a n n e r D r A u ro ra , O H 4 4 2 0 2 w w w .n ti1 .
NTI RACKMUX Console Drawer with UNIMUX Switch MOUSE CLICK EQUIVALENTS To emulate a right button click using Apple 1 button mouse, hold down the Command key ( button. ) while pressing the mouse Note: Right mouse button emulation must be enabled (see Change Settings on page 14) for this to work. KEYBOARD FEATURES The keyboard configuration of each CPU is saved in the UNIMUX switch.
NTI RACKMUX Console Drawer with UNIMUX Switch International Sun Keyboards The UNIMUX can recognize international layouts for Sun keyboards. procedure: In order to use an international Sun keyboard, follow this 1. Power-OFF the CPU from the UNIMUX 2. Connect the international keyboard to be used to the UNIMUX 3. Power-ON the CPU to the UNIMUX It is also possible to configure the UNIMUX to emulate a specific international Sun keyboard regardless of what actual keyboard is connected.
NTI RACKMUX Console Drawer with UNIMUX Switch DEFAULT PASSWORD RESET In the event the Administrator password is lost or forgotten, the password can be reset to the default password of ADMINISTRATOR. Figure 25 shows the location of the password reset button.