NTI R 1275 Danner Dr Tel:330-562-7070 NETWORK TECHNOLOGIES Aurora, OH 44202 Fax:330-562-1999 www.networktechinc.
TRADEMARK RACKMUX is a registered trademark of Network Technologies Inc in the U.S. and other countries. COPYRIGHT Copyright © 2007 by Network Technologies Inc. All rights reserved. No part of this publication may be reproduced, stored in a retrieval system, or transmitted, in any form or by any means, electronic, mechanical, photocopying, recording, or otherwise, without the prior written consent of Network Technologies Inc, 1275 Danner Drive, Aurora, Ohio 44202.
TABLE OF CONTENTS INTRODUCTION............................................................................................................................................................. 1 Models Available....................................................................................................................................................... 1 Types of CPUs Supported ................................................................................................................................
Translation Capabilities .......................................................................................................................................... 28 Translation Tables .................................................................................................................................................. 28 TROUBLESHOOTING ..................................................................................................................................................
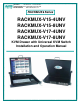
NTI RACKMUX KVM Drawer with NODEMUX Switch INTRODUCTION The RACKMUX-V15-8UNV (RACKMUX) is a KVM Drawer with Universal KVM Switch that combines a rackmount 15" TFT/ LCD monitor, keyboard, touchpad mouse, an 8-port Universal KVM switch (NODEMUX) in a space-saving 1RU industrial strength drawer with wrist pads. The RACKMUX is equipped with a built-in switch function, which allows control of up to eight (8) Windows or SUN-enabled CPUs with a single keyboard, touchpad and monitor.
NTI RACKMUX KVM Drawer with NODEMUX Switch MATERIALS Materials supplied with this kit: • • • • • • NTI RACKMUX-V15/17-4/8UNV KVM Drawer with Universal KVM Switch Line cord, country specific set of keys for keylock 2 Rear Mounting Brackets w/nuts 8 #10-32x3/4” screws and cage nuts for mounting to a rack CD with a pdf of this manual Materials Not supplied but REQUIRED: • A set of 2 cables for each CPU being connected to the switch: • PS/2 CPU to Switch • Legacy SUN CPU to Switch OR - VEXT-xx-MM for v
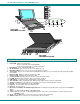
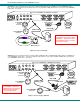
NTI RACKMUX KVM Drawer with NODEMUX Switch 1 2 3 4 5 6 11 12 13 15 Front View RACKMUX-V15-8UNV 1 A 7 8 Fn 9 10 14 16 17 18 19 20 21 Rear View RACKMUX-V15-8UNV FEATURES AND FUNCTIONS 1. 2. 3. 4. 5. 6. 7. 8. 9. 10. 11. 12. 13. 14. 15. 16. 17. 18. 19. 20. 21.
NTI RACKMUX KVM Drawer with NODEMUX Switch INSTALLATION Rack Mounting Instructions The RACKMUX was designed to be mounted to a rack and includes mounting flanges to make attachment easy. 1. Determine the mounting height in the rack for the drawer. It should be a height comfortable to use the keyboard and see the LCD display. Mark holes in each of the 4 corner cabinet rails at points all level with each other. 2. Secure the rear brackets to the rear rack cabinet rails.
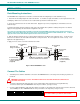
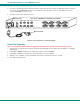
NTI RACKMUX KVM Drawer with NODEMUX Switch • PS/2 CPU- Connect a PS/2 CPU video port using a VEXT-xx-MM cable between a VIDEOx port on the NODEMUX and the CPU. Connect the PS/2 CPU keyboard and mouse ports using a VKTINT-xx-MM cable between a CPUx port on the NODEMUX and the CPU. (See Fig.2.) Rear View of NODEMUX in RACKMUX-V15-8UNV CPU 8 CPU 7 CPU 6 CPU 5 CPU 4 CPU 3 CPU 2 CPU 1 8 4 VIDEO 7 3 6 2 VIDEO 5 1 NETWORK TECHNOLOGIES INC 1275 Danner Dr, Aurora, OH 44202 Tel:330-562-7070 www.
NTI RACKMUX KVM Drawer with NODEMUX Switch 4. Connect the remaining input device and monitor interface cables from each CPU, making sure that cables from the each CPU are connected to the NODEMUX switch at connectors with the same port numbers ("CPU 1" and "VIDEO 1 connectors, "CPU 2" and "VIDEO 2" connectors...etc. ) 5. Connect the power cord to the IEC connector.
NTI RACKMUX KVM Drawer with NODEMUX Switch USING THE RACKMUX Once the RACKMUX is properly connected, the NODEMUX will enable a connection to be made between the attached CPUs and the monitor, keyboard, and mouse.
NTI RACKMUX KVM Drawer with NODEMUX Switch When a standard user powers up the system a security screen will appear if security has been enabled by the administrator. The user will need to login to the switch by following the instructions below for the USER LOGIN. If the user does not know the appropriate user name and password (setup by the administrator), contact the switch administrator for this information.
NTI RACKMUX KVM Drawer with NODEMUX Switch Administration Mode (Cont'd) Function: Keystroke: T - Selects the idle time in minutes Exit Administration Mode and return to previous mode (0-2) x (0-9) x - - (0-9) x (xxx from 000 to 255. i.e. T002 would set the time-out period for 2 minutes. 000 will disable it) Esc Switch Configuration Switch Configuration enables the administrator to configure the NODEMUX to be used as a stand alone switch or as one of the switches in a cascaded system.
NTI RACKMUX KVM Drawer with NODEMUX Switch Administrator Password To change the administrator password press from the Administration Mode menu. The administrator is able to change the administrator password as needed (see Fig. 9). Two edit fields are available, one for password, the other for verify password. The password can be up to 13 characters in length. Note: The default password for the administrator is ADMINISTRATOR.
NTI RACKMUX KVM Drawer with NODEMUX Switch System Access List The System Access List (accessible from the User Name List- page 10) displays a list of numbers representing the ports. From this screen the administrator can change access rights to the ports for the selected user. The user’s name is displayed at the top of the access list for reference. The mouse is used to change access rights by clicking on a given number to toggle a port’s status.
NTI RACKMUX KVM Drawer with NODEMUX Switch Figure 11- Command Mode menus Command Mode (Cont'd) Function: Keystroke: Sets scan time-out on each port Ctrl Selects a specific port Ctrl Enters Search Mode and adds a character to search string and selects the CPU’s name that matches best. Selects the first port on the switch A-Z 0-9 End Display Help Menu F1 Exit OSD Command Mode + P - (0-2) x (0-9) x (0-9) x - (0-9) x - (0-9) x (xxx from 002 to 255. ie.
NTI RACKMUX KVM Drawer with NODEMUX Switch Broadcast Mode To activate Broadcast Mode press + from the Command Mode menu. (use with extreme caution or commands intended for one CPU will be sent to all CPUs) Broadcast Mode allows the operator to send keystrokes to all active CPUs simultaneously (even those CPUs the user cannot connect to due to lack of security access). However, Broadcast Mode has some critical requirements: • BROADCAST mode must be OFF when booting any attached CPUs.
NTI RACKMUX KVM Drawer with NODEMUX Switch Edit Mode (Con'td) Function: Selects the last port on the switch Toggles between insert and overstrike Erase current character Keystroke: End (The character either gets inserted and the remainder of the name gets shifted to the right, OR the current character gets overwritten.
NTI RACKMUX KVM Drawer with NODEMUX Switch Maintenance Mode To enter Maintenance Mode press + from the Command Mode menu. Maintenance Mode enables a user to customize the On Screen Display to their requirements.
NTI RACKMUX KVM Drawer with NODEMUX Switch Help Mode To enter Help Mode press the key from the Command Mode menu (page 11). Help Mode displays a list of commands with a short explanation of their function. These lists are organized in pages for each mode (i.e. COMMAND, EDIT, and SEARCH). The following options enable the user to quickly obtain information on any command.
NTI RACKMUX KVM Drawer with NODEMUX Switch Configuration Baud Rate In order for a terminal to communicate with the NODEMUX, the terminal and NODEMUX must each be configured for the same baud rate. Press from the Administration Mode menu (page 8) to enter Switch Configuration mode. (Fig. 15) Press once to move the cursor bar to highlight "RS232 BAUD RATE". The default setting is 9600. Press or to change the selected baud rate to 300,600,1200,2400,4800, or back to 9600.
NTI RACKMUX KVM Drawer with NODEMUX Switch Wiring Schematic of Matrix-Y-1 cable 9D Male (Unit #1) 9D Female (Source) 9D Male (Unit #2) 2 3 3 3 5 5 5 2 2 7 8 1 4 6 Not connected to source connector Jumper Jumpers Figure 17- Matrix-Y-1 wiring schematic Unit Address In order for a terminal to communicate with one or more NODEMUX switches, each switch must have a unique address. The NODEMUX will only respond to commands from a terminal if its address is embedded in the command.
NTI RACKMUX KVM Drawer with NODEMUX Switch RS - reset unit(s) to default power-up switch connections FORMAT: RS AA RS = "reset unit" command followed by at least one space AA = unit address; if 00, all units on the bus will be reset and no response will be returned RESPONSE: * if command received and executed OK -OR? if syntax or transmission error occurred Note: The RS command does not change the switch configuration, it changes CPU-to-user connection settings.
NTI RACKMUX KVM Drawer with NODEMUX Switch RV- read unit software version FORMAT: RV XX,00 RV= "read software version" command followed by at least one space AA= unit address 00= command for the address location in memory of the software version RESPONSE: -OR? (syntax or transmission error occurred) CF - reset all connected units, regardless of address, to factory default configuration settings WARNING: THIS COMMAND WILL RESET ALL RS232 DAISY-CHAIN-CONNECTED NODEMUX SWITCHES TO FACTORY DEFAULT SETTIN
NTI RACKMUX KVM Drawer with NODEMUX Switch DISPLAY FUNCTIONS An NTI RACKMUX with a 17” monitor supports resolutions up to SXGA (1280 x 1024) with a refresh rate at between 55 and 76Hz. When a 15” monitor is present, support for resolutions up to XGA (1024 x 768) apply with a refresh rate at between 55 and 76Hz. The quality of the image on the LCD monitor is adjustable using an On Screen Display (OSD) menu using the control buttons on the RACKMUX.
NTI RACKMUX KVM Drawer with NODEMUX Switch Brightness/Contrast Menu Selecting the Brightness/Contrast menu will bring up a screen in which the user can adjust the brightness and contrast levels of the LCD display. Using the Up or Down arrows to navigate the menu, highlight either the BRIGHTNESS or CONTRAST sections and press the Select button to choose the option to adjust. Then use the Up or Down Arrow to adjust the setting. Select EXIT when finished to return to the Main Menu.
NTI RACKMUX KVM Drawer with NODEMUX Switch Setup Menu Selecting the Setup menu will bring up a screen in which the user can adjust OSD POSITION-the position of the OSD menus on the LCD display OSD TIME-the length of time the user can be idle before the OSD menu automatically exits (adjustable from 10 to 60 seconds) LANGUAGE-the language that the OSD menus will be presented in With the item highlighted, (use the Up or Down arrow to move between them), press the Select button to choose the option to ad
NTI RACKMUX KVM Drawer with NODEMUX Switch KEYBOARD FUNCTIONS RACKMUX-V15-x The keyboard on the RACKMUX-V15-x (and RACKMUX–V17-x) is a standard condensed Windows format. To reduce the keyboard size, some keys have been assigned multiple functions, accessible via the "Fn" key. This section will describe which keys have multiple functions and how to enable them. Use the LEDs to know what special features are enabled.
NTI RACKMUX KVM Drawer with NODEMUX Switch Number Pad The functionality of a Number Pad on a standard Windows keyboard has been incorporated into the keyboard of the RACKMUX-V15. To substitute the keys of the Number Pad 1 To substitute the keys of the Number Pad: 1. 2. Press the "NumLock" key. The NumLock LED ( 1 ) will illuminate. Press the "Fn" key twice quickly (double-click). The "Fn" LED will illuminate. To turn OFF Number Pad functions: 1. Press the "Fn" key twice quickly (double-click).
NTI RACKMUX KVM Drawer with NODEMUX Switch Other Functions of the "Fn" Key The Function ("Fn") key will enable other standard keyboard features in addition to the Number Pad keys (page 25) .
NTI RACKMUX KVM Drawer with NODEMUX Switch Numeric Keypad Option Models with the Numeric Keypad option (-N) (i.e. RACKMUX-V15-N-8UNV) have a standard Windows keyboard with 17-key numeric keypad. Note: The “Fn” key is not an active key on this keyboard.
NTI RACKMUX KVM Drawer with NODEMUX Switch KEYBOARD FEATURES The keyboard configuration of each CPU is saved in the NODEMUX switch. For example, if the CPU attached to Port 2 had CAPS LOCK and NUM LOCK selected the last time that CPU was accessed, then they will automatically be set when that CPU is accessed again. Keyboard-To-Computer Translation The NODEMUX switch enables a mixture of otherwise incompatible peripheral computer components to be connected together.
NTI RACKMUX KVM Drawer with NODEMUX Switch TROUBLESHOOTING PROBLEM: SOLUTION: Keyboard Errors Check cable connections on each CPU and the switch. PROBLEM: SOLUTION: No Video Check cable connections on each CPU and the switch. Verify that keyboard and video connect from each CPU to matching ports. After reconnecting, CPU may need to be re-booted in order to sense the monitor connection. PROBLEM: SOLUTION: No OSD The administrator may have configured the unit as a slave instead of stand-alone switch.
NTI RACKMUX KVM Drawer with NODEMUX Switch RACKMUX-KVM DRAWER STANDARD SPECIFICATIONS General Specs Case Material.................................................Electro-galvanized steel black powdercoated Dimensions WxDxH (in.)...............................19 x 21.9 x 1.75 Supported Rack Depths………………………..Adjustable 22” – 39” Input Power....................................................AC 100-240V, 50 – 60 Hz Operating Temperature..................................0-40˚C Storage Temperature…………………………..
NTI RACKMUX KVM Drawer with NODEMUX Switch Keyboard No. Of Keys ...................................................83 Keys (US), 84 keys (German, French, Italian, Spanish) Key Switch Type ............................................Membrane switch Keytop Style...................................................Rectangular Cylindrical Operating Force .............................................50gf +/- 25gf Stroke ............................................................3.0mm +/- .5mm Tactile ...........