User manual Oven BIDO1SS
Contents Safety information _ _ _ _ _ _ _ _ _ _ _ _ _ _ _ _ _ _ Safety instructions _ _ _ _ _ _ _ _ _ _ _ _ _ _ _ _ _ Product description _ _ _ _ _ _ _ _ _ _ _ _ _ _ _ _ _ Before first use _ _ _ _ _ _ _ _ _ _ _ _ _ _ _ _ _ _ _ Daily use _ _ _ _ _ _ _ _ _ _ _ _ _ _ _ _ _ _ _ _ _ _ Clock functions _ _ _ _ _ _ _ _ _ _ _ _ _ _ _ _ _ _ _ 2 3 5 5 6 7 Using the accessories _ _ _ _ _ _ _ _ _ _ _ _ _ _ _ 8 Helpful hints and tips _ _ _ _ _ _ _ _ _ _ _ _ _ _ _ _ 8 Care and cleaning _ _ _ _ _ _ _ _ _ _ _ _ _ _ _ _ _
• Internally the appliance becomes hot when in operation. Do not touch the heating elements that are in the appliance. Always use oven gloves to remove or put in accessories or ovenware. • Do not use a steam cleaner to clean the appliance. • Before maintenance cut the power supply. • Do not use harsh abrasive cleaners or sharp metal scrapers to clean the glass door since they can scratch the surface, which may result in shattering of the glass.
• The shock protection of live and insulated parts must be fastened in such a way that it cannot be removed without tools. • Connect the mains plug to the mains socket only at the end of the installation. Make sure that there is access to the mains plug after the installation. • If the mains socket is loose, do not connect the mains plug. • Do not pull the mains cable to disconnect the appliance. Always pull the mains plug.
Disposal Warning! Risk of electrical shock. • Before replacing the lamp, disconnect the appliance from the power supply. • Only use lamps with the same specifications. Service • Contact the Service to repair the appliance. We recommend only the use of original spare parts. Warning! Risk of injury or suffocation. • Disconnect the appliance from the mains supply. • Cut off the mains cable and discard it. • Remove the door catch to prevent children and pets to get closed in the appliance.
To change the time press again and again until the indicator for the Time of Day function flashes. You can not change the time of day if the Duraor End function operates. tion Preheating Preheat the empty appliance to burn off the remaining grease. Preheat the two ovens. Heat up one oven at a time. Set the functions listed below, if applicable. 1. Set the function and the temperature to 250°C. 2. 3. 4. 5. Let the appliance operate for one hour. and the temperature to Set the function 250°C.
Oven function Application Dual Circuit Grill To grill flat food items in large quantities. To make toast. Main oven functions Oven function Application OFF position Light Thermaflow® Defrost The appliance is OFF. To light up the oven interior. Roast or roast and bake food at the same cooking temperature on different levels at the same time. To defrost frozen food.
certain delay in time. First set Duration function. the End and then Setting the clock functions To activate the clock functions: 1. Set an oven function and temperature of cooking. This is not necessary for the Minute Minder . 2. Press the Selection button again and again until the indicator for the necessary clock function starts to flash. 3. Press + or - to set the necessary clock function. 4. The clock function operates. The display shows the indicator for the clock function you set.
Main oven The main oven is particularly suitable for cooking larger quantities of food. Baking General instructions • Your new oven may bake or roast differently to the appliance you had before. Adapt your usual settings (temperature, cooking times) and shelf levels to the values in the tables. • With longer baking times, the oven can be switched off about 10 minutes before the end of baking time, to use the residual heat. When you use frozen food, the trays in the oven can twist during baking.
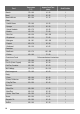
Temperature [°C] Approx Cook Time (mins) Shelf Position Biscuits 170 - 190 10 - 20 1 Bread 200 - 220 30 - 35 1 Bread rolls/buns 200 - 220 10 - 15 1 - Small & Queen 170 - 180 18 - 25 1 - Sponges 160 - 175 20 - 30 1 - Victoria Sandwich 160 - 170 18 - 25 1 - Madeira 140 - 150 75 - 90 1 - Rich Fruit 140 - 150 120 - 150 1 - Gingerbread 140 - 150 75 - 90 1 - Meringues 90 - 100 150 - 180 1 - Flapjack 160 - 170 25 - 30 1 - Shortbread 130 - 150 45 - 65 1 - Beef/Lamb
Temperature [°C] Approx Cook Time (mins) Shelf Position - Baked Jacket Potatoes 180 - 190 60 - 90 1 - Roast Potatoes 180 - 190 60- 90 1 - Large 200 - 210 25 - 40 1 - Individual 210 - 220 15 - 25 1 Food Vegetables: Yorkshire Pudding: Roasting Meat, Poultry See roasting chart. Main oven Baking Shelf Positions are not critical but ensure that oven shelves are evenly spaced when more than one is used (e.g.
Temperature [°C] Approx Cook Time (mins) Scones 210 - 230 8 - 12 Roasting: Meat and Poultry 160 - 180 see Roasting Chart Food Roasting Roasting dishes • Use heat-resistant ovenware to roast (please read the instructions of the manufacturer). • Large roasting joints can be roasted directly in the deep roasting pan or on the oven shelf above the deep roasting pan. (If present) • Roast lean meats in a roasting tin with a lid. This well keep the meat more succulent.
Food Bacon Rashers Grill Time (mins in total) 5- 6 Beefburgers 10 - 20 Chicken Joints 20 - 40 Chops - Lamb 15 - 25 - Pork 20 - 25 Fish - Whole Trout/ Makarel 10 -12 Fillets - Plaice/Cod 4-6 Kebabs 12 - 18 Kidneys - Lamb/Pig 6 - 10 Sausages 20 - 30 Steaks - Rare - Medium - Well Done Toasted Sandwiches Defrosting • Put the food out of the packaging and set it on a plate on the oven shelf. • Do not cover with a plate or bowl. This can extend the time to defrost very much.
The oven ceiling is ready to clean. Removing the shelf support rails Installing the heating element 1. Install the heating element in opposite sequence. Important! Install the heating element correctly on the two sides above the support on the inner wall of the oven. 2. 1 Pull the front of the shelf support rail away from the side wall. 2 Pull the rear shelf support rail away from the side wall and remove it. Installing the shelf support rails Install the shelf support rails in opposite sequence.
The oven door has 2, 3 or 4 panels of glass (depends on the model) Removing and cleaning the door glasses 1. Hold the door trim (B) on the top edge of the door at the two sides and push inwards to release the clip seal. 4. Clean the door glass panels. To install panels follow the procedure in reverse. Insert the smaller panel first, then the larger. Oven lamp Warning! There is a danger of electrical shock! Before you change the oven lamp: • Switch off the oven.
If you cannot find a solution to the problem yourself, contact your dealer or the service centre. The necessary data for the service centre is on the rating plate. The rating plate is on the front frame of the appliance cavity. We recommend that you write the data here: Model (MOD.) ......................................... Product number (PNC) ......................................... Serial number (S.N.) ......................................... Installation Warning! Refer to the Safety chapters.
90° 2x 3,5x25 Environment concerns Recycle the materials with the symbol . Put the packaging in applicable containers to recycle it. Help protect the environment and human health and to recycle waste of electrical and electronic appliances. Do not dispose appliances marked with the symbol with the household waste. Return the product to your local recycling facility or contact your municipal office. GB Packaging material The packaging material is environmentallyfriendly and recyclable.
Standard Guarantee Conditions and Exclusions. All our products come with 12 month warranty. To see our guarantee conditions and exclusions please visit our Customer Care Department www.benchmarxjoinery.co.uk. Service and Spare Parts. Service is provided by Electrolux Major Appliances as authorised service partner network. Please contact your local Service Centre on; 08445 616616 (Your call will automatically be routed to your local centre).
892957139-B-392013