
User manual


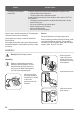


• Remove the polystyrene
block fitted on the door
seal. Pull out all items
from the drum.
• Fill the smaller upper hole
and the two large ones
with the plastic plug caps
supplied in the bag with
the User Manual.
Positionning
• Install the machine on a flat hard floor. Make sure
that air circulation around the appliance is not
impeded by carpets, rugs etc.
• Check that the machine does not touch the wall or
other kitchen units.
• Level the appliance by
raising or lowering the
feet.
• The feet may be tight to
adjust as they incorporate
a self locking nut, but the
appliance MUST be level
and stable.
• If necessary, check the setting with a spirit level. Any
necessary adjustment can be made with a spanner.
• After having levelled the
appliance, tighten the
lock nuts.
• Accurate levelling
prevents vibration, noise
and displacement of the
appliance during
operation.
Never place cardboard, wood or similar
materials under the appliance to
compensate for any unevenness in the
floor.
Water inlet
• The inlet hose is supplied with the appliance and
can been found inside the appliance drum.
• Do not use the hose from your previous appliance to
connect to the water supply.
This appliance must be connected toa
cold water supply.
45˚
35˚
• Connect the hose with
the angled connection to
the machine. Do not
place the inlet hose
downwards.
• Angle the hose to the left
or right depending on the
position of your water tap.
• Set the hose correctly by loosening the ring nut. After
positioning the inlet hose, be sure to tighten the ring nut
again to prevent leaks.
• Connect the hose to a tap
with a 3/4”thread. Always
use the hose supplied
with the appliance.
• The inlet hose must not be lengthened. If it is too short
and you do not wish to move the tap, you will have to
purchase a new, longer hose specially designed for this
type of use.
Water drainage
The end of the drain hose can be positioned in three
ways:
23