EN User Manual Washing Machine IWM601W
Contents Safety information Safety instructions Product description Control panel Programmes Consumption values Options Before first use 2 3 4 5 6 8 9 9 Daily Use - Washing only Hints and tips Care and cleaning Troubleshooting Installation Building in Technical Data 10 12 12 15 16 18 21 Subject to change without notice. Safety information Before the installation and use of the appliance, carefully read the supplied instructions.
• • • • • • • The ventilation opening in the base must not be covered by a carpet, mat, or any floor covering. The appliance must be connected to the water mains using the new supplied hose sets, or other new hose sets supplied by the Authorised Service Centre. Old hose sets must not be reused. If the mains power supply cable is damaged, it must be replaced by the manufacturer, its Authorised Service Centre or similarly qualified persons to avoid an electrical hazard.
• • mains plug fuse, use only a 13 A ASTA (BS 1362) fuse. This appliance complies with the E.E.C. Directives. • Water connection • • • • • Do not cause damage to the water hoses. Before connection to new pipes, pipes not used for a long time, where repair work has been carried out or new devices fitted (water meters, etc.), let the water flow until it is clean and clear. Ensure that there are no visible water leaks during and after the first use of the appliance.
Installation on suspended flooring 5 Drain pump filter 6 Feet for levelling the appliance Suspended wooden floors are particularly susceptible to vibration. Child safety To limit vibration we recommend placing a waterproof wooden panel, at least 15 mm thick, under the appliance. It should be screwed to at least 2 floor beams and should extend beyond the front feet. This device prevents children or pets to be closed in the drum. • • Turn the device clockwise, until the groove is horizontal.
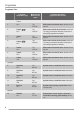
Programmes Programme Chart Programme Temperature range Maximum load Maximum spin speed Programme description (Type of load and soil level) Cottons 1 90°C 7 kg 1200 rpm White cotton and coloured cotton. Normal soil and light soil. 2 Cottons 60°C 7 kg 1200 rpm White cotton and fast-coloured cotton. Normal soil. The energy consumption decreases and the time of the washing programme is extended. 3 Cottons 60° 7 kg 1200 rpm White cotton and coloured cotton. Normal soil and light soil.
Programme Temperature range Maximum load Maximum spin speed Programme description (Type of load and soil level) 14 Delicates 30°C 3 kg 700 rpm Delicate fabrics such as acrylics, viscose and mixed fabrics requiring gentler washing. Normal soil. 15 Mix 20° 40°C 3 kg 900 rpm Special programme for cotton, synthetic and mixed fabrics lightly soiled. Select this programme to reduce the energy consumption. Make sure that the detergent is suitable for low temperature in order to have good washing results.
Programme Spin Rinse Hold Cottons ■ ■ ■ Synthetics ■ ■ ■ Easy Iron ■ ■ Delicates ■ Mix 20° ■ ■ Wool ■ ■ Rinses ■ ■ Drain ■ Spin ■ Prewash Quick Extra Rinse Delay Start ■ ■ ■ ■ ■ ■ ■ ■ ■ ■ ■ ■ ■ ■ ■ Consumption values Stated values are obtained in laboratory conditions with relevant standards. Different causes can change the data: the quantity and type of laundry and ambient temperature.
Programmes Load (kg) Standard 40°C cotton Energy consumption (kWh) 3.5 Water consumption (litre) 0.61 44 Approximate programme duration (minutes) 140 Remaining moisture (%)1) 53 1) At the end of spin phase. 2) Not available for some models. Off Mode (W) Left On Mode (W) 0.10 0.98 The information given in the chart above is compliant with the EU Commission regulation 1015/2010 implementing directive 2009/125/EC . Options The washing time will be prolonged.
4. 5. Put a small quantity of detergent in the compartment for washing phase. Set and start a programme for cotton at the highest temperature without laundry. This removes all possible dirt from the drum and the tub. Daily Use - Washing only Warning! Refer to Safety chapters. Detergent compartments Loading the laundry Detergent compartment for prewash phase. Open the water tap. Connect the mains plug to the mains socket. Detergent compartment for washing phase. 1. 2. 3.
You can cancel or change the delay setting before you press the button Start/ Pause. After pressing the button Start/ Pause, you can only cancel the delay. To cancel the delay start: a. Press the button Start/Pause to set the appliance to pause. The corresponding indicator flashes. b. Press the button Delay Start once; the indicator of the set delay goes off. Press the button Start/Pause again to start the programme immediately. Cancelling a running programme 1. 2.
Hints and tips The laundry load • • • • • • • • • • • • Divide the laundry in: white, coloured, synthetics, delicates and wool. Obey the washing instructions that are on the laundry care labels. Do not wash white and coloured items together. Some coloured items can discolour with the first wash. We recommend that you wash them separately for the first times. Button up pillowcases, close zippers, hooks and poppers. Tie up belts. Empty the pockets and unfold the items.
Descaling If the water hardness in your area is high or moderate, we recommend that you use a water descaling product for washing machines. • Remove the top part of the additive compartment to aid cleaning. • Make sure that all washing powder residue is removed from the upper and lower part of the recess. Use a small brush to clean the recess. Regularly examine the drum to prevent limescale and rust particles. To remove rust particles use only special products for washing machines.
• • When no more water comes out, unscrew the filter. Turn the filter anticlockwise. for more details), check if the water inlet filters are blocked. To clean the water inlet filters: • • 1 • 2 • • • 1 2 • • • Remove the filter. Use pliers, if necessary. When removing the filter, always keep a rag nearby to dry up any water spillage. Clean the filter under a tap, to remove any traces of fluff. Remove foreign bodes and fluff from the filter seat and from the pump impeller.
4. 5. 6. Set the Drain programme and let it operate until the end of the cycle. Turn the programme knob to OFF to disconnect the appliance from the power supply. Screw the water inlet hose back on and re-fit the emergency emptying hose after having put the cap on again. Warning! Make sure that the temperature is more than 0 °C before you use the appliance again. The manufacturer is not responsible for damages caused by low temperatures.
Problem The appliance does not drain the water. Possible solution • • • • • • Make sure that the sink spigot is not clogged. Make sure that the drain hose has no kinks or bends. Make sure that the drain filter is not clogged. Clean the filter, if necessary. Refer to 'Care and cleaning'. Make sure that the drain hose is in the correct position. The hose may be too low. Set the drain programme if you set a programme without drain phase.
• After removing all the packaging, carefully lay the appliance on it’s back to remove the polystyrene base from the bottom. Positionning • • Install the machine on a flat hard floor. Make sure that air circulation around the appliance is not impeded by carpets, rugs etc. Check that the machine does not touch the wall or other kitchen units. • • Remove the power supply cable and the draining hose from the hose holders on the rear of the appliance. • • 2 • Unscrew the three bolts.
• • Connect the hose to a tap with a 3/4”thread. Always use the hose supplied with the appliance. The inlet hose must not be lengthened. If it is too short and you do not wish to move the tap, you will have to purchase a new, longer hose specially designed for this type of use. Water drainage The end of the drain hose can be positioned in three ways: Building in Overview This appliance has been designed to be built into the kitchen furniture.
600 mm ~10mm min. 596 mm 560 mm 555 mm min. 830 mm 818 mm 75 mm 60 mm 170 mm 100 mm We recommend that you keep the packaging and the transit bolts for any movement of the appliance. Installing anti-tiliting device Preparation and assembly of the door The appliance is originally prearranged for the assembly of a door opening from right to left (see picture below) If the height of the counter is 820 mm or lower, you cannot install the anti-tilting device.
16-22 mm X Ø 35 mm 416 mm A 22±1,5 mm 14 mm 595-598 mm Hinges To mount the hinges drill two holes (dia. 35 mm, depth 12.5-14 mm depending on the depth of door furniture) on the inner side of the door. To fix the hinges to the door use the screws for wood 1 and 2 supplied with the appliance (see below). B To align the door perfectly, loosen the screw, adjust the door and tighten the screw A again. The appliance is prearranged for a magnetic closure of the door.
D A C E B Technical Data Dimension Width/ Height/ Depth/ Total depth 596 mm/ 820 mm/ 544 mm/ 560 mm Electrical connection Voltage Overall power Fuse Frequency 230-240 V 2050 W 13 A 50 Hz Level of protection against ingress of solid particles and moisture ensured by the protective cover, except where the low voltage equipment has no protection against moisture IPX4 Water supply pressure 1) 0,5 bar (0,05 MPa) 8 bar (0,8 MPa) Minimum Maximum Cold water Water supply 2) Maximum Load Cotton 7 kg
132905922-A-372017