EN User Manual Oven SFO2SS
Contents Safety information Safety instructions Product description Before first use Daily use Clock functions Using the accessories 2 3 5 5 6 7 8 Additional functions Hints and tips Care and cleaning Troubleshooting Installation Energy efficiency GREAT BRITAIN – Customer Care and Service 9 9 16 18 19 21 22 Subject to change without notice. Safety information Before the installation and use of the appliance, carefully read the supplied instructions.
• • • • • • • • • WARNING: The appliance and its accessible parts become hot during use. Care should be taken to avoid touching heating elements. Always use oven gloves to remove or put in accessories or ovenware. Before carrying out any maintenance, disconnect the appliance from the power supply. Ensure that the appliance is switched off before replacing the lamp to avoid the possibility of electric shock. Do not use a steam cleaner to clean the appliance.
• • • • • • Connect the mains plug to the mains socket only at the end of the installation. Make sure that there is access to the mains plug after the installation. If the mains socket is loose, do not connect the mains plug. Do not pull the mains cable to disconnect the appliance. Always pull the mains plug. Use only correct isolation devices: line protecting cut-outs, fuses (screw type fuses removed from the holder), earth leakage trips and contactors.
Service • • To repair the appliance contact an Authorised Service Centre. Use original spare parts only. • • • Disconnect the appliance from the mains supply. Cut off the mains electrical cable close to the appliance and dispose of it. Remove the door catch to prevent children or pets from becoming trapped in the appliance. Disposal Warning! Risk of injury or suffocation.
Daily use Warning! Refer to Safety chapters. Oven function Retractable knobs To use the appliance press the knob. The knob comes out. Turbo Grilling Setting a heating function 1. Turn the knob for the heating functions to select a heating function. 2. Turn the control knob to select the temperature. The lamp turns on when the oven operates. 3. To turn off the oven, turn the knobs to the off position.
Display A B C A. Function indicators B. Time display C. Function indicator Buttons Sensor field / Button Function Description MINUS To set the time. CLOCK To set a clock function. PLUS To set the time. Clock functions Clock functions table Clock function Application TIME OF DAY To set, change or check the time of day. DURATION To set how long the appliance operates. END To set when the appliance deactivates. TIME DELAY To combine DURATION and END function.
4. 5. 6. When the time ends, flashes and an acoustic signal sounds. The appliance deactivates automatically. Press any button to stop the acoustic signal. Turn the knob for the oven functions and the knob for the temperature to the off position. Setting the END 1. Set an oven function and temperature. 2. Press again and again until 3. Press or The display shows 4. 5. 6. starts to flash. to set the time. 5. flashes and an acoustic When the time ends, signal sounds.
Small indentation at the top increase safety. The indentations are also anti-tip devices. The high rim around the shelf prevents cookware from slipping of the shelf. Additional functions Cooling fan Safety thermostat When the oven operates, the cooling fan turns on automatically to keep the surfaces of the oven cool. If you turn off the oven, the cooling fan can continue to operate until the oven cools down. Incorrect operation of the oven or defective components can cause dangerous overheating.
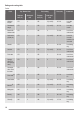
Baking and roasting table Cakes Food Top / Bottom Heat Temperature (°C) 10 Shelf position Fan Cooking Temperature (°C) Time (min) Comments Shelf position Whisked recipes 170 2 165 2 (1 and 3) 45 - 60 In a cake mould Shortbread dough 170 2 160 2 (1 and 3) 20 - 30 In a cake mould Butter-milk cheese cake 170 1 165 2 70 - 80 In a 26 cm cake mould Apple cake (Apple pie) 170 1 160 2 (1 and 3) 80 - 100 In two 20 cm cake moulds on a wire shelf Strudel 175 2 150 2 60 - 80 In
Food Top / Bottom Heat Temperature (°C) Shelf position Fan Cooking Temperature (°C) Time (min) Comments Shelf position Plate tarts 180 3 170 2 25 - 35 In a 20 cm cake mould Victoria sandwich 180 1 or 2 170 2 45 - 70 Left + right in a 20 cm cake mould Rich fruit cake 160 1 150 2 110 - 120 In a 24 cm cake mould Victoria 170 1 160 1 50 - 60 In a 20 cm cake mould sandwich1) 1) Preheat the oven for 10 minutes.
Food Top / Bottom Heat Temperature (°C) Shelf position Fan Cooking Temperature (°C) Time (min) Comments Shelf position Vegetable flan 200 2 200 2 45 - 60 In a mould Quiches 190 1 190 1 40 - 50 In a mould Lasagne 200 2 200 2 25 - 40 In a mould Cannelloni 200 2 200 2 25 - 40 In a mould Yorkshire pudding1) 220 2 210 2 20 - 30 6 pudding mould 1) Preheat the oven for 10 minutes.
Food Top / Bottom Heat Temperature (°C) Fan Cooking Shelf position Temperature (°C) Time (min) Comments Shelf position Lamb 190 2 190 2 110 - 130 Leg Chicken 200 2 200 2 70 - 85 Whole Turkey 180 1 160 1 210 - 240 Whole Duck 175 2 160 2 120 - 150 Whole Goose 175 1 160 1 150 - 200 Whole Rabbit 190 2 175 2 60 - 80 Cut in pieces Hare 190 2 175 2 150 - 200 Cut in pieces Pheasant 190 2 175 2 90 - 120 Whole Fish Food Top / Bottom Heat Temperature (°C
Food Quantity Pieces Time (min) Quantity (kg) 1st side 2nd side Kebabs 4 - 10 - 15 10 - 12 Breast of chicken 4 0.4 12 - 15 12 - 14 Hamburger 6 0.6 20 - 30 - Fish fillet 4 0.4 12 - 14 10 - 12 Toasted sandwiches 4-6 - 5-7 - Toast 4-6 - 2-4 2-3 Turbo Grilling Use the third shelf position. Set the maximum temperature of 200 °C.
Food Accessories Temperature (°C) Shelf position Time (min) Pizza, frozen, 0.35 kg wire shelf 220 2 35 - 40 Swiss roll baking tray or dripping pan 170 2 30 - 40 Brownie baking tray or dripping pan 180 2 30 - 40 Soufflè, 6 pieces ceramic ramekins on wire shelf 200 3 30 - 40 Sponge flan base flan base tin on wire shelf 170 2 20 - 30 Victoria Sandwich baking dish on wire shelf 170 2 35 - 45 Poached fish, 0.3 kg baking tray or dripping pan 180 3 35 - 45 Whole fish, 0.
Food Function Accessories Shelf position Temperature (°C) Time (min) Comments Small cake Conventional Cooking Baking tray 3 170 20 - 30 Put 20 small cakes per one baking tray. Apple pie Conventional Cooking Wire shelf 1 170 80 - 120 Use 2 tins (20 cm diameter), diagonally shifted. Sponge cake Conventional Cooking Wire shelf 2 170 35 - 45 Use a cake mould (26 cm diameter). Short bread Conventional Cooking Baking tray 3 150 20 - 35 Preheat the oven for 10 minutes.
use the oven if the door gasket is damaged. Contact an Authorised Service Centre. To clean the door gasket, refer to the general information about cleaning. Removing the shelf supports To clean the oven, remove the shelf supports. Caution! Be careful when you remove the shelf supports. 1. 2. Pull the front of the shelf support away from the side wall. 2. Lift and turn the levers fully on both hinges. 3. Close the oven door halfway to the first opening position.
8. Clean the glass panels with water and soap. Dry the glass panels carefully. Do not clean the glass panels in the dishwasher. When the cleaning is completed, install the glass panel and the oven door. When installed correctly the door trim clicks. Make sure that you install the internal glass panel in the seats correctly. A 5. Release the locking system to remove the internal glass panel. Replacing the lamp Warning! Risk of electric shock. The lamp can be hot. 1. Turn off the oven.
What to do if... Problem Possible cause Remedy The oven does not heat up. The oven is deactivated. Activate the oven. The oven does not heat up. The clock is not set. Set the clock. The oven does not heat up. The necessary settings are not set. Make sure that the settings are correct. The oven does not heat up. The fuse is blown. Make sure that the fuse is the cause of the malfunction. If the fuse is blown again and again, contact a qualified electrician. The lamp does not operate.
Building In 540 21 558 min. 550 114 19 20 600 min. 560 6 589 570 594 6 3 540 21 min. 550 558 19 20 580 114 min. 560 589 570 594 9 Securing the appliance to the cabinet This appliance is supplied without a main plug and a main cable. To access the electrical connections unscrew the 2 T20 screws on the rear panel top and take the panel out.
Applicable types of cables for UK only Connection via Oven Control Circuit Min. size cable / flex Cable / flex type 2,5 mm² PVC / PVC twin and earth Fuse 15 A min. 20 A max. Energy efficiency Product Fiche and information according to EU 65-66/2014 Supplier's name Neue Model identification SFO2SS Energy Efficiency Index 94.9 Energy efficiency class A Energy consumption with a standard load, conventional mode 0.83 kWh/cycle Energy consumption with a standard load, fan-forced mode 0.
GB GREAT BRITAIN – Customer Care and Service Standard Guarantee Conditions and Exclusions. All our products come with a 24 month warranty. To see our guarantee conditions and exclusions please visit our Customer Care Department www.benchmarxjoinery.co.uk. all information under 'Troubleshooting' in your instruction booklet before contacting us for service. Servicing and/or installation of your product should be carried out by a suitably qualified engineer.
867347091-A-162018