EN User Manual Oven SMO1SS
Contents Safety information Safety instructions Product description Before first use Daily use Clock functions Using the accessories 2 3 5 5 6 7 8 Additional functions Hints and tips Care and cleaning Troubleshooting Installation Energy efficiency GREAT BRITAIN – Customer Care and Service 8 9 14 15 16 17 18 Subject to change without notice. Safety information Before the installation and use of the appliance, carefully read the supplied instructions.
• • • • • • • • Always use oven gloves to remove or put in accessories or ovenware. Before maintenance cut the power supply. Ensure that the appliance is switched off before replacing the lamp to avoid the possibility of electric shock. Do not use a steam cleaner to clean the appliance. Do not use harsh abrasive cleaners or sharp metal scrapers to clean the glass door since they can scratch the surface, which may result in shattering of the glass.
• This appliance complies with the E.E.C. Directives. appliance, the housing unit or the floor. Do not close the furniture panel until the appliance has cooled down completely after use. Use Warning! Risk of injury, burns and electrical shock or explosion. • • • • • • • • • • • • • • • • • • • 4 This appliance is for household use only. Do not change the specification of this appliance. Make sure that the ventilation openings are not blocked. Do not let the appliance stay unattended during operation.
Product description General overview 1 2 3 4 5 6 7 12 4 8 9 3 10 2 1 11 Accessories • 1 2 3 4 5 6 7 8 9 10 11 12 • Wire shelf For cookware, cake tins, roasts. Control panel Temperature indicator / symbol Knob for the temperature Electronic programmer Knob for the oven functions Power lamp / symbol Air vents for the cooling fan Heating element Lamp Fan Shelf support, removable Shelf positions Baking tray For cakes and biscuits. Before first use Warning! Refer to Safety chapters.
Accessories can become hotter than usual. The appliance can emit an odour and smoke. This is normal. Make sure that the airflow in the room is sufficient. Daily use 1. Warning! Refer to Safety chapters. 2. Retractable knobs To use the appliance, press the control knob. The control knob comes out. 3. Turn the knob for the oven functions to select an oven function. Turn the knob for the temperature to select a temperature.
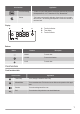
Oven function Application True Fan Cooking To bake on up to 2 shelf positions at the same time and to dry food. Set the temperature 20 - 40 °C lower than for Top / Bottom Heat. Defrost This function can be used for defrosting frozen foods, such as vegetables and fruits. The defrosting time depends on the amount and size of the frozen food. Display A B C A. Function indicators B. Time display C. Function indicator Buttons Button Function Description MINUS To set the time.
You can use the functions Duration and End at the same time to set the time for how long the appliance should operate and when the appliance should deactivate. This lets you activate the appliance with a delay in time. First set the Duration and then the End . Setting the clock functions The clock function operates. The display shows the indicator for the clock function you set. For the Minute Minder function the display shows the time left. 3.
Hints and tips when you cook. This can change the baking results and cause damage to the enamel. Warning! Refer to Safety chapters. Baking cakes The temperature and baking times in the tables are guidelines only. They depend on the recipes and the quality and quantity of the ingredients used. • • General information • • • • • The appliance has four shelf positions. Count the shelf positions from the bottom of the appliance floor.
Food Top / Bottom Heat Temperature (°C) Temperature (°C) Time (min) Comments Shelf position Strudel 175 2 150 2 60 - 80 In a baking tray Jam-tart 170 2 160 2 30 - 40 In a 26 cm cake mould Fruit cake 170 2 155 2 60 - 70 In a 26 cm cake mould Sponge cake (Fatless sponge cake) 170 2 160 2 35 - 45 In a 26 cm cake mould Christmas cake / Rich fruit cake 170 2 160 2 50 - 60 In a 20 cm cake mould Plum cake1) 170 2 160 2 50 - 60 In a bread tin Small cakes 170 3 160
Bread and pizza Food Top / Bottom Heat Temperature (°C) White Shelf position True Fan Cooking Temperature (°C) Time (min) Comments Shelf position 190 1 190 1 60 - 70 1 - 2 pieces, 500 gr one piece Rye bread 190 1 180 1 30 - 45 In a bread tin Bread rolls1) 190 2 180 2 (1 and 3) 25 - 40 6 - 8 rolls in a baking tray Pizza1) 190 1 190 1 20 - 30 On a deep pan Scones1) 200 3 190 2 10 - 20 In a baking tray bread1) 1) Preheat the oven for 10 minutes.
Meat Food Top / Bottom Heat Temperature (°C) 12 Shelf position True Fan Cooking Temperature (°C) Time (min) Comments Shelf position Beef 200 2 190 2 50 - 70 On a wire shelf and a deep pan Pork 180 2 180 2 90 - 120 On a wire shelf and a deep pan Veal 190 2 175 2 90 - 120 On a wire shelf and a deep pan English roast beef rare 210 2 200 2 44 - 50 On a wire shelf and a deep pan English roast beef medium 210 2 200 2 51 - 55 On a wire shelf and a deep pan English roast b
Food Top / Bottom Heat Temperature (°C) Pheasant 190 Shelf position 2 True Fan Cooking Temperature (°C) 175 Time (min) Comments Shelf position 2 90 - 120 Whole on a deep pan Fish Food Top / Bottom Heat Temperature (°C) Shelf position True Fan Cooking Temperature (°C) Time (min) Comments Shelf position Trout / Sea bream 190 2 175 2 (1 and 3) 40 - 55 3 - 4 fishes Tuna fish / Salmon 190 2 175 2 (1 and 3) 35 - 60 4 - 6 fillets Grilling Preheat the empty oven for 10 minutes before
Care and cleaning Warning! Refer to Safety chapters. 1 2 Notes on cleaning • • • • • • Clean the front of the appliance with a soft cloth with warm water and a cleaning agent. To clean metal surfaces, use a dedicated cleaning agent. Clean the appliance interior after each use. Fat accumulation or other food remains may result in a fire. Clean stubborn dirt with a special oven cleaner. Clean all accessories after each use and let them dry. Use a soft cloth with warm water and a cleaning agent.
5 6 90° 5 Release the locking system to remove the internal glass panel. 6 Turn the two fasteners by 90° and remove them from their seats. Replacing the lamp 7 Put a cloth on the bottom of the interior of the appliance. It prevents damage to the lamp glass cover and the cavity. Warning! Danger of electrocution! Disconnect the fuse before you replace the lamp. The lamp and the lamp glass cover can be hot. 2 1 7 First lift carefully and then remove the glass panel. 1. 2.
Problem Possible cause Remedy The oven does not heat up. The fuse is blown. Make sure that the fuse is the cause of the malfunction. If the fuse is blown again and again, contact a qualified electrician. The lamp does not operate. The lamp is defective. Replace the lamp. Steam and condensation settle on the food and in the cavity of the oven. You left the dish in the oven for too long. Do not leave the dishes in the oven for longer than 15 - 20 minutes after the cooking process ends.
Electrical installation The manufacturer is not responsible if you do not follow the safety precautions from the Safety chapters. 540 min. 550 580 This appliance is supplied without a main plug and a main cable. 21 558 114 19 20 min. 560 591 To access the electrical connections unscrew the 2 T20 screws on the rear panel top and take the panel out.
Energy efficiency class A Energy consumption with a standard load, conventional mode 0.83 kWh/cycle Energy consumption with a standard load, fan-forced mode 0.82 kWh/cycle Number of cavities 1 Heat source Electricity Volume 57 l Type of oven Built-In Oven Mass 28.6 kg EN 60350-1 - Household electric cooking appliances Part 1: Ranges, ovens, steam ovens and grills Methods for measuring performance. Energy saving The appliance has features which help you save energy during everyday cooking.
ENVIRONMENTAL CONCERNS not dispose appliances marked with the symbol with the household waste. Return the product to your local recycling facility or contact your municipal office. Recycle the materials with the symbol . Put the packaging in applicable containers to recycle it. Help protect the environment and human health and to recycle waste of electrical and electronic appliances.
867304835-F-162016