
17 inch LCD/Keyboard Rack Kit Installation Guide


17 inch LCD/Keyboard Rack Kit Installation Guide
Step Detail
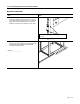
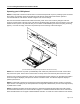
3. Remove the slides from the tray assembly. The
slides come shipped attached to the tray assembly,
the outer slide members must be removed to be
properly installed into the rack. To remove the outer
slide members, fully extend both slides to the open
position. Once extended unlock the outer slide
members by lifting up on the left side latch and
pressing down on the right slide latch. The outer
slide member can now be removed from the tray
assembly. The inner slides are left attached to the
tray assembly.
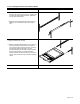
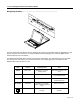
4. Adjust the rear slide mounting brackets to the proper
depth. The rear slide mounting brackets are pre-
assembled, but may need to be adjusted to the
proper distance measured in step 2. There is
multiple screw holes in the rear slide mounting
brackets and slide rails. You can use any of these
holes. Do not tighten screws until after you install the
slides in the rack, as you may need to make small
adjustments.
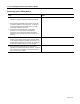
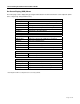
5. Insert nut clips into the rack mounting rails as
required. If your rack has square or round untapped
holes, you will need to use 10-32 nut clips.
Lift Up
Push Down
Page 4 of 14