
17 inch LCD/Keyboard Rack Kit Installation Guide


17 inch LCD/Keyboard Rack Kit Installation Guide
Step Detail
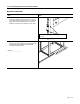
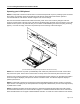
6. Attach the left slide rail assembly to the rack
mounting rail by using (6) #10-32 x ½” screws for the
front and rear slide mounting brackets. Repeat for
the right slide rail assembly.
7. Tighten the screws that attach the rear slide mount
bracket to the outer slide member. (From step 4)
(4X)
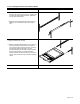
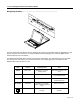
8. Extend the slides from the rack.
9. Install the LCD/keyboard assembly into the rack. Lift
the tray assembly and approach the rack with the
rear of the tray facing the rack enclosure. Align the
tray assembly with the slide rails in the rack.
Carefully assemble the two slide members together.
Push the tray assembly in until the slides latch
together. Release the lock mechanisms as shown in
step 3 in order to slide the tray assembly completely
closed.
Page 5 of 14