Battery-Powered Mower w/Optional Attachments Safety & Operating Instructions Model: CE 6.2 READ AND UNDERSTAND THIS MANUAL AND ALL INSTRUCTIONS BEFORE OPERATING THIS MOWER.
Thank You! Congratulations on your purchase of the NEUTON® Battery-Powered Mower CE 6.2 – the Smart Mower for Small Lawns. The design of the NEUTON Mower CE 6.2 uses state-of-the-art Battery technology to make mowing your lawn as easy and enjoyable as possible. If you have not already ordered it, be sure to try the CE 6.2’s Trimmer Attachment, too. This option makes the CE 6.2 the only mower that can also trim and edge your lawn – saving you steps, plus a whole garage full of separately powered equipment.
Table of Contents Chapter 1: Introducing the NEUTON Mower CE 6.2...................................................................................... 1 About this Manual ............................................................................................................................................................ 1 Conventions used in this Manual................................................................................................................................
Chapter 8: Troubleshooting Tips .................................................................................................................41 Troubleshooting Table .................................................................................................................................................41 Chapter 9: Optional MA 3.6 Trimmer and MA 5.6 Striper Roller ...............................................................43 Safety and Information Labels .....................................
Chapter 1: Introducing the NEUTON Mower CE 6.2 Congratulations on purchasing your new NEUTON Mower CE 6.2. The advanced technology built into your NEUTON Mower makes lawn care easy and enjoyable, year after year. As you get to know your NEUTON Mower, you will discover that it is strong, light, easy to maintain, and whisper quiet. It is clean, too, because it runs on a Battery. You will breathe easy and keep your lawn beautiful the smart, fun way – with your NEUTON Mower.
Conventions used in this Manual THIS INDICATES A HAZARDOUS SITUATION, WHICH, IF NOT AVOIDED, COULD RESULT IN DEATH OR SERIOUS INJURY. THIS INDICATES A HAZARDOUS SITUATION, WHICH, IF NOT AVOIDED, COULD RESULT IN MINOR OR MODERATE INJURY. THIS INFORMATION IS IMPORTANT IN THE PROPER USE OF YOUR MOWER. FAILURE TO FOLLOW THIS INSTRUCTION COULD RESULT IN DAMAGE TO YOUR MACHINE OR PROPERTY. TIP This is a helpful hint to guide you in getting the most out of your NEUTON Mower.
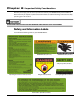
Chapter 2: Important Safety Considerations We want you to enjoy years of safe and productive use from your NEUTON Battery-Powered Mower. We do not want you injured, so please take a few moments to read the following instructions for safely operating your new machine. PLEASE READ THESE INSTRUCTION AND WARNING LABELS BEFORE USING YOUR MOWER. Safety and Information Labels You will find the following labels on your NEUTON Mower.
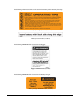
The following Information labels are located on the Battery and the Battery slot edge. Battery Operating Tips Label (237441) Battery Insertion Label (196021) The following WARNING label is located on the Bagger. Bagger WARNING Label (237451) The following WARNING label is located on the Battery Charger. Battery Charger WARNING Label (237521) 4 1-866-NEUTON1 (638-8661) www.neutonpower.
Protecting Yourself and Those around You Tragic accidents can occur if the operator is not alert to the presence of children. Children are often attracted to the Mower and the activity of mowing or trimming. Never assume that children will remain where you last saw them. • THIS CUTTING MACHINE IS CAPABLE OF AMPUTATING HANDS AND FEET, AND THROWING OBJECTS. FAILURE TO OBSERVE THE FOLLOWING SAFETY INSTRUCTIONS COULD RESULT IN SERIOUS INJURY OR DEATH.
Preparing to Use Your Mower or Trimmer • READ, UNDERSTAND, AND FOLLOW ALL INSTRUCTIONS ON THE MACHINE AND IN THE MANUAL. BE THOROUGHLY FAMILIAR WITH THE CONTROLS AND THE PROPER USE OF THE MOWER AND TRIMMER BEFORE STARTING. • NEVER OPERATE THE NEUTON MOWER OR TRIMMER WITHOUT THE PROPER GUARDS, SAFETY SWITCHES, OR OTHER SAFETY AND PROTECTIVE DEVICES IN PLACE AND PROPERLY CONNECTED.
Operating Your Mower or Trimmer Safely Your Mower can operate as a Discharging, Mulching, or Bagger Mower. Learn how to use the Side Discharge Chute, Mulching Plug, and Rear Bagger as appropriate. • • • • • • • • • • • • • • • • • • • ALWAYS STOP THE MOTOR, WAIT FOR THE BLADE OR CORD TO STOP MOVING, AND REMOVE THE SAFETY KEY WHENEVER YOU LEAVE THE OPERATING POSITION (BEHIND THE HANDLEBAR) FOR ANY REASON.
Handling the Battery Safely • NEVER CHARGE THE LAWN MOWER BATTERY IN THE RAIN OR IN WET CONDITIONS. • USE ONLY THE CHARGER PROVIDED TO CHARGE THE BATTERY. USE OF A DIFFERENT CHARGER MAY CAUSE A FIRE OR EXPLOSION. • EXERCISE CARE IN HANDLING THE BATTERY IN ORDER NOT TO SHORT-CIRCUIT IT WITH CONDUCTING MATERIALS SUCH AS RINGS, BRACELETS, AND KEYS. WHEN SHORT-CIRCUITED, THE BATTERY OR CONDUCTOR MAY OVERHEAT AND CAUSE BURNS. • NEVER ATTEMPT TO REPLACE THE INDIVIDUAL BATTERY CELLS INSIDE THE BATTERY.
Chapter 3: Setting Up Your NEUTON Mower This chapter outlines a few simple steps needed to set up your new Mower. Before beginning assembly, it may be helpful to familiarize yourself with the controls and features on your Mower by reviewing the photograph of the Mower on page 17 (Figure 15) and reading about the Mower’s controls and features. Please check that you have all of the components listed below. If anything is missing, please visit our website at www.neutonpower.com or call Neuton, Inc.
Mulching Plug NEUTON CE 6.2 Mower Bagger Side Discharge Chute (shown w/ Handle mounted) Battery Safety Key Battery Charger Figure 1 10 36mm Wrench & 3/4” Wrench 1-866-NEUTON1 (638-8661) www.neutonpower.
Assembling Your NEUTON Mower To allow you to quickly begin using your NEUTON Mower, it shipped to you partially assembled. The assembly process is easy and does not require any special tools, knowledge, or strength.
Step 2: Adjust the Handlebar Height TIP To keep the Mower from moving while you adjust the Handlebar, place your foot behind one of the wheels. 1. Push down on the Handlebar Adjust Lever (Figure 2) and fold the Handlebar up to a comfortable position for you, and then release the Lever. You can choose any of four (4) positions. Handlebar Adjust Lever Figure 2 Step 3: Remove the Battery You can quickly and easily remove the Battery from your Mower. 1.
Step 5: Attach the Side Discharge Chute, Mulching Plug, or Rear Bagger Side Discharge Chute The Side Discharge Chute (Figure 5) allows for proper discharge of the grass, which prevents clogging. The Chute is shipped without the Handle so you will have to install the Handle prior to use using a small Phillips Screwdriver. The Handle and Screw are located in the Product Pack bag that shipped with the Mower. 1. Raise the hinged Discharge Guard on the back of the Mower (Figure 5). 2.
Rear Bagger The NEUTON Rear Bagger lets you cut and catch your grass clippings, eliminating the need to rake. The Rear Bagger easily attaches to the rear of the Mower (Figure 7). The Bagger is shipped unassembled. The following instructions outline the steps necessary to assemble, install, and remove the Bagger. Rear Bagger Figure 7 Assembling the Bag to the Bag Frame 1. With the Bottom Stiffener Board facing down, insert the Frame into the Bag (Figure 8). 2.
Installing the Bagger Discharge Guard 1. Raise the Discharge Guard on your Mower (Figure 10) and note the metal Support Rod at the rear of the Mower. Support Rod 2. Grasp the Bagger by the Top Handle (Figure 11) and center it at the back of the Mower. 3. Align the Metal Latch Hooks (Figure 11) over the Support Rod (Figure 12) and lower the Bagger in place until the Wire Frame at the bottom of the Bagger rests on the Mower. 4. Lower the Discharge Guard.
Step 6: Insert the Battery after Being Fully Charged 1. Orient the Battery as shown in Figure 14a. Align the black side of the Battery with the side of the Mower housing where the label reads “Insert Battery with the black side along this edge.” NOTE: The indentations on the bottom of the Battery must line up with the metal tabs in the bottom the Battery compartment. 2. After confirming the correct orientation of the Battery, insert the Battery fully into the Battery compartment. 3.
Your Fully Assembled NEUTON Mower Start Knob Power/Mode Switch Control Bar Voltage Gauge Handlebar Adjust Lever (1 each side) Status Indicator Light Cover Release Button Battery (under cover) Access Cover Tools (under cover) Cutting Height Lever (under Cover) Trimmer Port (Optional Trimmer) Safety Key Slot (under Cover) Figure 15 NEUTON CE 6.
Controls and Features Make certain that you are familiar with the Controls, Parts, and operation of your NEUTON CE 6.2 Mower before using it. ⇒ Analog Voltage Gauge The Analog Voltage Gauge indicates the amount of Battery life remaining. The yellow area indicates acceptable voltage whereas the red area indicates low voltage. You should raise the cutting height or mow slower if the gauge momentarily drops into the red area. Recharge the Battery if the gauge stays in the red area.
⇒ Status Indicator Light Status Indicator Light The green Status Indicator Light on the Lower Crossbar (Figure 16) lights up when you install a charged Battery and insert the Safety Key. NOTE: A green Status Indicator Light does not guarantee that the Battery is fully charged, only that it has some charge, the Safety Key has been inserted, the electrical system is ready, and that the Mower can be started.
⇒ Analog Voltage Gauge The Analog Voltage Gauge (Figure 19) indicates the amount of Battery life remaining. The yellow area indicates acceptable voltage whereas the red area indicates low voltage. You should raise the Cutting Height or mow slower if the gauge momentarily drops into the red area. Recharge the Battery if the gauge stays in the red area. Analog Voltage Gauge Figure 19 20 1-866-NEUTON1 (638-8661) www.neutonpower.
Neuton CE 6.2 Product Specifications Motor RPM Tip Speed AMP Idle AMP Cutting Size Noise 3800 18,000 ft./min. 5–6 10 – 12 750W, 36V DC/50 Amp Under 80 Decibels Controls Start/Stop Shape Key Electric System Safety Control Bar Ergonomically Designed Removable Safety Key w/Circuit Breaker Electro-mechanical Relay Housing Material Handlebar Height Adjustment (at lowest housing height setting) Wheels, Front Wheels, Rear Weight Housing Length Housing Width Housing Height Injected Polypropylene 34.8" – 40.
22 1-866-NEUTON1 (638-8661) www.neutonpower.
Chapter 4: Operating Your NEUTON Mower This chapter explains how to Start, Stop, and adjust the Cutting Height of your Mower. NOTE: If the Mower Battery is not fully charged or if you are unpacking a new Mower for the first time, read “Chapter 5: Charging and Caring for the Battery” before operating the Mower. You should charge the Battery for eight (8) to twenty-four (24) hours before use.
Adjusting the Cutting Height Using the Cutting Height Lever located under the Access Cover (Figure 20), adjust the Cutting Height so that you cut off only one (1) to two (2) inches of grass at a time. 1. Open the Access Cover and remove the Safety Key. 2. Make sure all four (4) Wheels are level. Access Cover Cutting Height Lever 3. Push the Lever out of its present notched position and move the Lever up or down to the desired level.
Starting the Motor and Engaging the Blade • STARTING, STOPPING, AND RESTARTING AN ELECTRIC MOTOR REPEATEDLY WITHIN A FEW SECONDS CAN GENERATE A GREAT DEAL OF HEAT AND DAMAGE THE MOTOR. TO PROTECT THE LIFE OF YOUR NEUTON MOWER, ALWAYS WAIT AT LEAST FIVE (5) SECONDS AFTER STOPPING BEFORE RESTARTING THE MOWER. • THE CUTTING BLADE ALWAYS TURNS WHEN THE MOTOR IS RUNNING; THERE IS NO CLUTCH TO ALLOW THE BLADE TO STOP ROTATING WHILE THE MOTOR IS RUNNING. 1. Perform the Pre-Start Checks listed previously.
Stopping the Motor and Blade Simply releasing the orange Control Bar stops the Motor and Blade. THE BLADE CONTINUES TO ROTATE FOR A FEW SECONDS AFTER YOU SHUT OFF THE MOTOR. When Finished Mowing • Remove the Safety Key when the Mower is unattended. • Remember to recharge the Battery after each use; no matter how short a time you used it. See “Charging the Battery” on page 28 for details.
Chapter 5: Charging and Caring for the Battery BEFORE CHARGING THE BATTERY, READ ALL INSTRUCTIONS AND CAUTIONARY MARKINGS IN THIS MANUAL AND ON YOUR MOWER. DO NOT OPERATE YOUR MOWER UNTIL YOU HAVE READ AND UNDERSTAND ALL INSTRUCTIONS AND THE BATTERY IS FULLY CHARGED. The Battery The NEUTON Mower comes with a sealed, lead acid Battery already installed at the factory. The Battery is 36 volts and rated at 10 amp-hours. The Battery should not leak, regardless of the position in which it is stored.
Charging the Battery You must charge the Battery before using your Mower for the first time and after every use. You can charge the Battery in or out of the Mower. The performance of your Mower is the same, regardless of which charging method you choose. WHILE THE BATTERY IN YOUR MOWER WAS CHARGED AT THE FACTORY, YOU MUST RECHARGE IT FULLY (EIGHT (8) TO TWENTY-FOUR (24) HOURS) BEFORE USING YOUR MOWER. OTHERWISE, YOU MAY DECREASE THE CHARGING CAPACITY OF THE BATTERY.
Charging with the Battery out of the Mower 1. Remove the Battery from the Mower. 2. Remove the Protective Plug from the Charger Receptacle on the Battery and plug in the round Charger Connector (Figure 25). Protective Plug 3. Plug the Charger into a standard 110V wall outlet. The RED light on the Battery will light up indicating a connection between the Battery and the Charger.
Recharging to Full Charge for Off-Season Storage IF A DEPLETED BATTERY IS STORED, THE CHARGING CAPACITY OF THE BATTERY MIGHT DECREASE. When storing the Battery for periods up to six (6) months, Neuton, Inc. recommends that you leave the Battery on the Charger. It is important that the Battery be stored in a dry location and that the temperature remains between -4ºF (-20ºC) and +104ºF (+40ºC). For Off-Season storage of the Battery, it is important that the Battery is fully charged.
Caring for the Battery You can lengthen the life of your Battery by following some simple guidelines. • Always charge the Battery inside in a garage or other covered area where it will be dry and protected from the weather. • Only charge the Battery when the temperature is at least 32ºF (0ºC) – above freezing – but not more than 104ºF (40ºC). Charging in lower or higher temperatures can be harmful to the Battery.
32 1-866-NEUTON1 (638-8661) www.neutonpower.
Chapter 6: Optional Attachments You can purchase Optional Attachments for your NEUTON Mower. To order any of these Optional Attachments, please visit our website at www.neutonpower.com or call Neuton, Inc. Toll Free 1-866NEUTON1 (638-8661). Your NEUTON Mower shipped with the Side Discharge Chute, allowing you to discharge grass clippings as the standard mowing mode, a rear Bagger which allows you collect grass clippings, and a Mulching Plug that allows you to mulch clippings.
Blade Sharpener The NEUTON Blade Sharpener (Figure 28) is a very useful hand-held sharpener. 1. Remove the Blade and secure it in a vise. 2. Position the carbide insert of the Sharpener, which has a “-“ sign, against the edge to be sharpened. 3. Press down firmly and pull the Sharpener from the inside edge toward you. Usually three (3) or four (4) strokes are sufficient. Repeat for the opposite end of the Blade.
Chapter 7: Servicing and Storing Your NEUTON Mower This chapter explains how to clean your Mower; change, sharpen, and balance the Blade; and store your Mower for long term. Servicing Your Mower • NEVER MAKE ADJUSTMENTS OR REPAIRS WITH THE MOTOR RUNNING. ALWAYS STOP THE MOTOR, WAIT FOR THE BLADE TO STOP MOVING, REMOVE THE SAFETY KEY AND REMOVE THE BATTERY TO PREVENT ACCIDENTAL STARTING. • NEVER TAMPER WITH SAFETY DEVICES. CHECK THEIR PROPER OPERATION REGULARLY.
Cleaning Your Mower Periodically clean your Mower to ensure peak performance. BEFORE PERFORMING THE FOLLOWING CLEANING PROCEDURES, REMOVE THE SAFETY KEY AND BATTERY TO PREVENT ACCIDENTAL STARTING. Supplies Needed: • Clean, damp cloth or sponge • Mild soap or detergent (if needed) • Soft nylon brush (if needed) 1. Using a damp cloth or sponge with a mild soap or detergent, clean the Mower.
• USE ONLY LUBRICANTS THAT ARE COMPATIBLE WITH ELECTRICAL COMPONENTS SUCH AS WD-40®. • NEVER USE SILICONE OR GRAPHITE BASED LUBRICANTS. 1. Spray a small amount of WD-40® or similar lubricant on a paper towel or clean cloth. 2. Clean both sides all along the top and sides of the orange Control Bar (Figure 15 on page 17). 3. Slide the Start Knob (Figure 22 on page 25) to the left and squeeze the orange Control Bar up into the top of the Handlebar as if you were starting the Mower (Figure 23 on page 25). 4.
36mm Wrench 1. Remove the Safety Key and the Battery. If you are charging the Battery in the Mower, first disconnect the Charger from the electrical (wall) outlet. 2. While holding the Handlebar (as if you were mowing) turn the Mower over on its right side to expose the Blade. 3. Place the 36mm Wrench over the Steel Hex Adapter (the large metal piece that holds the Blade in position) and place a 3/4" Socket or Wrench over the Blade Nut (Figure 29). 3/4" Wrench Figure 29 4.
Balancing the Blade An out-of-balance Blade causes your machine to vibrate excessively. Excessive vibration may cause damage to the Mower, especially the Motor. Because you are removing metal from the Blade, make sure to remove an equal amount from each end to keep the Blade balanced. The best way to balance a Blade is with a Blade Balancer (available at most local Hardware stores); or with a large Screwdriver, Nail, or Bolt.
Storing Your NEUTON Mower ALWAYS STOP THE MOTOR, WAIT FOR THE BLADE TO STOP MOVING, REMOVE THE SAFETY KEY AND REMOVE THE BATTERY TO PREVENT ACCIDENTAL STARTING DURING STORAGE. Whether you store the Mower for a short or long period, always remember these important guidelines: • Always store the Mower with a full Battery charge and follow the recharging instructions in “Chapter 5: Charging and Caring for the Battery”.
Chapter 8: Troubleshooting Tips Most difficulties are easy to fix. Consult the Troubleshooting Table for common problems and their solutions. If you continue to experience problems or need repairs beyond these minor adjustments, visit our website at www.neutonpower.com or call Neuton, Inc. Toll Free at: 1-866-NEUTON1 (638-8661) for assistance. ALWAYS REMOVE THE SAFETY KEY AND BATTERY BEFORE PERFORMING ANY ADJUSTMENTS, MAINTENANCE, OR REPAIRS TO YOUR MOWER.
ALWAYS REMOVE THE SAFETY KEY AND BATTERY BEFORE PERFORMING ANY ADJUSTMENTS, MAINTENANCE, OR REPAIRS TO YOUR MOWER. PROBLEM The Mower runs, but the cutting performance is unsatisfactory, or there is a loss of power. The Mower is hard to push. The Battery loses its charge quickly. The Mower rear Bagger is collecting grass poorly. 42 CORRECTIVE ACTION ⇒ The Battery was probably not at full charge prior to Mowing. Charge the Battery, if necessary. ⇒ The Blade may be dull, bent, loose or damaged.
Chapter 9: Optional MA 3.6 Trimmer and MA 5.6 Striper Roller This chapter explains the safe operation, use, and maintenance of the MA 3.6 Trimmer and MA 5.6 Striper Roller. Please read this entire chapter before attaching and using the Trimmer and Striper Roller. Safety and Information Labels You will find the following labels on the Trimmer Warning and Safety Instructions label (237541) Operating Instructions label (237461) Danger label (224581) Head Adjustment label (237481) NEUTON CE 6.
Operating Your Trimmer Safely Before operating your Trimmer, please review “Chapter 2: Important Safety Considerations”. Trimming on Slopes Safely Slopes are a major factor related to slip-and-fall accidents, which can result in severe injury. All slopes require caution. If you feel uneasy on a slope, do not trim or edge it. Always: Use caution on slopes. Whenever possible, trim or edge across the face of slopes, not up and down. Exercise caution when changing direction on slopes.
Attaching, Removing and Using the Trimmer Attaching and removing the Trimmer is quick and easy. ALWAYS REMOVE THE SAFETY KEY BEFORE ATTACHING, REMOVING, OR ADJUSTING THE TRIMMER. Attaching the Trimmer 1. Adjust the Mower Cutting Height Lever to position 4; this sets the Cutting Height to the highest level. 2. Insert the Trimmer post into the Trimmer Port in the front of the Mower (Figure 33). The Post will snap into place when fully inserted.
Adjusting the Trimmer Head Before adjusting the Trimmer, you must first decide to Edge or Trim your lawn. To set the Trimmer Head for edging or trimming, push in the Trimmer Head Adjustment Button on top of the Trimmer and rotate the Trimmer Head to the Trim or Edge position (Figure 35 or 36) until the Head snaps into position. Trimmer Head Adjustment Button Trim Position Figure 35 Trimmer Head Adjustment Button Edge Position Figure 36 46 1-866-NEUTON1 (638-8661) www.neutonpower.
Starting the Trimmer The Battery in the NEUTON Mower powers the Trimmer, making the cutting cord spin. Make sure the Battery has a full charge before you begin. • STARTING, STOPPING, AND RESTARTING AN ELECTRIC MOTOR REPEATEDLY WITHIN A FEW SECONDS CAN GENERATE A GREAT DEAL OF HEAT AND DAMAGE THE MOTOR. TO PROTECT THE LIFE OF YOUR NEUTON TRIMMER, ALWAYS WAIT AT LEAST FIVE (5) SECONDS AFTER STOPPING BEFORE RESTARTING THE TRIMMER.
Advancing the Cord Each time the Trimmer starts or comes to a complete stop, the Trimmer’s Cutting Cord automatically advances and cuts itself to 5-1/2" resulting in an eleven (11) inch cutting swath. You can also manually advance the Cord. 1. Release the orange Control Bar to stop the Trimmer motor and remove the Safety Key. 2. Push in the white Button on the side of the Spool Housing (Figure 37) and pull the Cord to advance it.
Maintaining and Storing the NEUTON Trimmer This section explains how to clean and store the Trimmer, replace the Spool, and change the Spool Housing. ALWAYS REMOVE THE SAFETY KEY BEFORE REMOVING THE TRIMMER FROM THE MOWER, PERFORMING ANY ADJUSTMENTS, MAINTENANCE, SPOOL CHANGES, OR REPAIRS TO THE TRIMMER. ALLOW THE TRIMMER TO COOL AT LEAST FIVE (5) MINUTES BEFORE SERVICING OR STORING. Replacing the Spool Replace the Spool when the Cord runs out. 1.
Cleaning the Trimmer Periodically clean the Trimmer to ensure peak performance. Supplies Needed: • • • Clean, damp cloth or sponge Mild soap or detergent (if needed) Soft nylon brush (if needed) 1. Remove the Safety Key and remove the Trimmer from the Mower. 2. Using a damp cloth or sponge with a mild soap or detergent, clean the Trimmer. Never use water, gasoline, solvents, or other petroleum-based or solvent-based products when cleaning – remember that this is an electric Trimmer. 3.
Tool and Supplies Needed: • Bag of fine sand • Funnel • Hammer (optional) 1. Install one (1) of the two (2) End Caps (found in a plastic bag stapled around a Hook Arm) in one end of the Roller (Figure 43). TIP The End Cap fits snugly so you may have to gently tap it in with a Hammer. 2. Stand the Roller on the end with the End Cap installed and fill the Roller through the opposite hole in the Roller with fine sand using a Funnel and then install the second End Cap. 3.
Figure 45 52 1-866-NEUTON1 (638-8661) www.neutonpower.
Chapter 10: Parts Lists, Schematic Diagrams, and Warranty Parts List - NEUTON CE 6.2 Mower NOTE: Part numbers listed are available through Neuton, Inc.
Item # Description Qty Part # Item # Description Qty Part # 36 Contact, Electrical, CU Connector 2 176101 53 Spring, Extension 1 240971 37 Nut 2 240941 54 Nut, Connector 4 176411 38 Screw 1 240141 55 Axle, Rear 1 238721 39 Washer 1 196701 56 Plate, Rear Axle, Metal (Right) 1 238781 40 Label, Serial Number 1 57 Plate, Front Axle, Metal 4 238691 41 Deck, Lower, Mower 1 238571 48,58 Right Rear Wheel 67-69 Replacement Kit 1 250071 42 Plate, Mounting, Motor 1
Item # Description Qty Part # Axle, Front 1 238681 82 Bar, Control, Orange 1 66-70 Left Front Wheel Replacement Kit 1 250091 83 Spring, Control Bar 2 66 Wheel Assembly, Front, Left 1 238641 84 Screw, 4mm x 6mm 1 67 Bearing, POM 2 243711 85 Spring, Extension, Start Knob 1 68 Washer, Flat 2 176321 86 Screw, 4mm x 16mm 2 69 Nut, Axle 1 176331 87 Internal Control Bar Fixed Piece 1 70 Cap, Wheel, Front 1 238651 88 Housing, Upper Handlebar, Bottom 1 71-90 Upper Ha
Item # Description Qty Part # Item # Description Qty Part # 101 Washer, Lock w/Cap 2 120 Mesh, Bagger 1 240071 102 Guide, Cable 1 121 Flap, Rear 1 239601 103 Nut, Connector, Small 2 122 Bar, Rear Flap 1 238611 104 Nut, Connector, Big 2 123 Plug, Mulching 1 238811 105 Button, Height Adjustment of Handlebar Right 1 124 – Chute, Discharge 126 1 238821 106 Spring, Height Adjustment Button Right 1 124 Handlebar, Chute 1 238841 107 Label, WARNING, Pinch Point 2 12
Schematic Diagrams - NEUTON CE 6.2 Mower 080111 NEUTON CE 6.
080111 071101 58 1-866-NEUTON1 (638-8661) www.neutonowners.
Parts List - Optional MA 3.6 Trimmer NOTE: Part numbers listed are available through Neuton, Inc. Item # Description Qty Part # 1 MA 3.6 Trimmer w/o Cutter Head 1 240101 2-4 Cutter Head Assembly 1 177051 2 Housing, Cartridge 1 195891 3 Spool w/Cord 1 177221 4 Cover, Spool Housing, Green 1 195911 Schematic Diagram - Optional MA 3.6 Trimmer NEUTON CE 6.
Notes: 60 1-866-NEUTON1 (638-8661) www.neutonpower.
2-Year Limited Warranty Terms and Conditions The NEUTON® CE 6.2 Battery-Powered Mower is warranted for two (2) years, one (1) year for the NEUTON® Attachments and Accessories, against defects in materials or workmanship when put to personal residential household use. For the purposes of the warranty, “personal residential household use” refers to non-commercial residential use and further excludes misuse, accidents, or damage due to inadequate maintenance. Neuton, Inc. certifies that the NEUTON® CE 6.
Daily Checklist for your NEUTON Mower To help maintain your NEUTON Mower for optimum performance, we recommend you follow this checklist each time you use your machine. [ ] BATTERY: Make sure the Battery has a full charge. [ ] CLEAN: Before inserting the Safety Key, inspect the Mower Blade and clean it to remove any debris (such as grass or twigs) that might be clinging to the Blade from its last use.