
Instruction Manual

B
A
C
D
E
18
[0.7”
]
3
[0.12”
]
F
H
G
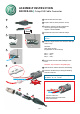
ASSEMBLY INSTRUCTION
NC3FXX-HA Crimp XLR Cable Connector
|
Page 1
Snap
A
B
C
E
F
D
G
H
Slide the boot onto the cable.
Position a contact in the die and hold the
contact by pressing the tool slightly
together - DO NOT CRIMP!
Position the wire in the contact & crimp it.
Push the crimped contacts into the insert until you
notice a snap.
Attention:
Align lug to the top!
Pay attention to correct wiring!
PIN1…Screen
PIN2…Hot,+
PIN3…Cold,-
Put the chuck onto the cable and align it with
insert.
Slide the insert and the chuck into the housing.
Finish the installation by screwing the bushing
onto the connector.
1. Turn the contact 90°
2. Pull the contact out of the insert
3. Insert new Contact
Standard crimp according IEC 60352-2 (B crimp). Wire
sizeAWG22-24,0.22-0.34mm.
2
EXTRACTION OF CONTACT
Prepare cable as shown (twist the screen).
Repeat steps C, D, E for the remaining two
contacts.
Attention: Pay attention to the guiding key.
1.
2.