NVR-7401-32HD-B TV DLED 32" (81.
Mando a distancia Mando a distancia 10 10 11 12 13 Menu del sistema de bloqueo Modo hotel 13 14 15 17 18 1
2
(soportes de montaje no incluidos)
Carcasa de adaptación
8
9
10
11
12
13
14
15
16
AYUDA 17
18
NVR-7401-32HD-N TV DLED 32" (81.
2 3 4 5 5 Controle remoto 6 8 8 10 11 13 15 Hotel mode 15 19 21 1
( Suporte fixado na parede é parte opcional) 2
3
4
5
6
7
HDMI 8
9
10
11
12
13
14
15
16
17
18
19
20
21
NVR-7401-32HD-N TV DLED 32" (81.
Table Of Contents Preparations Guide Safety Information.................................................................................................................2 Important Safety Precautions.................................................................................................3 Installed And Connected TV TV Bracket assemble.............................................................................................................4 TV Buttons And Terminal Interface........................
Safety Information High voltages are used in the operation of this product.to reduce the risk of electric shock,do not remove cover of the cabinet, refer servicing to qualified service personal If the TV any changes or coarse adjustment, electric shocks to be hurt, do not attempt to open a machine-maintenance, customer contact centres needed overhaul.
Important Safety Precautions 1. Read these instructions. 2. Keep these instructions. 3. Heed all warnings. 4. Follow all instructions. 5. Do not use this apparatus near water. 6. Clean only with dry cloth. 7. Do not block any ventilation openings. Install in accordance with the manufacturer’s instructions. 8. Do not install near any heat sources such as radiators, heat registers, stoves, or other apparatus (including amplifiers) that produce heat. 9.
TV Bracket assemble (Bracket items not provided) Fix the TV on the wall 1.First,put the TV on the table smoothly and put some soft cloth on the table to avoid scratching the screen. 2.User the screw driver to take off the screws which are fixed on the bottom stand (the direction of the arrow, refer to the ptoto1).And take off the bottom stand(please take off the screws and bottom stand carefully). 3.Make one bracket which can fix on the wall according to the size of arrow direction of photo2 and photo3. 4.
TV Buttons And Terminal Interface TV Buttons Note: The following is only functional schematic, And the actual position and arrangement of different models may be different. :Turn ON/OFF Power. SOURCE:External Signal Input Selection. MENU:Display Main MENU And Confirm MENU Item Selection. CH+/-:Selecting Channel. VOL+/-:Adjusting Volume. Terminal Interface Note: The following are the various terminal interface, the actual position and arrangement, the number of different models may be different.
External device connection diagram DVD Set-top boxes HDMI HDMI HDMI input connection INPUT INPUT VIDEO R Y L AV input connection Pb INPUT Pr VIDEO R L AV input connection USB connection AV input connection Set-top boxes SCART connection OUTPUT VIDEO R L AV output connection TV connection 6
Install And Connect TV Set your TV To put your TV in a firm place which can bear the weight of the TV. To avoid danger, please don’t expose the TV near water or heating place (such as light, candle, heating machine),do not block the ventilation at the back of TV. Connect antenna and power 1.Connect the antenna cable to the antenna socket on the back of the TV. 2.To plug the power cord of TV (AC 100240V~ 50/60Hz). 3 Turn on TV 3.Press the power button of the TV the indication light will turn to green.
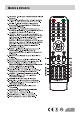
Remote Controller DTV/ATV: Switch between Analog and Digital TV DTV/ATV P.MODE SLEEP S.MODE MENU SOURCE MTS ENTER DISPLAY EXIT MTS ENTER: RECLIST REC FAV/LIST FREEZE GUIDE ASPECT CANCEL SUB.
Remote Controller TV/RADIO When watching channel,allows you to switch between TV and Radio modes GUIDE:1. Launches the EPG (Electronic Program Guide) 2. Fast reverse in PVR or Media Player mode. TIME SHIFT: 1.DTV channel time shift Function. 2.play on PVR or Media Player mode. 1. DTV/ATV P.MODE SLEEP S.MODE MENU 2. Previous chapter in PVR or Media Player mode 1. 2.Exit the playing function in PVR or Media Player mode. SOURCE ENTER EXIT DISPLAY MTS RECLIST REC FAV/LIST FREEZE 32 33 1. 2.
TV Menu Input Source 1. Press ▼ / ▲ button to select the option that you want to adjust in the PICTURE menu. 2. Press Enter/ button to adjust. 3. After finishing your adjustment, Press MENU button to save and return back to the previous menu. Picture MODE Press ▼ / ▲ button to select Picture Mode, then press to select. button TIPS: You can press PMODE button to change the Picture Mode directly. Brightness/Contrast/ Sharpness/Saturation/Hue Press button to select option, then press to adjust.
TV Menu Channel Menu SOUND MENU Press MENU button to display the main menu. Press button select SOUND in the main menu,then press ENTER / ▼ to enter. Press MENU button to display the main menu. Press button to select CHANNEL in the main menu,then p ress ENTER / ▼ to enter. Sound 1. Press ▼ / ▲ button to select the option that you want to select in the CHANNEL menu. 2. Press Enterbutton to enter sub-menu. 3. Press MENU button to return back to the previous menu.
TV Menu Digital Manual Scan Press ▼ / ▲ button to select Digital Manual Scan, then press Enter / button to enter sub-menu. Analog Manual Scan Press ▼ / ▲ button to select Analog Manual Scan, then press Enter / button to enter sub-menu. Channel Edit Press ▼ / ▲ button to select Channel Edit, then press Enter / button to enter sub-menu. The three colored key is the shortcut key for programming the channel.
TV Menu HOTEL MODE LOCK SYSTEM MENU Press MENU button to display the main menu. Press button select Lock System in the main menu,then press ENTER / ▼ to enter. Active Hotel Mode Set hotel mode On or Off. Note: The following settings work only when Active Hotel Mode is set to be ON. Max Vol. Set the max volume that you can adjust. Default Vol. Set the default volume for every time you open the TV, the default volumeis 20. Source Lock To lock the input sources that you want.
TV Menu PVR Settings Press ▼ / ▲ button to select PVR Settings, then press Enter button to enter sub-menu.It will check the USB . Press ◄ / ► button to select File Manager,then press Enter button to enter sub-menu. 1. Press ▼ / ▲ button to select the option that you want to adjust in the SETUP menu. 2. Press Enter/ button to adjust. 3. After finishing your adjustment, Press MENU button to save and return back to the previous menu.
TV Menu Auto Download Press ▼ / ▲ button to select Auto Download, then press◄ / ► button to select On or Off. Manual OAD Download Press ▼ / ▲ button to select Manual OAD Download, then press Enter button to enter sub-menu. USB Menu USB OPERATION Note: Before operating USB menu,Plug in USB device, then press INPUT button to set the Input Source to USB . Press button to select USB in the Source menu, then press Enter button to enter.
USB Menu Press to play or pause. Press to play the previous song. Press to play the next song. Press to play backward. Press to play faster. Press to stop. Press CH+/- to switch operation focus between File List and Player. Movie Press ◄ / ► button to select MOVIE in the main menu, then press Enter button to enter. Press ▼ / ▲ button to select drive disk you want to watch, then press Enter button to enter. Press ▼ / ▲ button to select return option to back to the previous menu. Press to play or pause.
Machine Technical Specifications Screen Size TV System 16” PAL/SECAM ATV:99 DTV:1200 5W+5W 19” PAL/SECAM ATV:99 DTV:1200 5W+5W 22” PAL/SECAM ATV:99 DTV:1200 5W+5W 24” PAL/SECAM ATV:99 DTV:1200 5W+5W Preset Channel s Speaker Output 32” PAL/SECAM ATV:99 DTV:1200 10W+10W 39”/40” PAL/SECAM ATV:99 DTV:1200 10W+10W 42” PAL/SECAM ATV:99 DTV:1200 10W+10W 46” PAL/SECAM ATV:99 DTV:1200 10W+10W 50” PAL/SECAM ATV:99 DTV:1200 10W+10W Screen Size po wer Con sump tion (LE
EN55013: 2001 +A1: 2003 +A2: 2006 TV DLED 32" (81.