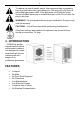
6 Stage AIR PURIFIER CH3000 INSTRUCTION MANUAL CAUTION: Read manual carefully for proper installation and operation.
CONTENTS Specifications ..................................................................................................... 3 Features ............................................................................................................. 3 Introduction ......................................................................................................... 4 Applications ........................................................................................................ 5 Installation ..
1. SPECIFICATIONS Model: CH3000 Rated Voltage: USA-AC 120V/60Hz, Europe 230V/50Hz Power Consumption: 40W Fan Speed (non-grade): 1500-3000 RPM Air Volume: Max 106 CFM(3 m /min) Ion Output ≥5 x 10 cm3 (or≥2.5 x 10 /cm3) UV Spectrum: ≥20ìw/cm (at 10cm-distance), 1PC Ozone Plates 2PCS, 4 1/2 x 4 1/2 inches (115mm x 115mm) HEPA Rate: up to 99.97% Remote Control Distance ≤10M Sound Level (DV): Low35 Product Size in inches: W 9 in x D 11 in x H 12 in Gross Weight: 14.5 Pounds (6.
To reduce the risk of electric shock, this equipment has a grounding type plug that has a third (grounding) pin. This plug will only fit into a grounding type power outlet. If the plug does not fit into the outlet, contact qualified personnel to install the proper outlet. Do not alter the plug in any way. WARNING! - Do not operate without proper installation. Doing so may void the warranty. CAUTION! – Cut off the power when performing maintenance.
APPLICATIONS • Home, Office, Restaurant, Hotel • Smoking Areas • Production Areas • Basements • Casinos & Large Meeting Halls • Veterinary Hospital • Barns, Kennels & Stables • Photo Labs & Salons • Day Care Centers • Chemical Odors • Bowling Alleys & Parlors INSTALLATION 1. Remove unit from shipping carton. 2. Remove all protective materials. 3. Read Owner’s Manual thoroughly prior to installation. 4. Fully insert cord into the power cord receptacle on the back of the unit. 5.
filters by pulling out the white ribbon on the top. Step 4: Insert the 2 Ozone plates found in the small brown box. For maximum performance, Ozone plates may need to be washed in warm water. Always allow them to properly dry before installing. Step 5: Reinstall all filters in the same order they were removed and reattach back cover. Determine placement location and plug unit into 120-volt outlet.
allow unrestricted airflow. • Be sure power cord is not accessible to small children to prevent injury. CAUTION! During Ozone mode this unit should never be placed where it can blow directly into the face of any person or pet.
SETTINGS AND ADJUSTMENTS Buttons function and Operation Descprition No Name Function and operation instruction Standby mode: Machine turns on when press Power button, air purifier start working;: Air purifier off when press the Power button 1 Power 2 LCD screen Show machine’s work status 3 FAN 5 speed fan to adjust fan speed, note: the coverage area change 200 sq.
Timer off 1. Press button 3 + 5 at the same time, LCD show 0:00 clock 2. Operate No 4 button within 2 seconds to adjust timer, timer increase 0.5Hr each time press this button 3. Timing function finish, enter autoamatic off mode, back to previous working status. Note: press any button to off the timer function when timer off mode start.
No Name 1 Power 2 Sleep mode 3 Fan speed increase 4 Fan speed decrease 5 Decrease OZONE 6 Increase OZONE 7 Timer Off Function and operation instruction Standby mode: Machine turns on when press Power button, air purifier start working;: Air purifier is off when press Power button • Press one time: enter 1200 sq.ft SLEEP mode nd • Press 2 time, enter 1000 sq.
8 9 10 AWAY mode Ozone on/off UV on/off Air purifier works at maximum function on AWAY mode nd Press 1 time: shut off after 0.5H;Press 2 time, shut off after rd th 1hr;Press 3 time, shut off after 2hr;Press 4 time, back to manual mode Press this button to on or off the OZONE Note: PURIFY does not work if OZONE OFF, OZONE can only be used in unoccuped space only.
Fan Blade and Front Grill Cleaning: (Take off front/reinstall grill method.) To remove for cleaning: 1. As detail on the left shows, hold bottom of front grill and pull out. 2. When latch releases from front panel, lift front grill approximately 30 degrees. 3. Pull front grill away from unit in a parallel motion. To reinstall after cleaning: Place top latch of grill in front panel opening. Push bottom latch of grill into bottom slot.
120 volt models: Fusing current no more than 1.0 Amp. CAUTION! If the fuse holder cap is not installed correctly, the unit will not operate. TROUBLESHOOTING GUIDE Indicators of Operation: (Operation of the Ozone & Power Indicator lamp.) • Ozone button to be operated when the room is unoccupied. Open the door and window when you return to the room if Ozone operated for several hours. • Turn the unit on and check that the small red/orange lamp is illuminated.
Troubleshooting – What to look for first: 1. I have plugged in the unit, turned the power switch to "On" and nothing is happening. What's wrong? • Make sure the electrical outlet is capable of providing power to the unit. • Check the back cover located at the back of the unit to make sure it is fully installed and snapped into place. If the back cover is not fully installed, a safety switch will cause the unit to not power on.
5. Unit does not operate: • Is the unit plugged in? • Is the power cord fully inserted into the back of the unit? • Are you sure the outlet is functioning normally? • Is the unit turned on? • Is the back grill installed properly to depress the safety switch forward? 6.