
Installation Guide


110
110
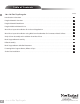
Beam Insert
Main Support Beam Assembly
1
Insert two short steel stiffener into one long steel stiffener to
create full length piece. Repeat so you have two full main support
Insert the end of the main support beam marked ‘A’ into the joiner.
Install the joiners so that the side with the four holes are facing
up. Push
firmly until the extrusion bottoms out inside the joiner.
Please Note:
Be sure to orientate the main support beams correctly so the
pre-drilled holes for future installation of rafter brackets is correct.
Insert one assembled steel stiffener (with steel block facing up),
into the lower pocket of the main support beam past the joiner.
Push until steel block hits the internal ribbing
.
Slide the other end of the main support beam marked ‘A’ over the
steel insert and into the joiner.
Screw the joiner to main support beams and steel insert using
1 1/2” screws. The bottom and top holes will need to be pre-
drilled
Install the rafter brackets to the main beams using 5/8”
screws. Follow the
pre-drilled holes to identify locations.
1
2
3
beams.
STEP FOUR
4
5
2
10
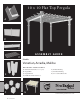
10 x 10 Flat Top Pergola
3
5
6
6
Four holes facing up
4
Pre-drill holes on bottom and top to
accomodate for internal steel stiffener.
At this stage, the columns should be properly
installed as per the following illustration,
with the columns 110” apart.
Also, notice that the holes at the top of each
post should be facing the same direction.
Beam Insert
Beam Insert
Beam Insert
Beam Insert
Beam Insert
Bea
Steel block should face up
A
A
A
Note: If you have base molding on your
posts, measure above moldings as the
measurement is to be from post to post.
www.newenglandarbors.com