2’ x 4’ Raised Garden with casters VT17100 Instruction Manual V 2.0 | Apr 29-2016 The world needs vegetables.
Congratulations! We’re thrilled that you chose to purchase a Vita Garden. We’re sure that you’ll not only grow healthy foods but you’ll have fun too. Your new Vita Garden is a fantastic investment for many reasons: 1. 2. 3. 4. 5. Grow your own healthy organic foods Reduce your water consumption Naturally control weeds Plant earlier (the soil warms faster) Far easier on your back Warranty We want you to know that your new garden has a 20 year warranty against: 1. Yellowing 2. Fading 3.
Box Contents Before you begin, please check the box for these contents. In the event of missing or defective parts please call our customer service deptartment at 1.844.880.VITA (8482) Mon. to Fri. 8:00 AM to 4:00 PM EST. 1. Posts (4) - (PN: 60013) 2. Post Caps (4) - (PN: 60023) 3. Long Side Panels (2) - (PN: 60014) 4. Short Side Panels (2) - (PN: 60015) 5. Floor Supports (3) - (PN: 60016) 6. Floor Boards (4) - (PN: 60017) 4 7. Casters (4) - (PN: 60018) 8.
Dimensions 48 in 24 in 32 7/8 in 32 in 20 in 48 in 4 2’ x 4’ SunSeeker Raised Garden with Casters 24 in
Getting started Follow these simple instructions to assemble your new Raised Garden. 1. Recycle your cardboard box packaging with your local recycling facility. This box has been printed using environmentally friendly inks. 2. Fill new garden with organic soil. We usually recommend a mixture of 1/3 Vermiculite to 1/3 Compost to 1/3 Peat Moss or Coconut Coir. 3. Plant your veggies. Your local nursery for the best vegetables for the growing zone that you live in.
1 Step 1A 1A Insert one side panel between the posts as shown. Note the locations of the pre-drilled holes. They should all be facing ‘inwards’. Step 1B Measure 1 inch down from the top of the post, and fasten the side panel through the pre-drilled holes as shown. Four screws will be needed. Step 1C Repeat steps 1 and 2 for the second side panel.
Step 2A 2 Place one of the side panels from step 1C on it’s side as illustratoed and insert a short side panel between the grooves in the post. Step 2B Insert and fasten the second short side panel as illustrated.
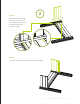
3A 3 Step 3A With a helper, stand up the assembly from the previous step and attach the second long side panel assembly as illustrated. 3B Step 3B Lock the bed together using three floor supports as illustrated. The notches in the floor supports should line up with the notches in the long side panel floor support. Step 3C Fasten the side panels to the posts using the screws provided.
4 4A Step 4A Insert the four post caps onto the post as shown. Step 4B With a helper, lift one post at a time and insert the caster into the bottom of the post as illustrated. The casters will lock into place once fully inserted.
The world needs vegetables. www.vitagardens.