IP Power 9212 User Manual
IP POWER 9212 USER MANUAL USER MANUAL IP POWER 9212 Version: X.X 2005.07 -1- VER. X.
Warning: any changes to this equipment without permission may cause damages to your equipment! This equipment has been proved to can be prevented from the influence of harmful electronic jamming in normal business use condition. IMPORTANT NOTICE 1. IP POWER 9212 is deigned to be used in-door, we have no responsibility for the possible damage in out-door use especially in the rain.。. 2.
IP POWER 9212 USER MANUAL Table of Content 1. INTRODUCTION..................................................................................................................... 4 FEATURES ....................................................................................................................................... 2.BEFORE YOU START............................................................................................................. 5 PACKAGE CONTENTS .........................................
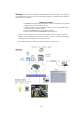
1. Introduction The IP Power 9212 is a Network Controller & Sensor with 8 DI & 8 DO. A specific PC or software is not needed; you can easily control devices remotely and check the device status via the Internet anywhere in the world. Using a Browser such as Internet Explore or Netscape, you can securely access the unit. It includes 8 Digital Inputs, 8 Digital Relay Outputs and works like an IO Server.
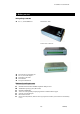
IP POWER 9212 USER MANUAL 2. Before you start 9212 package contents One set of IP POWER 9212 Main Board : 9200 Sensor board :9201 Pro Control Board : 9202 Pro One network wire with RJ45 port One 1A, 110~220V adaptor One D-Sub 15 Pin cable One install disc One rapid install manual Minimum System Requirements Minimum Intel Pentium II 300MHz/compatible AMD processor WINDOWS operating system (IE5.
3.
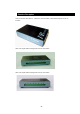
IP POWER 9212 USER MANUAL 4. Hardware & Software installation Before you star to use IP Power 9212, please follow the steps below: Check the package to make sure the contents is complete. Prepare one Ethernet HUB, or Router Check the voltage of the power supply to make sure it is AC 110-240 volt Hardware Installation : Connect RJ45 first then POWER jack 1 Connect the 9200 to HUB through RJ 45 netting cable. 2 Connect the 9200 (IN) to 9201 & 9200 ( OUT ) to 9202 through D-SUB cable.
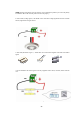
NOTE: Because of the polarity protective function, it won’t damage the product if you reverse the polarity in installation. But it will cause the product cannot work properly 2. Source mode ( Voltage signal ) -- IN1 & IN4: can be connected to voltage signal detectors such as smoke detector, light detector and gas detector. 3.
IP POWER 9212 USER MANUAL Source mode ( Voltage input) : IN1-IN4 contacts are active signal sensor. If the voltage difference between the two contacts in one set within 0V~3V, 9212 shows ON. It the voltage difference within 4V~24V, 9212 shows OFF. So user can detect the change of equipment. Such as smoke detector, light detector and gas detector. NOTE: 1. The data in this figure is the average measure value.
Step 1 : Cut off the live wire.(Use a test pencil or screwdriver with voltage tester to identify the live wire between the two wires of electrical wire.) NOTICE: this method must cut off the electrical wire of the household appliance. Please make the decision after reading method 5-2 and 5-3. Step 2: Use a test pencil or screwdriver with voltage tester to identify the live wire between the two wires of electrical wire. Cut off the live wire and connect to the port of IP Power 9212.
IP POWER 9212 USER MANUAL 3. You an control multi power by use the power extension cord NOTICE: Do not connect too much energy intensive electrical equipment such as air conditioner, electrical heater, microwave over or over in the same electrical outlet. Too much electrical currency may cause fire. This product not guaranties the possible damage because of too much electrical currency.
2. All the IP 92XX series, IP Kamera 9000 series/ IP Video 9100 series in the same subnet of the Ethernet will be found and be display in the window by the software. The default name of IP Sensor 9212 is IP POWER. IPEditV3 can adjust Name / Gateway / IP / Netmask / HTTP Port1) 2- 1 : Change Name : MAXIMUM 10 DIGIT 2-2 : After Change Gateway , IP, Netmask (xxx.xxx.xxx.0 ~ xxx.xxx.xxx.
IP POWER 9212 USER MANUAL 3. If can not get in the 92XX web page , please set the segment of IP 9060(A) to be same as your PC. * You can get your PC network information – IP Addres, Subnet Mask and Default Gateway by step: start execute key “cmd” in dialog key “ipconfig” in MS-DOS mode The last digit of IP address can be any number between 1~254, but can not be same as your PC. If using in any PC, just use HUB and type the 192.168.0.100 in Browser or use “ipedit.exe “ then you can get in the webpage.
6. Control and settings through the Internet Type the new IP address of IP Power 9212 in the address field and you can enter the login web page. Input the default password 12345678(you can change the password as you wish), click the OK and then you can enter the Web Control page. 1)Maximum 8 digit for Password 。 Sensor of IP Power 9212 : Read IO Source mode ( Voltage input) : IN1-IN4 contacts are active signal sensor.
IP POWER 9212 USER MANUAL IN5-IN8 contacts are short circuit sensor. If the resistance between the two contacts in one set within 0Ω~200Ω, 9212 shows ON. If the resistance within 500Ω~∞, 9212 shows OFF. So user can detect the movement of equipment through the magnetic reed switch or other kind of reactive sensors. NOTE: 1. The data in this figure is the average measure value.
Click the test-itself button and you will see the figure above. The states of OUT1, OUT2, OUT3 and OUT4 will separately keep in ON for 1 second, 3 seconds, 6 seconds and 8 seconds, then all back to OFF. After one period, four outputs will keep in OFF state for the same time. This process will repeat until you click the reset or cancel button. 2. Set the output’s state to ON/OFF Click the output you want to change, set it to ON or OFF state and click apply button to finish the setting. 3.
IP POWER 9212 USER MANUAL Setting the password for IP Power 9212 Click the change password option at the left window and you can enter the change password page. Follow the instructions, fill in the old password and new password, then click the apply button to confirm. Setting the IP address for IP Power 9212 1. Setting a fixed IP address for IP Power 9212. Click the setup option in the left side of the window and you can enter the setting web page.
5) When setup the setting please confirm the IP Address & Controlled IP Address is same address. Special Hardware Inter-Control - 92XX series : Use 9201 / 9212 ( DI part) to control ( IP Power 9212 & 9202 / IP Sensor 9201 / IP Motor 9203 ) 1.
IP POWER 9212 USER MANUAL B. Light : This device can control 9202 / 9212 (IP Power) - by change the default setting of : Normal close or normal open C. Motor : This device can control 9203(IP Motor) –control the direction of turning.. 3. Controlled IP Address: Setting the Ip Address of controlled device . In Inter - control mode when transfer , . the Out Light(P6.1/P6.2) will always on ,if the main controller freeze the Out Light P6.1 is always on ,if the controlled device freeze , the light of P6.
Setting Sample : Receiver: 12345678@abcd.com 87654321@dcba.com Sender: abcd@168.com Mail Server: 168.com Mail Password: ●●●●●● Warning MSG: Alert After type in all the information please click “apply” first to save the change and then “send ” to send mail. There is status bar next to at the clock : There are four possible situation for sending e-mail. a. b. Mail send OK : Receiver should receive mail in short time.
IP POWER 9212 USER MANUAL a)Receiver : 0x200(512 bytes) b)Sender : 0x30 (48 bytes) c) Server: 0x30 (48 bytes) d) Password: 0x30 (48 bytes) e) Warning MSG(text) : 0x50 (80 bytes) –can be empty 5) Mail contents include : ”From:”, “To:”, “Subject”, “IP Family Address” GPRS for Cell Phone : Support WAP. IP POWER 9212 support GPRS function , you can use cell phone ( with online function ) To setup the online device ( real IP address) as operate in browser .
Step 4 after finish update please wait some second and then re-log In PS : If use DHCP please enable DHCP Note: : 1)If the Port is 80 then you can directly update。 2) If update fail ,you can manual reset the device and update again . 7.
IP POWER 9212 USER MANUAL After you have setting the Ethernet and router, you can access the IP Sensor 9212 from the Internet. It will bring you all kinds of convenience. After assigning them different IP address and mapping to each port of the router, you can visit each equipment through the Internet network. - 23 - VER. X.
8. Associated with other IP network product You can associate the IP Power 9212 with other IP network product of OUR in your home Ethernet, such as IP Kamera 9000 network camera, IP Video 9100 network video server and IP Sensor 9201, IP POWER 9202E to monitor the equipments or sensors installed in the doors or windows. This is an economic solution to achieve the network monitor, detection and control.
IP POWER 9212 USER MANUAL 9. FAQ Q1: I forgot the password and can not enter the administration page now, what can I do? A1: Turn on the power normally, and then click the ipedit.exe program to enter the web page. Type in the username “superuser” and press ok then press the reset button in 9200; it will back to the default settings. Now you can enter the administration page. Q2: I cannot open the IE web page, why? A2: Please update your IE or use the up-to-date version of Netscape browser.