50cm Ceramic Freestanding Cooker NWLS 0TEW NWLS 0TEB Instruction manual
You’ll soon be enjoying your new Freestanding Cooker It all begins here, with your instructions. Don’t worry, there’s nothing too technical coming up. Just simple, step-by-step guidance to get you up and running quickly. Sound good? Then let’s get started. Help and Guidance We’re here to help you get the most from your Freestanding Cooker. Should you require any guidance, a simple solution can often be found online at: www.newworldassist.co.
Contents 1 Safety information 2 3 4 5 6 Safety information 4 Getting to know your Freestanding Cooker Product support Troubleshooting 22 Help and assistance 23 Declaration of conformance to product standards 24 Overview 7 Disposal 24 Accessories 8 Guarantee 25 Installing your Freestanding Cooker Installation requirements 9 Electrical connection 11 Using your Freestanding Cooker Control panel 12 Oven functions 13 General oven and cooking tips Practical Cooking Advice 16 17 Us
Safety information Important - Please read these instructions fully before installing or operating INSTALLATION WARNINGS DURING USAGE IMPORTANT: Prior to Installation ensure that the local supply conditions (electricity voltage and frequency) are compatible with the requirements of your freestanding cooker.
Safety information Important - Please read these instructions fully before installing or operating IIMPORTANT: When the door of the oven is open, do not hang or lean anything on it. You may unbalance your appliance or damage the door or door hinges. IIMPORTANT: Make sure the oven control knobs are all in the off position when not in use IMPORTANT: If you do not intend to use your builtin oven for a long period of time then turn off the electric supply to the oven.
Getting to know your Freestanding Cooker You’ll be up and running in no time Ready? Let’s begin... Please read these instructions carefully. They contain important information which will help you get the best from your freestanding cooker and ensure safe and correct installation and operation. If you require any further assistance, our technical experts are happy to help. For full details, refer to the product support section at the end of these instructions.
Getting to know your You’ll be up and running in no time 1 2 3 4 5 6 7 8 9 10 11 12 13 1. Hob 2. Cooking zone 3. Control Panel 4. Shelf position 5. Wire Shelf 6. Oven Door 7. Shelf position 8. Wire Shelf 9. Door seal 10Baking tray 11.Oven Door 12.Hinge 13.
Getting to know your You’ll be up and running in no time Accessories 1. 1 x Baking tray 2. 3. 1 x Grill insert 1 1 x Grill pan handle 2 4.
Installing your Freestanding Cooker Bringing it all together First Use Installation requirements IMPORTANT: When using your oven for the first time your cooker may give off an unusual odour from the heating elements and insulation materials. This is normal for new cookers. To eliminate this odour run the oven at 250 THIS COOKER MUST BE INSTALLED BY A QUALIFIED INSTALLER IN ACCORDANCE WITH LOCAL REGULATIONS degrees for 40-60 mins with the oven empty.
Installing your Levelling feet Safety chain 5 10
Installing your Freestanding Cooker Bringing it all together Electrical connection IMPORTANT: Electrical connections must be carried out by a suitably qualified person and in accordance with all relevant local building and installation regulations. Fitting on a Power Supply Cable Connecting appropriate power supply terminal board/ connector block: Using a screwdriver, prize open tabs of the Terminal board cover. Remove the wire clamp screw.
Using your Getting the most from your appliance Control panel 1 3 1.Top oven thermostat knob Sets grill oven thermostat / Mode. 2.Main oven function Knob Sets Oven Function / Temperature 3.
Using your Freestanding Cooker Getting the most from your appliance Oven functions Grill Top & Bottom Element Bottom Element Oven light Grill -The top central heating elements comes on .The extremely high and direct temperature of the grill makes it possible to brown the surface of meats and roasts while locking the juices in to keep them tender. The grill is also highly recommended for dishes that require a high temperature on the surface: beef steaks, veal, rib steak, fillets, hamburgers etc.
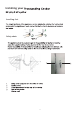
Using your Freestanding Cooker Getting the most from your appliance Programmable Timer This model has a digital display, 24hr clock with 3 control buttons. When the power is connected, the screen displays ‘AUTO’. Adjusting the digital clock For first use of cooker, the time must be set by using the digital timer. The time must be set every time the cooker has been reset by the mains.
Using your Freestanding Cooker Getting the most from your appliance Timer The digital countdown timer can be set up to 23 hours and 59 minutes maximum. button and then + or To set the timer, press the - button until the desired time is displayed. Once the button is released, the current time and U is displayed. When the button is pressed the remaining time is displayed. When the set time is reached, disappears and the alarm will ring. To button.
Using your Freestanding Cooker Getting the most from your appliance General oven and cooking tips General Oven Tips The wire shelves should always be pushed firmly to the back of the oven. Baking trays with food cooking on them should be placed level with the front edge of the oven’s wire shelves. Other containers should be placed centrally. Keep all trays and containers away from the back of the oven, as over-browning of the food may occur.
Using your Freestanding Cooker Getting the most from your appliance Practical Cooking Advice The oven offers a wide range of alternatives which allow you to cook any type of food in the best possible way. With time you will learn to make the best use of this versatile cooking appliance and the following directions are only a guideline which may be varied according to your own personal experience. Preheating You should always preheat your oven before placing food in it to cook.
Using your Freestanding Cooker Getting the most from your appliance Using the ceramic cooking zones of your cooker Do not use mats, heat diffusers or wok stands. These will cause a temperature build-up which can damage the hob. Do not let cooking pots over spill, this could leave a mark and residue on the glass. Ceramic hotplate Do not use if the ceramic glass top is cracked or broken. Do not leave aluminum foil on the hot ceramic hotplates (permanent damage will occur).
Care and maintenance Looking after your appliance Cleaning WARNING! Isolate the power supply to the appliance and make sure that the cooker is cool. Before cleaning your cooker or performing maintenance, make sure that the cooking mode selection knob and the cooking temperature selection knob is set to ‘OFF’. To extend the life of your cooker, it must be cleaned frequently.
Looking after your appliance Disconnect the oven from the power supply at the fuse-box by means of the switch used to connect the appliance to the electrical mains ;or unplug the appliance. Remove the glass cover of the lamp-holder by rotating anti-clockwise. Remove the lamp and replace with a lamp resistant to high temperatures (300℃) with the following characteristics: temperatures (300℃)with the following characteristics: Voltage: 220-240V Wattage: 25W Type: E 14 Replace the glass cover.
G G Model NWLS50TEW/ NWLS50TEB Voltage and frequency 220-240V AC 50Hz Upper oven power consumption 1210-1440W Lower oven power consumption 2220-2640W Total oven power consumption 3430-4080W Upper oven usable capacity 31L Lower oven usable capacity 62L Power consumption for large zones (1660-1960W)x1 Power consumption for small zones (1100-1307W)x3 Total ceramic zone power consumption 4960-5880W Total power consumption 8390-9960W Energy rating A 21
Product support Help is always at hand Troubleshooting If you have a problem with your appliance, check the troubleshooting table below to try and rectify your problem before calling your product support service centre. Note: Do not attempt to repair this cooker yourself, call our New World Support Team to carry out any repairs on: 0333 305 2263.
Product support Help is always at hand Help and assistance If you require any technical guidance or find that your washing machine is not operating as intended, a simple solution can often be found in the Troubleshooting section of these instructions or online at www.newworldassist.co.uk If you still require further assistance, call one of our experts on 0333 305 2263*.
Declaration of conformance to product standards Disposal This appliance/fitting is marked according to the European directive 2012/19/EU on Waste Electrical and Electronic Equipment (WEEE).
Call us now and activate your 24 month guarantee Thank you for choosing New World. Your new product is guaranteed against faults and breakdowns for 24 months. Don’t forget to register it with us today so we can provide you with our best possible after-sales service and useful updates. www.newworldassist.co.uk 0333 305 2263 Your New World Guarantee This product is guaranteed for 24 months from the date of original purchase.
Contact: www.newworldassist.co.