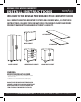
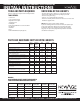
NEWAGE STEEL WELDED CABINETRY INSTALL INSTRUCTIONS WELCOME TO THE NEWAGE PERFORMANCE PLUS CABINETRY SERIES ALL CABINETS MUST BE MOUNTED TO STUDS ON A SECURE WALL, AS PER THESE INSTRUCTIONS. FAILURE TO DO SO MAY RESULT IN SERIOUS INJURY AND VOIDS PRODUCT WARRANTY AND MANUFACTURER’S LIABILITY. 84” WORKTOP WALL CABINET LOCKER CABINET 3 DRAWER BASE CABINET 56” WORKTOP 2 DOOR BASE CABINET WARNING: EXCESSIVE WEIGHT HAZARD • Use two or more people to move, assemble or install cabinet or locker.
NEWAGE STEEL WELDED PERFORMANCE PLUS CABINETRY INSTALL INSTRUCTIONS TOOLS AND PARTS REQUIRED: UNPACKING OF THE CABINETS: • Begin by placing the cabinet on a sound level surface. • Remove all cardboard and foam packaging material. • Remove clear plastic bag. • Dispose / recycle all packaging materials. • Remove and verify all the contents in the box. See “Parts and Hardware Supplied List” Gather the required tools and parts before starting installation.
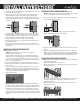
NEWAGE STEEL WELDED PERFORMANCE PLUS CABINETRY INSTALL INSTRUCTIONS ASSEMBLY INSTRUCTIONS: INSTALL THE HEIGHT-ADJUSTABLE STEEL LEVELING LEGS: (for all cabinets except for wall cabinet) 1. Open the cabinet and remove any loose shelves, closet rods, support brackets, etc. 2. Close / lock the cabinet drawers. NOTE: If you need to open the cabinet / locker doors during leveler assembly, open them slowly and do not put any weight on the open doors. This avoids damage to the cabinet hinges. 3.
NEWAGE STEEL WELDED PERFORMANCE PLUS CABINETRY INSTALL INSTRUCTIONS 2. Determine which side of the locker you would prefer to have the butcher block top mounted to. 3. Once side location is determined place the butcher block side support bracket on the outside of the locker by aligning the holes in the locker with the holes in the support bracket. Ensure the bracket is positioned with the side lip pointing up. See below diagram.
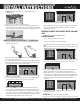
NEWAGE STEEL WELDED PERFORMANCE PLUS CABINETRY INSTALL INSTRUCTIONS NOTE: Make sure all shelf tabs are completely in place, see below diagram. 8. Repeat Step 6 three additional times with the remaining mounting hardware to install the wall cabinet. 5. Repeat steps 2 – 4 for the remaining shelves. 6. Follow the same process for the Closet Rod by placing the two closet rod brackets on opposite sides (left and right) of the locker, and securing them to the side tabs.
NEWAGE STEEL WELDED PERFORMANCE CABINETRY INSTALL INSTRUCTIONS ALIGNING DOORS BY ADJUSTING THE EUROPEAN HINGES: 1. Using a Philips screwdriver the doors can be adjusted up or down, left or right and depth forward or backward. Door Height Adjustment 2. The screws labelled (1.) in Diagram A. adjust height and alignment of door to adjacent door or cabinet frame. Door Side Adjustment 3. The screw labelled ( 2.) in diagram B. adjusts door left and right to align with adjacent door or cabinet frame.
NEWAGE PRODUCTS INC. WELDED-STEEL CABINETRY WARRANTY LIFETIME MANUFACTURER WARRANTY When this product is installed, operated and maintained according to the instructions attached to or furnished with the product, NewAge Products Inc. will replace the defective product or parts if the part fails as a result of defective materials or workmanship for the Lifetime of the product. NEWAGE PRODUCTS INC. WILL NOT PAY FOR: 1.
NEWAGE STEEL WELDED CABINETRY INSTALL INSTRUCTIONS WELCOME TO THE NEWAGE PERFORMANCE PLUS CABINETRY SERIES ALL CABINETS MUST BE MOUNTED TO STUDS ON A SECURE WALL, AS PER THESE INSTRUCTIONS. FAILURE TO DO SO MAY RESULT IN SERIOUS INJURY AND VOIDS PRODUCT WARRANTY AND MANUFACTURER’S LIABILITY.
NEWAGE STEEL WELDED PERFORMANCE PLUS CABINETRY INSTALL INSTRUCTIONS TOOLS AND PARTS REQUIRED: UNPACKING OF THE CABINETS: • Begin by placing the cabinet on a sound level surface. • Remove all cardboard and foam packaging material. • Remove clear plastic bag. • Dispose / recycle all packaging materials. • Remove and verify all the contents in the box. See “Parts and Hardware Supplied List” Gather the required tools and parts before starting installation.
NEWAGE STEEL WELDED PERFORMANCE PLUS CABINETRY INSTALL INSTRUCTIONS ASSEMBLY INSTRUCTIONS: INSTALL THE HEIGHT-ADJUSTABLE STEEL LEVELING LEGS: (for all cabinets except for wall cabinet) 1. Open the cabinet and remove any loose shelves, closet rods, support brackets, etc. 2. Close / lock the cabinet drawers. NOTE: If you need to open the cabinet / locker doors during leveler assembly, open them slowly and do not put any weight on the open doors. This avoids damage to the cabinet hinges. 3.
NEWAGE STEEL WELDED PERFORMANCE PLUS CABINETRY INSTALL INSTRUCTIONS 2. Determine which side of the locker you would prefer to have the butcher block top mounted to. 3. Once side location is determined place the butcher block side support bracket on the outside of the locker by aligning the holes in the locker with the holes in the support bracket. Ensure the bracket is positioned with the side lip pointing up. See below diagram.
NEWAGE STEEL WELDED PERFORMANCE PLUS CABINETRY INSTALL INSTRUCTIONS NOTE: Make sure all shelf tabs are completely in place, see below diagram. 8. Repeat Step 6 three additional times with the remaining mounting hardware to install the wall cabinet. 5. Repeat steps 2 – 4 for the remaining shelves. 6. Follow the same process for the Closet Rod by placing the two closet rod brackets on opposite sides (left and right) of the locker, and securing them to the side tabs.
NEWAGE STEEL WELDED PERFORMANCE CABINETRY INSTALL INSTRUCTIONS ALIGNING DOORS BY ADJUSTING THE EUROPEAN HINGES: 1. Using a Philips screwdriver the doors can be adjusted up or down, left or right and depth forward or backward. Door Height Adjustment 2. The screws labelled (1.) in Diagram A. adjust height and alignment of door to adjacent door or cabinet frame. Door Side Adjustment 3. The screw labelled ( 2.) in diagram B. adjusts door left and right to align with adjacent door or cabinet frame.
NEWAGE PRODUCTS INC. WELDED-STEEL CABINETRY WARRANTY LIFETIME MANUFACTURER WARRANTY When this product is installed, operated and maintained according to the instructions attached to or furnished with the product, NewAge Products Inc. will replace the defective product or parts if the part fails as a result of defective materials or workmanship for the Lifetime of the product. NEWAGE PRODUCTS INC. WILL NOT PAY FOR: 1.