
Instructions / Assembly


ASSEMBLY INSTRUCTIONS:
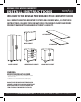
INSTALL THE HEIGHT-ADJUSTABLE STEEL LEVELING LEGS:
(for all cabinets except for wall cabinet)
1. Open the cabinet and remove any loose shelves, closet rods,
support brackets, etc.
2. Close / lock the cabinet drawers.
NOTE: If you need to open the cabinet / locker doors during
leveler assembly, open them slowly and do not put any weight
on the open doors. This avoids damage to the cabinet hinges.
3. Using two or more people, place the cabinet / locker on its back.
Using supplied packaging material to cushion the cabinet to
prevent any scratching of the painted surfaces.
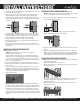
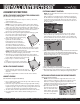
4. One at a time line up each height-adjustable leveling leg with
the corner of the cabinet. The threaded
holes in the base of the cabinet should
align with the holes in the leveling leg.
5. Using a 7/16th wrench hand
tighten the 7/16th bolt with one
lock washer into each of the pre-
threaded holes. There are 4 holes to
attach the leveling leg to the base of
the cabinets. A minimum of two holes
should be bolted to attach the leveling leg and the base of the
cabinet. All four holes do not need to be secured with a bolt in
order to properly attach the leveling leg.
NOTE: Bolts should be snug. Do not over tighten or force bolts.
This may result in the damaging of the threads.
6. After the leg is securely mounted to the base of the cabinet,
screw on the threaded leveler by hand. Thread the leveler 95%
in. This will be adjusted later on in the install.
7. Repeat steps 3 – 5 for the remaining
legs.
8. Using two or more people, stand up the
base cabinet and place into desired location.
INSTALL THE CABINET HANDLES
1. Locate the holes on the front of the doors or
drawers and align the correct size handles with
the holes.
2. Using the supplied bolts secure the handles to the cabinets.
CABINET LEVELING
(for all cabinets except for wall cabinet)
1. Place a small magnetic level onto the top of the cabinet to verify
the levelness of the cabinet.
2. If the oor slopes adjust the cabinets height-adjustable leveling
legs up or down to bring the cabinet to a level position. This may
require two people, one person to verify / bring cabinet level and
one person to adjust the legs up and down simultaneously.
3. The base cabinet must be adjusted front to back and side to side.
4. Do not put items in the cabinet until the leveling process is
complete.
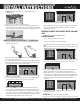
FASTENING CABINETS TOGETHER:
NOTE: Base Cabinet Drawers must be removed prior to fastening
cabinets together
Pull each drawer out to full extension, simultaneously depress
the left lock down and right lock up in each slider while pulling
out the drawer. The drawer will slide out of the tracks ready to
remove. See the diagram below to note where the locks are on
the drawer slides.
1. Locate cabinet fastening holes on the sides of each cabinet.
There are black caps covering the holes. These caps must be
removed rst to expose the holes. Pop the caps out with a at
head screwdriver or other tool. Two holes are located at the top
and bottom on the sides of each cabinet.
2. With your initial cabinet already securely mounted to the wall or level
in place, put a 7/16” x ¼” zinc plated hex bolt through the hole and
into the same hole of the next cabinet you wish to install. Finish o the
bolt by hand tightening on a 1/4” - 20 hex lock nut.
3. Repeat this step for the remaining holes.
4. Using a small magnetic level, level the second cabinet.
5. Once level using a 7/16” wrench and a 7/16” socket wrench tighten the
nuts. Ensure both cabinet faces are ush prior to tightening of nuts.
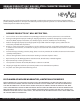
INSTALLING BUTCHER BLOCK SIDE SUPPORT BRACKET:
(optional, for locker cabinets)
NOTE: The butcher block side support bracket is to be used
in the event that a work top is added to the cabinetry system
without a secondary supporting base lower cabinet. The
installation of this bracket is made easier if the shelves are not
yet in place, to provide more working space.
1. Open the locker doors and
locate the three punched
holes on either side of the
locker cabinet. These holes
are located 32” up from the
inner base of the locker.
INSTALL INSTRUCTIONS
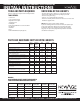
NEWAGE STEEL WELDED PERFORMANCE PLUS CABINETRY
need more information? try, WWW.NEWAGEPRODUCTS.COM or 1 877 306 8930 or for U.K 0800 031 4069 for answers to commonly asKed qUestions.