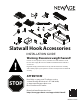
Slatwall Hook Accessories INSTALLATION GUIDE ! Warning: Excessive weight hazard! Use two or more people to move, assemble or install slatwall to avoid back or other injury. Do not leave children unattended near slatwall or accessories. High risk of injury if installed incorrectly: Follow instructions carefully and routinely inspect your system to ensure all components are fastened securely.
NEWAGE PRODUCTS INC. GARAGE SERIES MANUFACTURER WARRANTY PROOF OF PURCHASE IS REQUIRED TO OBTAIN WARRANTY SERVICE. Please have the following information available when you call our customer service team: • Name, address and telephone number • Product Name / SKU Number • A clear, detailed description of the problem • Proof of purchase including order number Register your NewAge Products purchase online for quicker customer assistance and access to exclusive benefits Visit www.newageproducts.
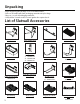
Unpacking • Begin by placing the package on a covered flat surface. • Remove all cardboard, foam packaging material and nylon bags. • Dispose / recycle all packaging materials. • Verify all the contents in the box and gather the required tools.
List of Slatwall Accessories Parts Bin SKU#52226 Parts Bin Support SKU#51746 Slatwall Accessories Kits SKU#51720 - 12PC SLATWALL HOOK KIT SKU#51721 - 20PC SLATWALL HOOK KIT SKU#51722 - 40PC SLATWALL HOOK KIT S. No. Description Qty S. No. Description Qty S. No.
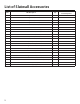
List of Slatwall Accessories S.No.
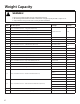
Weight Capacity ! WARNING! 1. Do not exceed the weight capacity of the slatwall panels. 2. The NewAge Metal Slatwall and PVC Slatwall has a weight capacity of 75lbs / Square Foot. 3. Only install Accessory Hooks onto securely mounted Slatwalls. S.No. Load Type Max.
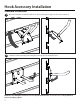
Hook Accessory Installation Standard Installation 1 Once the Slatwall is installed; install the hook by guiding the top lip into the desired channel. 2 Seat the hook by inserting and resting the lower lip into the channel below. Note: Do not attempt to install accessories upside down. Ensure accessories are securely installed before mounting objects.
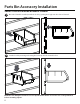
Parts Bin Accessory Installation SKU#51784 Installation on Metal Slatwall 1 Once the Slatwall is installed; install the hook by guiding the top lip into the desired channel. 2 Seat the hook by inserting and resting the lower lip into the channel below. Note: Do not attempt to install accessories upside down. Ensure accessories are securely installed before mounting objects.
Parts Bin Accessory Installation SKU#51784 Installation on PVC Slatwall 1 Once the Slatwall is installed; install the Part Bin Support by guiding the top lip into the desired channel. 2 Once the support is installed, seat the Part Bin onto the Hook as shown below. Note: Do not attempt to install accessories upside down. Ensure accessories are securely installed before mounting objects.
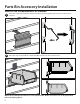
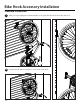
Bike Hook Accessory Installation Standard Installation 1 After properly installing the Slatwall and Bike Hook, guide the bikes front wheel into the hook. 2 Slowly lower the bike as it begins to secure itself on the wall.
Shelf Installation 2ft and 4ft Shelving - Standard Installation 1 Once the Slatwall is installed; install the Shelf Support as shown. Then install the Shelf by by guiding the top lip of the Shelf hook into the desired channel. Refer to the Hook Install illustration for reference. 2 Once the Shelf and Shelf supports are installed, pre-set the supports onto the appropriate location at front of the shelf as shown. Then tighten the Screw provided on both the Shelf supports.
Crochet pour accessoires de panneau rainuré GUIDE D’INSTALLATION ! Avertissement : Danger de charge excessive! Pour éviter les blessures au dos et autres, déplacez, assemblez et installez le panneau rainuré avec l'aide de deux personnes ou plus. Ne laissez pas d'enfant sans surveillance près d’un panneau rainuré ou d’accessoires.
NEWAGE PRODUCTS INC. GARANTIE DU FABRICANT POUR LA SÉRIE GARAGE UNE PREUVE D’ACHAT EST REQUISE • Le nom, l’adresse et le numéro de téléphone POUR OBTENIR UN SERVICE SOUS GARANTIE.
Déballage • Commencer par placer l’emballage sur une surface plane doté d’un revêtement; • Retirer tout le carton, les matériaux d’emballage en mousse et les sacs en nylon; • Mettre au rebut/recycler tous les matériaux d'emballage; • Vérifier l’ensemble du contenu de la boîte et réunir les outils nécessaires.
Liste d’accessoires de panneau rainuré Bac de pièces Support de bac de pièces UGS UGS nº 52226 nº 51746 Kits D’Accessoires Slatwall UGS nº 51720 - 12PC SLATWALL UGS nº 51721 - 20PC SLATWALL UGS nº 51722 - 40PC SLATWALL CROCHET KIT CROCHET KIT CROCHET KIT S. No. Description Qty S. No. Description Qty S. No.
Liste d’accessoires de panneau rainuré S.No.
Capacité de charge ! S.No. 1. Ne dépassez pas la capacité de charge des panneaux rainurés. 2. Le panneau rainuré métallique et le panneau rainuré en PVC de NewAge ont une capacité de charge de 75 lb/pied carré. 3. Installez les crochets d’accessoires uniquement sur des panneaux rainurés solidement fixés. Description de l’UGS Type de charge Capacité de charge max.
Installations des crochets d’accessoires Installation standard 1 Une fois que panneau rainuré est installé; installez le crochet en guidant la lèvre supérieure dans le canal souhaité. 2 Posez le crochet en insérant et en faisant reposer la lèvre inférieure dans le canal inférieur. Remarque : Ne tentez pas d’installer des accessoires à l’envers. Assurez-vous que les accessoires sont solidement fixés avant de monter des objets.
Installation d’un bac de pièces UGS nº 51784 Installation sur un panneau rainuré en métal 1 Une fois que panneau rainuré est installé; installez le crochet en guidant la lèvre supérieure dans le canal souhaité. 2 Posez le crochet en insérant et en faisant reposer la lèvre inférieure dans le canal inférieur. Remarque : Ne tentez pas d’installer des accessoires à l’envers. Assurez-vous que les accessoires sont solidement fixés avant de monter des objets.
Installation d’un bac de pièces UGS nº 51784 Installation sur un panneau rainuré en PVC 1 Une fois que panneau rainuré est installé, installez le support de bac de pièces en guidant la lèvre supérieure dans le canal souhaité. 2 Une fois que le support est installé, posez le bac de pièces sur le crochet, comme illustré ci-dessous. Remarque : Ne tentez pas d’installer des accessoires à l’envers. Assurez-vous que les accessoires sont solidement fixés avant de monter des objets.
Installations d’un crochet à vélo Installation standard 1 Après avoir adéquatement installé le panneau rainuré et le crochet à vélo, guidez la roue avant du vélo sur le crochet. 2 Abaissez doucement le vélo au moment où il se positionne solidement au mur.
Installation d’une tablette Tablette de 2 et 4 pi - Installation standard 1 Une fois que le panneau rainuré est installé, posez le support de tablette, comme illustré. Puis, installez la tablette en guidant la lèvre supérieure sur le crochet de tablette dans le canal souhaité. Consultez l’illustration de l’installation du crochet en guise de référence.