
How to Guide


17
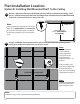
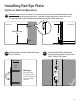
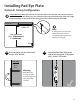
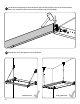
Installing Pad Eye Plate
Option B: Ceiling Conguration
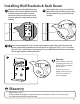
Drill pilot holes into the solid wood
using a 3/16” drill bit.
Secure Pad Eye Plate (#22) to the
stud or joist using two 3” lag screws
(#15), and a 7/16” socket.
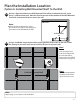
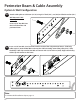
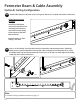
Ceiling Mounted:
18-33” (Adjustable in
1” increments)
Ceiling Mounted
Depth: 22”
Ceiling Mounted Depth:
44”
Wall Mounted:
35”
Ceiling Mounted:
18-57”
Note:
If Ceiling Joists are not in the
required location, refer to
“Installing with Irregular Joist
Spacing” on Page 23.
9B
10B 11B
Ceiling Mounting: Measure and mark 22” from the wall, in line with the wall mounting bracket
(#12) and center of the ceiling joist, this will be the closest eye plate hole (#22) to the wall. Align
the pad eye plate on the center of the ceiling joist and mark the ceiling for pilot holes.
Side View
#12
#22
Wood
Stud
Warning:
Must bore into
3 inches of solid
wood for lag screw
(#15) to be fully
secured.
Side View