
How to Guide


26
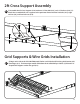
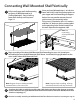
Connecting Wall Mounted Shelves Horizontally
3
4
5
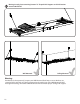
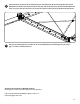
Note: Only one cable assembly is required for each pair of side perimeter beams.
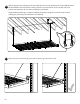
Attach Side Beams by guiding the
mounting holes into the carriage bolts and
shoulder rivets on the wall bracket. Then
bolt the side perimeter beams with a 1/4”
washer and 1/4” acorn nut.
Once the connecting side beams have
been installed, continue installation with
step 17 on page 20.
Insert a 5/16” Hex Bolt into the Front/First hole of the side perimeter beams. Slide Pully cable cap
onto the Hex Bolt and wrap the Cable Assembly around the pulley. Slide the Pulley Cable Cap onto
the Hex Bolt and secure with a 5/16” lock nut. Align tab on Pulley Cable Cap with cutout in side
frame.
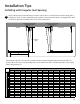
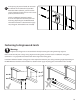
Install rst wall shelf according to option
A (Wall Mounted) or B (Ceiling Mounted),
until reaching Step 12 on page 16 or page
18.
1
2
Note: Before installing the Wall Mounting
Brackets, ensure wall mounted bracket will
be shared between two shelves that both
carriage bolts are mounted where there will
be two Wall Mounted Shelves connected.