
How to Guide


27
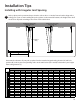
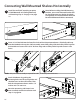
Connecting Wall Mounted Shelf Vertically
Begin assembly of the lower Wall Mounted Shelf according to steps 3-8, based upon
desired height from the Wall Mounted Shelf above. Install back hanging brackets on the
same stud as above Wall Mounted Shelf.
Continue assembly according to Wall Mounted Shelf installation instructions, resuming on step 12.
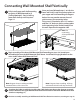
3
4
5
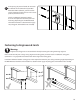
Complete the Cable Assembly by installing the Cable Eyelet according to the distance measured
from the bottom of the upper Wall Mounted Shelf to the bottom of the lower Wall Mounted Shelf.
(Similar to step 9b pg.17)
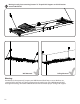
Note: Diagram shows installing two Wall
mounted Shelves of the same size
Note: Diagram shows installing 2ft deep
wall mounted shelf to 4ft deep wall shelf.
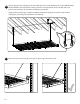
Once you have followed steps 1 to 8 for the
lower wall shelf, install the pad eye plates on
your upper wall shelf according to diagram
below. You may need to remove the end
grids to access the mounting holes.
Using two 1/4” hex bolts, four 1/4” washers
and two 1/4” lock nuts, bolt a pad eye plate
to the mounting holes furthest away from
the wall. Repeat to the opposite side.
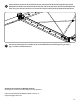
2
Note: For
connecting
2ft deep Wall Shelf
below
Fully Install upper wall shelf according
to option A (Wall Mounted) or B
(Ceiling Mounted). Start installing
lower wall shelf up until Step 8 on
Page.14
1