
Instructions / Assembly


Adjusting The Door Hinges
A
Using a Philips screwdriver, the doors can be adjusted:
Left, right, forwards and backwards.
To adjust the doors left or right, turn the screw (A) clockwise or counterclockwise.
To adjust the gap between the doors and frame, turn the screw (B)
clockwise or counterclockwise.
Thank you for purchasing a NewAge Product!
Please give us a call or visit online if you have any questions.
Call 1.877.306.8930; for UK 0800.031.4069; e-mail at info@newageproducts.com
B
12
13
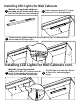
LED Light Guide
LED Light with power Adapter
SKU# 60836/60838
LED Light with Connector
wire
SKU# 60837/60839
The adapter kit is used to connect to the
electrical outlet, and contains the power on/
o switch for the LED lights. It is used when
one single light unit is needed or as the rst
light used when linking multiple light units
together. It controls on/o power for all light
units linked to it. Includes adapter, LED light,
plastic clips, and double sided tape.
The connector kit is used when additional light
units(up to 4) want to be linked together. It
works in conjunction with and is controlled by
the LED light with power adapter unit.Includes
double sided tape and plastic clips.
How to connect the LED Lights
For LED Lights to work correctly, the adapter
cable (A) must connect to end with on/o
switch, for LED Light to be operational. Use
connector cords (B) to connect additional
lights. Up to 4 LED lights can be connected
to one Power adapter cord(A).
A
A
B
ON/OFF Switch
NOTE: For Wall Switch Operation
If you are using a switch controlled power
outlet to operate the LED Lights, the power
adapter cord needs to plug into the end
opposite the ON/OFF switch end.