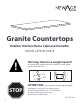
Granite Countertops Outdoor Kitchen/Home Cabinets/HomeBar INSTALLATION GUIDE ! STOP 1 Warning: Excessive weight hazard! Use two or more people to move, assemble, or install granite top to avoid back injury. ATTENTION: Is your Granite Countertop damaged? Need help or spare parts? For fastest service, contact NewAge Products at 1-877-306-8930; or support@newageproducts.com. Do not return to the retailer. IM-CTT.
Index Unpacking 3 Product Inspection 3 Product Information 3 Product Specifications 4 Outdoor Kitchen 4 Home Bar 4 Home Kitchen 4 Tools Needed 5 Types of Countertops (Kitchen Cabinets) 6 Standard Size Countertop 6 Extended Size Countertop 7 Installation Layout 8 Home Kitchen 8 Outdoor Kitchen 9 Home Bar 9 Home Cabinets Countertop Installation 10 Installing Countertop on a diswasher 13 Installing Corner Counter top 16 Home Bar Countertop Installation 19 Outdoor Kitchen C
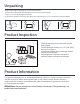
Unpacking • Begin by placing the package on a covered flat surface. • Remove all cardboard, foam packaging material and clear plastic bags. • Dispose / recycle all packaging materials. • Verify all the contents in the box and gather the required tools. See “Tools Needed” in the list below. Product Inspection • • • • Check to see all parts are received as per the order placed. Contact NewAge Products at 1-877-306-8930; for any missing parts.
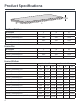
Product Specifications H L D Outdoor Kitchen Description L D H Granite Countertop 32in 32in 24in 1.25in Granite Countertop 56in 56in 24in 1.25in Granite Countertop 64in 64in 24in 1.25in Granite Countertop 84in 84in 24in 1.25in L D H Granite Countertop 42in 42in 22in 1.25in Granite Countertop 63in 63in 22in 1.25in Granite Countertop 84in 84in 22in 1.25in Home Bar Description Home Kitchen Description Standard Size Extended Size L D Granite Countertop 12in 12in 25.
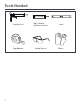
Tools Needed 100 % SILICONE 5 Caulking Gun 100% Silicone (Mildew resistant) Level Tape Measure Safety Glasses Gloves
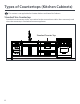
Types of Countertops (Kitchen Cabinets) This section is not applicable for Outdoor Kitchen and Home Bar Cabinets. Standard Size Countertop Standard size countertop widths are matched to the exact cabinet widths. Most commonly used when the countertop is interlocked between appliances.
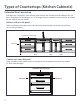
Types of Countertops (Kitchen Cabinets) Extended Size Countertop Extended size Countertops are used where the cabinets are installed with the addition of a side panel. Extended size Countertops are 1.57in longer than the standard size countertops to account for the width of two side panels. Cabinet with one side panel When installed on the cabinet with one side panel, the extended size counter top will have an over hang of 20mm.
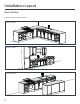
Installation Layout Home Kitchen Examples of Installation Layout Corner Layout Linear Layout Island Layout 8
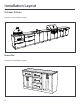
Installation Layout Outdoor Kitchen Examples of Installation Layout Home Bar Examples of Installation Layout 9
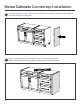
Home Cabinets Countertop Installation 1 Install the end panels on the sides of the cabinets. For side panel installation refer to Page 27 in Kitchen Cabinets Install guide. 2 Make sure the cabinets are attached by screws and level to each other.
Home Cabinets Countertop Installation 3 Using a caulking gun with100% silicone (not included), apply a bead of silicone on the top panel of the cabinets. 4 Using two persons, lift countertop and place on top of cabinets. Align the back edge of the granite top with the back edge of the cabinets, see Diagram A.
Home Cabinets Countertop Installation 5 12 Make sure the counter top is centered by aligning the countertop edges with the side panels. Using a wet cloth, wipe away any excess silicone along joint between countertop and cabinet. Follow the silicone manufacturers instructions for dry time.
Home Cabinets Countertop Installation Installing Countertop on a diswasher 1 leave space for the dish washer of 24” for a standard dishwaher and install adjacent cabinets next to it. Dish Washer 24” 2 13 Take the support bracket and Install to the side panel of the sink cabinet just below the sink. Drill in two 4x30 chipboard screws using a power drill.
Home Cabinets Countertop Installation Installing Countertop on a diswasher 3 Using a caulking gun with100% silicone (not included), apply a bead of silicone on the top panel of the cabinets and the support bracket. 4 Using two persons, lift countertop and place on top of cabinets and the support bracket. Align the back edge of the granite top with the back edge of the cabinets, see Diagram A.
Home Cabinets Countertop Installation Installing Countertop on a diswasher 5 15 Make sure the counter top is centered by aligning the countertop edges with the side panels. Using a wet cloth, wipe away any excess silicone along joint between countertop and cabinet. Follow the silicone manufacturers instructions for dry time.
Home Cabinets Countertop Installation Installing Corner Counter top 1 Make sure the cabinets are attached by screws and level to each other.
Home Cabinets Countertop Installation Installing Corner Counter top 3 4 17 Using a caulking gun with100% silicone (not included), apply a bead of silicone on the top panel of the cabinets. Using two persons, lift L-Shaped countertop and place on top of the corner cabinet.
Home Cabinets Countertop Installation Installing Corner Counter top 5 Using two persons, lift countertop and place on top of cabinets and the support bracket. Align the back edge of the granite top with the back edge of the cabinets, see Diagram A.
Home Bar Countertop Installation 1 Fasten and level cabinets to each other. (Refer to Home Bar Install guide for securing, fastening and levelling cabinets) 2 Using a caulking gun with100% silicone (not included), apply a bead of silicone along the top frame supports of the cabinets.
Home Bar Countertop Installation 3 Using two persons, lift countertop and place on top of cabinets. Align the back edge of the granite top with the back edge of the cabinets, see Diagram A. A 4 20 Make sure the counter top is centered by aligning the countertop edges with the side panels. Using a wet cloth, wipe away any excess silicone along joint between countertop and cabinet. Follow the silicone manufacturers instructions for dry time.
Outdoor Kitchen Countertop Installation 1 Fasten and level cabinets to each other. (Refer to Outdoor Kitchen Install guide for securing and levelling cabinets) 2 Using a caulking gun with100% silicone (not included), apply a bead of silicone along the top frame supports of the cabinets.
Outdoor Kitchen Countertop Installation 3 Using two persons, lift countertop and place on top of cabinets. Align the back edge of the granite top with the back edge of the cabinets, see Diagram A. A 4 22 Make sure the counter top is centered by aligning the countertop edges with the sides of the cabinets. Using a wet cloth, wipe away any excess silicone along joint between countertop and cabinet. Follow the silcone manufacturers instructions for dry time.
Use, Care and Maintenance The consumer is responsible for proper use and maintenance of the granite countertop, please see following points that should be followed. Usage : DO : • Use coasters for cups, glasses and bottles, especially alcohol or acidic beverages, as these have potential to stain granite stone. • Use a hot pad for hot dishes, drinks and pots and pans. Hot pots and pans can stain/burn granite. Do Not : • Directly use the granite as a cutting surface, use a cutting board for chopping.
Manufacturer One Year Limited Warranty When the granite countertop is installed, used and maintained according to the Use, Care and Maintenance of Granite Countertop section in the instructions attached to or furnished with the countertop, NewAge Products Inc. will replace the defective granite as a result of defective materials or workmanship for a period of One Year from the purchase date of the granite top. NEWAGE PRODUCTS INC.