
How to Guide


6
7
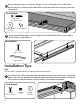
Using two M5 Phillips bolts, screw the Light Valance into the Wall Shelf hex rivet. Repeat
for all remaning Light Valances.
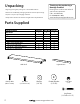
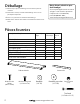
Parts Needed:
6
1
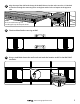
Drill a pilot hole using a 3/16” drill bit. Using a 1/4” x 2-1/2” lag bolt, one 1/4” ID Fender
Washer and a 7/16” socket, bolt the Wall Shelf into the Stud. Repeat for remaning studs and
second shelf.
To install the Top Shelf upside down, flip the shelf to where the top of the shelf is now facing
down. Insert the 1/4” Hex bolt and washer through the bottom mounting holes and tighten
with a lock nut inside the cabinet. Continue steps 3-5 to complete installation.
Fender Washer
(1/2” OD)
7/16” Socket
Lag Bolt (1/4”dia x 3”)
Lag Screw
(1/4” dia x 2-1/2”)
M5 Bolt
(M5 x 12mm)
Parts Needed:
Installation Tips
Note:
The Top Shelf is capable of being installed upside down if desired.
Lock Nut
(1/4”)
Washer
(1/4” ID)
Hex Bolt
(1/4” dia x 5/8”)
Parts Needed:
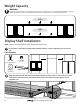
Light Valance