
Instructions / Assembly
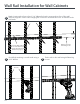
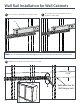
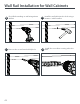
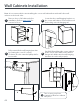

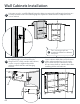
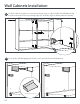
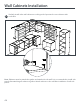
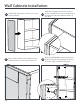
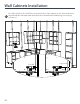
Table Of Contents
- IM-HKC.01A-01 REV 1.1_Home Cabinets Installation Guide
- Unpacking
- Product Inspection
- Home Cabinets and Accessories
- Tools Needed
- Hardware
- Room Preparation
- Installation Layout Options
- Installation Overview
- Removal and Installation of Doors
- Removal and Installation of Drawers
- Installation of Drawer Front Panels
- Installation of Drawer Front Panels
- Adjusting the Wood Shelves
- Installation of Glass Shelves on Wall Cabinets with Glass Doors
- Installation of Feet for Base Cabinets
- Corner Layout Installation
- Wall Rail Installation for Wall Cabinets
- Wall Cabinets Installation
- Installing the Linear layout
- Installing the Island layout
- Installing the U shaped layout
- Additional Accessories offered by NewAge
- SPARE PARTS - BASE CABINET with DOORS
- SPARE PARTS - BLIND CORNER
- SPARE PARTS - 3 DRAWER
- SPARE PARTS - SPLIT DRAWER and DOORS
- SPARE PARTS - PANTRY
- SPARE PARTS - SINK CABINET
- SPARE PARTS - STANDARD WALL CABINETS
- SPARE PARTS - CORNER WALL CABINET
- DOOR AND DRAWER REFERENCE TABLE
- Manufacturer One Year Limited Warranty

41
Wall Rail Installation for Wall Cabinets
Wall Studs
Reference line for
Wall hanger rails
Top Line for Wall Cabinets
(84” or 90” from the base
level line measured and
marked on page 9.)
Wall Studs
60mm (2.36”)
Pre drill the markings on wall studs using a
3/32” drill bit.
Fix the rails to the wall using 6x70mm lag
screws.
54
Top Line for Wall Cabinets
(84” or 90” from the base
level line measured and
marked on page 9.)
Wall Studs
Reference line for
Wall hanger rails
2 3/8”
Mark a horizontal reference line 2 3/8 “ (60mm)below the measured top line of the wall
cabient. Align the center of the hanging rail on this line and mark the holes of wall rail on the
wall studs.
3