AI-215 Series Portable Ice Maker OWNERS MANUAL Read and save these instructions. .
A Name You Can Trust Trust has to be earned and we will earn yours. Customer happiness is the focus of our business. From the factory to the warehouse, from the sales floor to your home, the whole NewAir family promises to provide you with innovative products, exceptional service, and support when you need it the most. Count on NewAir. As a proud NewAir owner, welcome to our family. There are no robots here, real people shipped your product and real people are here to help you.
READ AND SAVE THESE INSTRUCTIONS. TABLE OF CONTENTS Safety Information & Warnings ........................................................................... 4 Parts List ............................................................................................................... 5 Basic Parts Diagram ..................................................................................... 5 Control Panel Diagram .................................................................................
SAFETY INFORMATION & WARNINGS As with any electrical appliance, basic safety precautions must be followed in order to reduce the risk of fire, electrical shock and/or injury to persons or property. Be sure to read all instructions before using this appliance and observe the following safety tips: Do not operate this appliance if it has a damaged cord. Only connect the ice maker to a properly polarized outlet. No other appliance should be plugged into the same outlet.
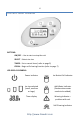
Do not touch the evaporator while the unit is in use or during the ice making process. It may cause severe burning. PARTS LIST BASIC PARTS DIAGRAM 1 4 6 7 5 2 3 1. Cover 2. Control Panel 3. Water Drain Cap 4. Ice Basket 5. Ice Scoop 6. Ice Shovel 7.
CONTROL PANEL DIAGRAM BUTTONS: ON/OFF – Use to start or stop the unit SELECT - Selects ice size TIMER – Set or cancel timer (refer to page 9) CLEAN – Begin self-cleaning function (refer to page 7) LCD DISPLAY SYMBOLS: Power indicator Ice Bucket Full Indicator Ice size selected (small, medium or large) Add Water Indicator (flashes when water needs to be added) Timer display Warning Indicator – problem with unit Self-Cleaning Indicator http://www.NewAir.
ASSEMBLY & INSTALLATION 1. Remove the exterior and interior packaging. Check that the ice basket and ice scoop are included. If any parts are missing, please contact customer service. 2. Clean the interior with lukewarm water and a soft cloth. Take out the ice basket and clean it. 3. Place your ice maker in a location that is protected from direct sunlight and other heat sources (e.g., stove, furnace, and radiator).
OPERATING INSTRUCTIONS MAKING ICE 1. Open the unit’s cover, remove the ice basket, and pour water into the water reservoir. Keep the water level below the “MAX” line marked inside the reservoir. 2. Plug in the unit to the grounded power supply outlet. 3. Press the “ON/OFF” button on the control panel to begin the ice making cycle. 4. Select the size of the ice cube by pressing the “SELECT” button.
USING THE TIMER How to Set the ON-TIMER Program When the unit is off, you can program the timer to start the unit after a set number of hours. 1. 2. 3. Press the TIMER button on the control panel. “1.0H” will flash in the Timer Set Display Window. Press the SELECT button to set the Timer delay to a time between 1.0 and 18.0 hours, in half hour increments. After the desired time is set, the display will show the time remaining and will decrease in 0.1 hour increments.
CLEANING & MAINTENANCE Clean the outside of the ice maker with a mild detergent solution and warm water. Use a soft cloth to wipe to avoid scratching or damaging the surface of the unit. Use the unit’s self-clean function to clean the interior of the unit: 1. 2. 3. 4. 5. 6. 7. 8. 9. Remove the ice basket. Add 1:1 mixture of water and vinegar. Plug in the unit. Hold down the CLEAN button for at least 6 seconds and release. The unit will automatically enter the self-clean program.
STORAGE Before storing your ice maker, clean it according to the directions above and allow it to dry thoroughly – at least 24 hours – in order to prevent the growth of mold or mildew. Store your ice maker in the original packaging, or cover with a soft cloth or plastic sheet. TROUBLESHOOTING Problem The “ADD WATER” indicator light is on. Possible Cause There is not enough water in the tank. The “ICE BUCKET FULL” indicator light is on. The “WARNING” indicator light is on. The ice basket is full.
Problem The ice making cycle appears to be normal but no ice is being produced. The ice cubes are too small. Possible Cause The refrigerant may be leaking. Solution Consult a qualified technician. A pipe in the cooling system may be blocked. Ambient temperature or water temperature in inner tank is too high. The ambient temperature or water temperature may be too high. The compressor may need to warm up. Consult a qualified technician. The ice has a “plastic” taste.
LIMITED MANUFACTURER’S WARRANTY This appliance is covered by a limited manufacturer’s warranty. For one year from the original date of purchase, the manufacturer will repair or replace any parts of this appliance that prove to be defective in materials and workmanship, provided the appliance has been used under normal operating conditions as intended by the manufacturer.