Please read and save these instructions.
CONTENTS SAFETY PRECAUTIONS ......................................................................................................... Important Safety Precautions of CO2 (Carbon Dioxide) Gas .............................................................. Proper Location .................................................................................................................................. Use of Extension Cords ........................................................................................
SAFETY PRECAUTIONS Read all of the instructions before using this appliance. When using this appliance, always exercise basic safety precautions, including the following: 1. Use this appliance only for its intended purpose as described in this operation manual. 2. This appliance must be properly installed in accordance with the installation instructions before it is used. See the installation section for more details. 3.
SAFETY PRECAUTIONS 21. This appliance is not intended for use by young children or infirm persons without supervision. 22. This appliance is NOT A TOY! 23. Young children should be supervised to ensure that they do not play with this appliance. 24. When transporting the refrigerator, keep the unit in the upright position. Do not tilt the appliance beyond 45° or place the unit in an upside down position.
SAFETY PRECAUTIONS Important Safety Precautions of CO2 (Carbon Dioxide) Gas 1. Co2 gas can be dangerous! CO2 cylinders contain high-pressure compressed gas, which can be hazardous if not handled properly. Make sure you read and understand all the procedures for the CO2 cylinders before installation. 2. Always connect the CO2 cylinder to a regulator! Failure to do so may cause an explosion resulting in possible death or injury when the cylinder valve is opened. 3.
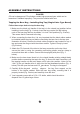
ASSEMBLY INSTRUCTIONS SAVE THESE INSTRUCTIONS For Future Use DANGER! Risk of child entrapment! Before throwing away your old appliance: ● Take off the doors. ● Leave the shelves or other accessories in place so that children may not easily become trapped inside. (Note: If the refrigerator has been placed in a horizontal or tilted position for any period of time, please wait at least 24 hours before plugging the unit in.
ASSEMBLY INSTRUCTIONS you are still unsure whether the kegerator has been properly installed, we recommend that you contact a qualified installer. Note: Allow the kegerator to stand in an upright position for at least 8 hours before plugging in the unit. This is very important! Once the unit is laid on its side, the refrigerant in the refrigeration system is shifted. The refrigerant in the refrigeration system needs to stabilize before the unit is turned on.
ASSEMBLY INSTRUCTIONS Also, See Illustrations E & F on pages 12 & 13, showing the hose connections to CO2 regulator and the regulator to the beer tap. Installing the Guardrail Follow the steps below to install the guardrail. 1. Place the guardrail on top of the cabinet. 2. Align all support feet of the guardrail with the holes on the top of the unit. Installing the CO2 Regulator and the CO2 Cylinder Follow these steps to safely install the CO2 regulator and CO2 cylinder.
ASSEMBLY INSTRUCTIONS DANGER! CO2 can be dangerous! CO2cylinders contain high-pressured gas, which can be hazardous if handled improperly. They must be handled with care. Tapping the Beer Keg – Installing Keg Tap (Single-Valve Type Barrel) Follow these steps below to tap the beer keg. 1. Make sure the black pull handle of the tap is in the closed (up) position before installing it on the keg (Fig. 1 below).
OPERATING YOUR KEGERATOR Connect to the Beer Line Tube Connect to CO2 Gas Line Tube OCKWISECL RN TU Black pull handle Keg Coupler Beer Keg Neck fig.1 fig.2 fig.3 Lift Upright Beer Keg Keg Support fig.4 fig.5 Illustration A Black Rubber Washer Installed in Wing Nut Illustration B Then Attach to CO2 Bottle Connector Operating Your Kegerator Dispensing Beer Follow the steps below to dispense beer. 1.
OPERATING YOUR KEGERATOR Note: It is normal to see condensation form on the faucet. It is caused by the difference of temperature between the cold beer and the inside of the faucet when beer is flowing through the line. Cleaning & Maintenance Flushing the tubes Follow the steps below to clean the keg tap and hoses. (See Illustration on the right.) Detach beer line 1. Turn off CO2 completely before attempting to clean. 2.
SPECIAL SAFETY INFORMATION Important Safety Message for Draft Beer Dispensing : Your kegerator system has two safety devices already provided in the CO 2 pressure line. The coupler for this kegerator is compatible with the ¼ Pony Keg sized barrel and the ½ Barrel full size (US Kegs). While the kegerator can hold both the 5 gallon Cornelius Keg and the 5 gallon D System Keg, should you decide to run either one of these 5 gallon kegs, you may need to obtain an alternate keg connector.
SPECIAL SAFETY INFORMATION Illustration D Illustration E 12
QUICK ASSEMBLY INSTRUCTIONS Illustration F QUICK ASSEMBLY INSTRUCTIONS Installing Casters 1. Remove all items from inside cabinet. 2. Lay kegerator on its side. 3. Install four casters, making sure the two locking casters are up front 4. Stand kegerator up on casters and allow Freon to settle for at least 8 hours before plugging in. *All O-rings and rubber washers are preinstalled by the factory, but should be double checked. The bag of O-rings and rubber washers included are replacement pieces.
QUICK ASSEMBLY INSTRUCTIONS refrigerator. 3. Sit tower down onto opening and turn counter clockwise to lock. Install Guardrail 1. Place guardrail (10) over rubber inserts on refrigerator cabinet and push down to secure. Connecting regulator and coupler (Illustrations on page 9) 1. Make sure regulator valve and CO 2 tank valve are off by turning clockwise. 2. Connect regulator (7) to CO2 tank (9). Use open wrench included to tighten. 3. Connect air hose (20) end with green nut to regulator (7). 4.
QUICK ASSEMBLY INSTRUCTIONS Band 6 15
LIMITED MANUFACTURER'S WARRANTY LIMITED MANUFACTURER'S WARRANTY This appliance is covered by a limited manufacturer's warranty. For one year from the original date of purchase, the manufacturer will repair or replace any parts of this appliance that prove to be defective in materials and workmanship, provided the appliance has been used under normal operating conditions as intended by the manufacturer.