AWC-330E 33 Bottle Freestanding Compressor Wine Cooler OWNERS MANUAL Read and save these instructions. .
A Name You Can Trust Trust has to be earned and we will earn yours. Customer happiness is the focus of our business. From the factory to the warehouse, from the sales floor to your home, the whole NewAir family promises to provide you with innovative products, exceptional service, and support when you need it the most. Count on NewAir. As a proud NewAir owner, welcome to our family. There are no robots here, real people shipped your product and real people are here to help you.
READ AND SAVE THESE INSTRUCTIONS. TABLE OF CONTENTS Safety Information & Warnings ...................................................... 4 Parts List .......................................................................................... 5 Parts Diagram ........................................................................... 5 Assembly & Installation .................................................................. 6 Handle Assembly .................................................................
SAFETY INFORMATION & WARNINGS When using any electrical appliance, basic safety precautions must be followed in order to reduce the risk of fire, electrical shock and/or injury to persons or property. Be sure to read all instructions before using this appliance and observe the following safety tips: Attention: To prevent the risk of child entrapment, do not allow children to operate, play with, or crawl inside the unit.
Use only genuine supplier’s replacement parts. Imitation parts can damage the unit, affect its operation or performance, and may void the warranty. PARTS LIST When you receive your unit, carefully remove the exterior and interior packaging. It is recommended that you retain the packaging for future use. Check to make sure the following parts are included: 6 Shelves 1 door handle and 2 screws with locking washers and flat washers 1 instruction manual PARTS DIAGRAM 1. 2. 3. 4. 5. 6.
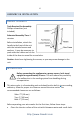
ASSEMBLY & INSTALLATION HANDLE ASSEMBLY Tools Required for Assembly: Phillips screwdriver (not included) Estimated Assembly Time: 5 minutes Before installation, attach the handle to the front of the unit with the included screws and washers. It may be necessary to push aside the rubber seal on the inside of the door to reveal the screw holes. Caution: Avoid over-tightening the screws, or you may cause damage to the unit.
Place the cooler on a level surface that will be strong enough to support the unit when it is fully loaded. To level your cooler, adjust the front feet located at the bottom of the unit. Install the cooler away from direct sunlight and heat sources such as stoves, heaters, or radiators. Direct sunlight may affect the unit’s acrylic coating, and nearby heat sources can increase electrical consumption. Extreme cold or hot ambient temperatures may also prevent proper performance.
After turning on the wine cooler, the LED display will show the ambient temperature first, and then the internal cabinet temperature. After you set the desired temperature, this set temperature will flash for 5 seconds on the display and then revert back to the internal cabinet temperature. OPTIMIZING PERFORMANCE To ensure maximum performance and efficiency, be sure to place your wine cooler in an area where there is proper air circulation.
DEFROSTING YOUR COOLER This wine cooler is equipped with an auto-defrost function that will eliminate the need to defrost the unit manually under most circumstances. If you notice an excess of frost buildup inside the unit, take these steps to remove it: 1. 2. 3. Unplug the wine cooler. Allow frost to melt from the inside of the cooler. Dry thoroughly before plugging it in again. MOVING YOUR COOLER To move your cooler: Remove anything stored inside.
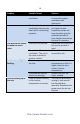
Problem Possible Causes There is insufficient ventilation. The door is not completely closed or the door seal is not working properly. The wine cooler seems to make too much noise. An interior red light is flashing. Frost is building up in the unit. The unit is not leveled. There is insufficient ventilation. The unit is too close to a wall or another surface. The set temperature is too low. The automatic defrost function is working. There is excess humidity or the interior temperature is too low.
WINE STORAGE GUIDE The ideal temperature for storing red or white wines is 55°F, with humidity between 60% and 75% RH. Store corked bottles on their sides, to keep the cork from drying out and allowing air into the bottle. UV rays make wine age faster, so keep bottles out of direct sunlight. Avoid heavy vibrations from motors, etc. Store wine separately from strong odors that might contaminate the flavor of the wine.
LIMITED MANUFACTURER’S WARRANTY This appliance is covered by a limited manufacturer’s warranty. For one year from the original date of purchase, the manufacturer will repair or replace any parts of this appliance that prove to be defective in materials and workmanship, provided the appliance has been used under normal operating conditions as intended by the manufacturer.