
How to Guide


6
http://www.NewAir.com
ASSEMBLY & INSTALLATION
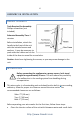
HANDLE ASSEMBLY
Tools Required for Assembly:
Phillips screwdriver (not
included)
Estimated Assembly Time: 5
minutes
Before installation, attach the
handle to the front of the unit
with the included screws and
washers. It may be necessary to
push aside the rubber seal on the
inside of the door to reveal the screw holes.
Caution: Avoid over-tightening the screws, or you may cause damage to the
unit.
INSTALLATION
Before connecting the appliance to a power source, let it stand
upright for approximately 2 hours. This will reduce the possibility
of a malfunction in the cooling system from handling during
transportation.
This wine cooler is a freestanding unit and should not be built in to surrounding
cabinetry. Allow for proper air clearance around the wine cooler. The
recommended clearances are as follows:
Sides: ¾” (19 mm)
Top: 4” (100 mm)
Back: 2” (50 mm)
Before operating your wine cooler for the first time, follow these steps:
Clean the interior surface of the unit with lukewarm water and a soft cloth.