CC-280E Thermoelectric Cigar Cooler OWNERS MANUAL Read and save these instructions.
A Name You Can Trust Trust has to be earned and we will earn yours. Customer happiness is the focus of our business. From the factory to the warehouse, from the sales floor to your home, the whole NewAir family promises to provide you with innovative products, exceptional service, and support when you need it the most. Count on NewAir. As a proud NewAir owner, welcome to our family. There are no robots here, real people shipped your product and real people are here to help you.
READ AND SAVE THESE INSTRUCTIONS. TABLE OF CONTENTS Safety Information & Warnings ........................................................................... 4 Parts List ............................................................................................................... 5 Parts Diagram............................................................................................... 5 Assembly & Installation .......................................................................................
SAFETY INFORMATION & WARNINGS When using any electrical appliance, basic safety precautions must be followed in order to reduce the risk of fire, electrical shock and/or injury to persons or property. Be sure to read all instructions before using this appliance and observe the following safety tips: Attention: To prevent the risk of child entrapment, do not allow children to operate, play with, or crawl inside the unit.
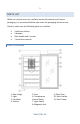
PARTS LIST When you receive your unit, carefully remove the exterior and interior packaging. It is recommended that you retain the packaging for future use. Check to make sure the following parts are included: 4 slide-out shelves 2 drawers Door handle and 2 screws 1 instruction manual PARTS DIAGRAM 1. Door Hinge 2. Light 3. Fan Mask 4. Shelves 5. Feet 6. Temperature Control Panel 7. Light Switch 8. Magnetic Seal Count On Us 9. Glass Door 10. Door Handle 11.
ASSEMBLY & INSTALLATION HANDLE ASSEMBLY Tools Required for Assembly: Phillips screwdriver (not included) Estimated Assembly Time: 5 minutes Before installation, attach the handle to the front of the unit with the included screws. It may be necessary to push aside the rubber seal on the inside of the door to reveal the screw holes. Caution: Avoid over-tightening the screws, or you may cause damage to the unit.
FACTORY ODOR REMOVAL Wash the interior of the cooler with a mild detergent and warm water. Leave the door open and allow it to air dry thoroughly. If a “plastic” smell persists, place a dish of baking soda in the unit or stuff the cooler with newspapers overnight. When finished, let the unit run a full day to complete the airing out process. DRAWER SET-UP The drawers and shelves included with this cooler are designed to sit flush with the front edge of the cabinet.
Select Celsius or Fahrenheit temperature scale. Raise the desired temperatures.* Turn the light on and off. Lower the desired temperature. * * The interior temperature can be adjusted in increments of 1 degree between 54° and 66°F (10° - 18°C). CLEANING & MAINTENANCE CLEANING YOUR COOLER To clean your cooler: Unplug the cooler and remove anything inside.
The ideal relative humidity (RH) for storing cigars is between 65% and 75% RH. To properly monitor and maintain RH in the CC-280E, you will need to add a hygrometer (humidity gauge) and some variety of humidifier to the cooler. Keep cigars out of direct sunlight, to avoid exposure to damaging UV rays. It is recommended to keep cigars in their original boxes and packaging as long as possible. Keep unwrapped cigars separate in your cooler to avoid unwanted mingling of flavors.
Problem The cooler vibrates while operating. The cooler produces a lot of noise. The door will not close properly. Possible Causes The unit is not sitting on a level floor, or the unit’s feet are not correctly installed. The unit is not leveled. Solution Make sure the unit’s feet are in the proper position and tightened securely. The fan may be obstructed. Check the fan to make sure there is no debris or obstruction. If not, contact the manufacturer. See above. The unit is not leveled.
LIMITED MANUFACTURER’S WARRANTY This appliance is covered by a limited manufacturer’s warranty. For one year from the original date of purchase, the manufacturer will repair or replace any parts of this appliance that prove to be defective in materials and workmanship, provided the appliance has been used under normal operating conditions as intended by the manufacturer.