Operation Manual East European Mount Picatinny Mount NVS 10MG DAY/NIGHT VISION SCOPE 105 Sparks Ave.
IMPORTANT INFORMATION READ PRIOR TO ACTIVATION You have just purchased a complicated electronic device. To operate it properly, please read this manual carefully. Here are some common Precautions that must be noted. NEVER expose the opened objective lens of an active unit in daylight (if operating in night mode). At daytime objective lens must be covered by caps. There is a tiny hole in the cap to provide enough light for day time operation. NEVER aim active unit at intense light sources (i.e.
TABLE OF CONTENTS 1. 2. 3. 4. 5. 6. DESCRIPTION................................................ 1 DELIVERY SET ............................................. 2 SPECIFICATIONS.......................................... 3 DESIGN........................................................... 4 TOOLS AND ACCESSORIES........................ 9 GENERAL INFORMATION ........................ 10 6.1 Precautions............................................... 10 6.2 General Instructions .................................
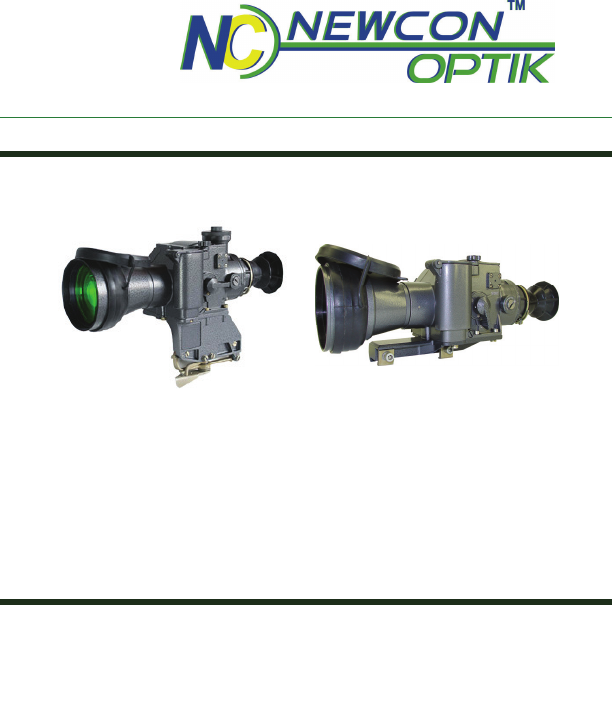
1. DESCRIPTION 1.1 The integrated day/night riflescope NVS 10MG is a day/night sight (hereinafter referred to as the sight) with the set of accessories. The sight is intended for aimed firing during daylight and at night, using large variety of weapons with side mounting or weaver mounting rail. 1.2 The sight provides detection, recognition, observation of a target and aiming firing in daylight and at night. 1.
2.
3. SPECIFICATIONS 4x 0.2 9° 108mm/F1.5 72 50 – 27.4 40 Fixed -0.5 to -1 D ±34 MoA* 0.7 MoA * >500 >1500 18 mm, Gen 2+ or 3 >500 >45 3V (2 x AA) 60 hours -55°C to +55°C -55°C to +70°C Yes 255x88x80 1.600 Magnification Field of view Objective lens focal length/F Objective lens diameter, mm Focus range, m Eyepiece focal length, mm Eyepiece relief distance, mm Dioptric adj.
4.
Figure 2 1 – Light filter 3 – Hand wheel for of reticle brightness 5 – Battery pack 7 – Battery compartment cover 9 – Handle DAY/ NIGHT 11 – Elevation scale 2 – Objective 4 – Switching mechanism 6 – Battery 8 – Latch 10 – Switch ON / OFF 12 – Elevation adjustment hand wheel 14 – Eyepiece 13 – Windage adjustment screw 15 – Clutch 17 – Side mount 19 – Washer 21 – Latch 23 – Handle 16 – Eyepiece Rubber 18 – Mount 20 – Clutching screw 22 – Lever 5
WARNING! Never operate your night vision device at daylight without the lens cover on! Never direct the lens to bright light! The functional device scheme is given on the figure 1 (see the Exhibit A). In daylight, the handle (5) is set into the position DAY, setting the switching mechanism into position (4a). Light filter (1) must be removed from the objective (2). Visible image that is formed by the objective (2) is projected onto the reticle (7) through the collective lens (3) and lens system (6).
During night and in dusk turn the handle (5) into position NIGHT. This sets the switching mechanism into position (4b), when the image intensifier A2 replaces the lens (3) in the aiming channel. Internal micro switcher SA2 is connected mechanically with the handle (5). Now, when you turn the switch SA1 into ON position, the power from batteries G1 and G2 is applied to the image intensifier A2.
Two rechargeable or non-rechargeable batteries of AA type are organized in a battery pack (5), which is placed into the battery compartment (6) and closed by cover (7). To fix the cover (7), turn the latch (8) counter clockwise.
5. TOOLS AND ACCESSORIES Battery control module should be used for the field inspection of the batteries. It has four LEDs on the front panel. Numbers “1.1”, “1.2”, “1.3”, “1.4”, which are marked near the LEDs, indicate battery voltage in Volts. The accuracy of voltage measurement is 0.1 V. The wrench key is designated for turning the windage screw (13). The protected rubber eye shade from the accessories kit is used instead of the standard eye shade (16).
6. GENERAL INFORMATION 6.1 Precautions NEVER switch the handle day/night into the night position in a daytime without the light filter on the objective; NEVER aim the sight to the bright sources of light (flares, glowing automotive head lamp) when it is on; NEVER touch the optical components by hands.
6.2 General Instructions Prior to usage, be sure that you understand the sight controls and fixing mechanism. If the sight was in storage, clean optical components with napkin. Remove the lubricant from the metallic surfaces.
- place the ON/OFF switch into the position OFF; Visibility decreases and / or disappears. Bright light sources (moon, projectors or headlights) may result in visibility degradation or even complete disappearance. If this happens move the scope away from the light source immediately. The image should be restored in within 2 minutes. Poor atmospheric conditions such as fog haze or extremely dark environments will decrease the visibility distance as well.
- Turn off the switch (10). In a daytime, set the DAY/NIGHT handle 9 into the position DAY, check that the switch (10) is in the OFF position, and then take the light filter (1) off the objective (2). In twilight, put the light filter (1) on the objective (2), turn on the switch (10), and set the DAY/NIGHT handle 9 into the position NIGHT. In the night, take the light filter (1) off the objective (2), turn on the switch (10), and set the DAY/NIGHT handle 9 into the position NIGHT.
6.3 Mounting on weapon (Side Mount) Mount the sight on the weapon in the following order: - Adjust the mounting seat groove (figure 2) with the mount type “dovetail”; - Move the sight forward up to the stop and fix it, turning the handle (23) forward up to the total fixation on the mount (18). The sight should be screwed tightly to the mount; - If the sight is not fixed tightly, take the sight off the weapon and regulate the clutch on the mount.
7. MAINTENANCE Keep the sight clean from the dust and dirt while operating. Surfaces of the optical components should be always clean. Clean the glass surfaces with flannel or cotton wool saturated with ethanol or special cleaning solvent to remove grease. - Wind a bit of a cotton wool at the end of wooden spatula; - Wet cotton with the solvent; - Wipe the glass by wetted cotton, not touching the frame; - Change the wool to a dry piece and finish cleaning by circular motions from center to edge.
8.
9. STORAGE When preparing the unit for long-term storage, it is necessary to perform corrosion proofing with a special lubricant. Each 4 (four) years the lubricant should be renewed to fully protect the device from corrosion. During this operation the rest of previous lubricant coating should be removed, and all metal surfaces should be degreased by a cotton-wool cloth moistened in benzene. The new lubricant coating should be applied after degreasing with a brush.
It’s allowed to store the units in transportation case at temperatures up to 70C (158 F) for not more than 10 hours. It is unacceptable to place the NVS 10MGs on the floor, near stoves and windows that let through direct sunrays. Presence of acid and alkaline vapour, as well as of other aggressive admixtures in the air is unacceptable. After a 4-year period of storage, it is necessary to perform thorough check-up of the NVS 10MGs’ functionality.
10. WARRANTY NEWCON warrants this product against defects in material and workmanship for one year from the date of the original purchase. Longer warranty is available, subject to the terms of the specific sales contract. Should your Newcon product prove to be defective during this period, please deliver the product securely packaged in its original container or an equivalent, along with the proof of the original purchase date, to your Newcon Dealer.
11. CUSTOMER SUPPORT Should you experience any difficulties with your NEWCON OPTIK product, consult the enclosed manual. If the problem remains unresolved, contact our customer support department at (416) 663-6963 or toll free at 1-877-3686666. Our operating hours are 9am-5pm, Monday - Friday, Eastern Standard Time. At no time should equipment be sent back to Newcon without following the instructions of our technical support department. NEWCON OPTIK accepts no responsibility for unauthorized returns.
12. ACCEPTANCE CERTIFICATE NIGHT VISION DEVICE NVS 10MG NVS 10MG serial number: _________________________________ Image Intensifier Tube serial number: ___________________ Complies with all technical specifications and has passed the inspection.
R1 – 5.