
Installation Sheet


Trim Installation
Note:
To achieve desired handle rotational alignment, the cartridge MUST be tightened in a clockwise rotation only.
(Cartridge Bonnet factory torque is 14-16 ft-lbs.)
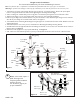
1. Attach handle and diverter trim to valves. Any adjustments for rotational alignment must be made to the
valve body - not to the cartridge. (Note: Allow minimum spacing between handles and escutcheon/bonnet
to prevent damage to the surface finish.) Secure handles into place with setscrew.
2. Slide spout nipple into quick connect deck flange (re-grease if necessary). Make sure spout is flush with
deck and secure into place with setscrew. See Figure 3
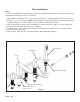
3. Install decorative ring to threaded deck flange. Attach braided hose, from diverter, to the hand shower
decorative hose and assembly.
4. Turn on water supply, check for leaks and make any final adjustments required.
Escutcheon
Spout
Spout nipple w/ O-rings
Valve
Quick connect Deck
flange w/ spacer
Threaded Deck Flange
Handle shower
Handle/Bonnet
Figure 3
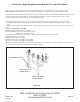
NWP-1-658
Adapter
(Discard)