
Installation


SAFETY WARNINGS
1.DO NOT install this equipment without first reading and understanding this instuction sheet. If you are unable to under-
stand these Warnings and Instructions, contact a health care professional, dealer or technical personnel for assistance before
attemping to install this equipment- otherwise, injury may occur.
2.After ANY adjustments, repair or service and BEFORE use, make sure that all attaching hardware is tightened securely.
3.Grab Bars add security for bath and commode areas if attached as instructed. Location, size and angle of bars should be
determined by a quilified professional to provide optimum safety and function.
4.Use EXTREME caution on wet tub or floor surfaces.
5.Users with limited physical capabilities should be supervised or assisted in bath and commode areas, even when using the
Grab Bars.
6.This Grab Bar can provide support and increased stability for an indivitual weighing up to 350 pounds. Grab Bars are
NOT designed to support the total weight of an indivitual. Use the bar for assistance ONLY.
7.Be sure Grab Bars are correctly and securely installed. NEVER use Grab Bars if any looseness is noted.
BEFORE INSTALLING GRAB BAR:
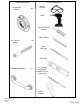
1. Remove the Grab Bar and parts from the package.
2. Locate wood wall studs.
3. Attach Mounting Flange onto Grab Bar, tighten M5 setscrew, then place Grab Bar over wall stud at desired position.
4. Mark the hole pattern if installing over ceramic tiles, place masking tape on the mounting area before marking the hole
location.
GRAB BAR MAY NOT PROVIDE DESIGNED AMOUNT
OF SUPPORT UNLESS THESE INSTRUCTIONS ARE
STRICTLY FOLLOWED
For proper installation, both ends of Grab Bar MUST
be positioned over a wall stud.
For solid support, at least two (2) of the three (3) screws
at each end of the Grab Bar MUST go through the wall-
board or tile and be tightly secured into the wallstud.
Grab Bar may be installed vertically, horizontally or
at an angle, so long as at least two (2) of the three (3)
mounting screws on both ends of the Grab Bar are
secured into a wall stud (see Figure 2).
Locate the wall studs behind the wall before beginning
installation (a stud finder can be obtained from a hard-
ware store).
THE FOLLOWING STEPS REQUIRE DRILLING INTO
THE WALL
When drilling into the wall, exercise care to avoid any elec-
trical wiring or plumbing that may be located behind the
wall. Damaged electrical wiring can cause electrical shock
and/or fire. Since older homes do not always fall in
line with current housing codes and requirements, know
where internal wall wiring is located so that no wires will
interface with your installation.
PROPER INSTALLATION IS EXTREMELY IMPORTANT.
IF IN DOUBT, INSTALLATION SHOULD BE DONE BY A
QUALIFIED PROFESSIONAL.
TO INSTALL INTO WOOD WALL STUDS:
1. Put on safety glasses before starting.
2. Use the power drill and 7/64 inch drill bit to drill all holes into the wall and wood wallstuds at the marked positions.
NOTE: If installing Grab Bar over ceramic tiles, the 1/4 inch carbide tip drill bit will be needed for drilling through the tile, in
order to prevent damage to the tiles. Drill pilot holes through the tiles by using a 1/4 inch carbide tip drill bit. Once a hole
has been drilled through the ceramic tiles, use the 7/64 -inch drill bit to drill a pilot hole in the wood wall stud itself.
3. Place Grab Bar on wall, aligning mounting holes with the holes in the wall.
4. Apply a bead of silicone sealant designed for wet applications to the back face of both grab bar mounting flanges.This will
help prevent water from bleeding through the mounting holes and potentially damaging the wallboard.
5. Insert the wood screws provided into one end of the Grab Bar, screw into wall and wall stud.(HAND TIGHTEN
ONLY) (see Figure 3).
6. Repeat Step 4 for opposite end of the Grab Bar.
7. Securely tighten all mounting Wood Screws with a screw driver.
8. Install O-ring onto grab bar Mounting Flange.
9. Slide Escutcheon around bend and press into place over Mounting Flange O-ring.Wetting O-ring aids installation
(See Figure 3).
Page 3 of 4
WARNING
BOTH ends of grab bar must be installed into WOOD wall studs
NWP-1020-3912
EN-3279
REV -