
NWP 2040 4261


NW
P-2040-4261
REV - G
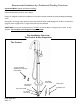
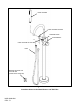
INLETS
1/2"
TO 3/4" NPSM
ADAPTER FITTING (X2)
(INCLUDED)
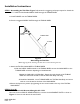
Figure
6
Connecting
Tub Filler Inlets to Water
Supply.
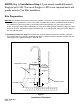
STEP 3:
Pressure Test Water Supply Connection
a. Before attempting to mount the Tub Filler to the
floor,
Test water connections to ensure water tight
seals. The installer is responsible for ensuring a water tight seal. Lay the Tub Filler on the floor and
pull the tub filler supply lines above the floor surface to enable leak detection as needed.
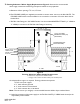
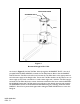
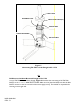
STEP 4: Securing
the
Tub Filler to the Floor: Figure 7 illustrates the hardware required to mount the
Tub Filler Riser to the floor.
a. Gently push down and slide all the flexible hose connections through the floor opening.
b. Position the tub filler above the floor opening and orient the tub filler spout to the desired
orientation with respect to the tub.
c. Rotate the tub filler LEVER HANDLE to verify that the full rotation will not interfere with
the bathing fixture or back wall per Figure1.
d. Use a pencil to mark the locations of the three BASE ANCHOR HOLES on the finished
floor around the opening in the floor.
e. Lay the tub filler on the floor and out of the way.
f. Using a drill and a 5/16” drill bit, drill 3 holes, 2” deep at the marked locations. Warning:
Care should be taken to avoid damaging the water supply lines during the drilling process.
g. Insert PLASTIC ANCHORS into the three 5/16” holes. Tap flush to the floor surface with a
hammer as needed.
h.
Position
Tub
Filler
TUBING RISER BASE over the inserted anchors.
i. Drive SCREWS through the TUBING RISER BASE holes and into the anchors until snug.
j. Slide FLANGE down to the base of the TUBING RISER until flush with the floor.