
Installation Sheet

Rough in valve Installation
Recommended Installation by a Professional Plumbing Contractor
Note: Use plumbers tape or equivalent to seal all threaded joints.
Warning: To prevent severe damage to valve body, any solder/braze process must be per-
formed a min. of 4" from ports.
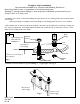
1. Install the Spout quick connect Deck Flange through center hole of mounting surface. Secure with washer
nut. See Fig. 1
Note: Spout Nipple is installed in the Deck Flange for safe keeping until the trim is to be installed.
2. Place washer nut on valve body. Insert body, (blue cold & red hot), through hole from below mounting sur-
face. See Fig. 1. Adjust and secure with additional washer nut so that the top of valve stem is at the correct
height from mounting surface. See Table 1.
Fig. 1
3/4 NPT
Washer
Nut
Washer
Nut
Deck
Flange
See table for
stem length
Finished Deck
1 1/4”
1 1/4”
3/4 NPT
3.Attach hot/cold valves to spout, utilizing ¾" copper pipe. See Fig. 2
Fig. 2
Inlet for hot
water supply
Inlet for cold
water supply
NWP-1-502
EN-3547
Rev B
Spout nipple to be
used with trim
installation **
**Remove from deck flange for
trim installation.