
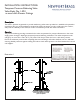
Installation Sheet

Setting the Temperature Limit Stop
This valve has an upper temperature limit stop , which can allow desired and
safe hot water temperature (recommended maximum is 110°F). This stop
may be adjusted once the valve is installed. Before making this adjustment,
run the water with the valve turned to the hot setting. If the water temper-
ature is too high in this position, then perform the following adjustments:
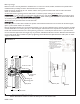
·
Remove the trim (handle, escutcheon and cover).
·
Remove the all-thread nipple, retaining screws and retaining plate.
·
Remove the broach and the limit stop. Do not remove the mechanical
stop.
If for any reason the mechanical stop or the cartridge is removed, the follow-
ing steps must be performed:
1.Close the valve by turning the cartridge stem clockwise
until it stops, (Do not forcefully rotate).
2. Position the mechanical stop on the cartridge against
the stop block as shown in Illustration 5 and continue with the following
steps.
·
From the CLOSED position, rotate the cartridge stem counter-clockwise
until the desired temperature is achieved.
·
Place the limit stop on the cartridge stem against the stop block as shown
in Illustration 7. Rotate several times to make sure the stop is at the desired
temperature setting.
·
Replace the full extension broach, retaining plate and screws, all-thread, nip-
ple and locking nut. (NOTE: For stem to be fully seated into cartridge, all-
thread nipple and locking nut must be tightly secured against retaining
plate.)
Illustration 3
Illustration 4-7
9/16/2011
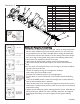
1
2
6
5
4
3
7
8
9
10
11
12
13
14
15
Item Qty Description P.N.
11AllThread Nipple 10631
22Retaining Plate Screw 92014
31Retaining Plate 11459
41Oring 91099
51Full Broach 10632
61Limit Stop 10493
71Mechanical Stop
81Oring 91049
94Cover Screw 10714
10 1 Valve Body Cover
11 1 Cover Oring
12 1 Cartridge 1207
13 2 Check Vavle 11491
14 1 Valve
15 1 Locking Nut 10259