
Installation Guide


11/11/2003
Trim Installation
Note:To achieve desired handle rotational alignment, the cartridge MUST be tightened in a clockwise rotation
only.
(Cartridge Bonnet factory torque is 14-16 ft-lbs.)
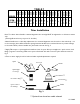
4.Attach handle trim to valve.Any adjustments for rotational alignment must be made to the valve body - not
to the cartridge. (Note:Allow minimum spacing between handles and escutcheon/bonnet to prevent damage
to the surface finish.) Secure handles into place with setscrew. See Fig. 3
5.Apply Teflon tape to spout nipple and install into base of spout. Slide spout nipple into quick connect deck
flange (re-grease if necessary). Make sure spout is flush with deck and secure into place with setscrew. See
Fig. 3
6.Turn on water supply, check for leaks and make any final adjustments required.
** Optional item based on model selected
Spout nipple
w/ O-rings
Quick connect
Deck flange
Decorative Ring
**
Bonnet
**
Escutcheon
**
Handle
Setscrews
Valve
Spout
TABLE 1
SERIES
806
816
826
836
842
846
856
916
926
936
986
996(L)
1006
1036
1206
1406(L)
1506
2016
2026
2106
STEM
LENGTH
2 1/2"
2 3/4"
2 1/4"
2 1/4"
2 3/4"
2 1/2"
2 9/16"
2 3/4"
2 1/4”
2 1/4"
2 1/2”
2"
2 1/4"
2 1/4"
2 1/4”
2”
2 1/8”
2 7/16"
2 9/16"
2 1/4"
Fig. 3