
Installation Guide


Rough-in Valve Installation
Recommended Installation by a Professional Plumbing Contractor
Note: Use Teflon tape or equivalent to seal all threaded joints.
Warning: To prevent severe damage to valve body, any solder/braze process must be performed a min. of 4"
from ports.
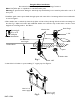
1. Install the quick connect spout shank through spacer and center hole of mounting surface. Secure with wash-
er nut. See Figure 1.
2. Place washer nut on valve body. Insert body, (blue cold & red hot), through hole from below mounting sur-
face. See Fig. 1. Adjust and secure with additional washer nut so that the top of valve stem is at the correct
height from mounting surface. See Table 1.
Spout nipple
to be used
with trim
installation
3. Attach hot/cold valves to spout, utilizing ¾" copper pipe. See Figure 2.
Inlet for hot
water supply
Inlet for cold
water supply
Fig. 2
Deck Flange
1-1/4”
Spacer
Washer Nut
3/4” NPT
See table 1 for
stem length
1-1/4”
Finished Deck
Fig. 1
Washer Nut
3/4” NPT
NWP-1-506