
Installation Sheet


NWP-1-587 11/29/2017
EN-3222
Rev A
Trim Installation
Note: If cartridge was removed for any reason, it MUST be re-tighten to factory torque
of 14-16 ft-lbs.
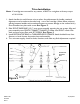
1. Attach handle trim and diverter trim to valves. Any adjustments for handle rotational
alignment must be made to the valve body - not to the cartridge. (Note: Allow minimum
spacing between handles and escutcheon/bonnet to prevent damage to the surface finish.)
Secure handles into place with screw. See Figure 3.
2. Slide SPOUT BASE RING (16) ** onto spout assembly, exposing the set screws. Align and
press assembly onto QUICK CONNECT FLANGE (2). Make sure SPOUT is flush with
deck and secure into place with SET SCREW. See Figure 3.
3. Install DECORATIVE RING to THREADED DECK FLANGE. Attach braided hose, from
diverter, to hand shower decorative hose and assembly.
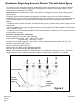
4. Turn on water supply, check for leaks, functions, and make any final adjustments required.
16
3
Figure 3
Hand Shower
Decorative
Hose
Decorative ring
Set
screw