
Installation Sheet

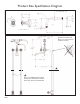

Shut-off Valve
Escutcheon
3/4” NPT Brass Nipple
(not included)
3/4” Ear Copper Sweat Elbow
(not included)
Copper Pipe
(water supply)
Wood Screws
(not included)
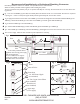
Recommended Installation by a Professional Plumbing Contractor
Note: Many installation variations are available. One potential scenario is outlined below.
Adhere to industry standards & local regulations when installing this product.
The use of petroleum base plumbers putty on our products will nullify the warranty. We recommend the use of clear silicone seal-
ing materials.
Fig. 1: For riser inlet NIPPLE (1)-(3/4” NPT, not included), deck hole diameters of 7/8” are recommended. Two holes are required at
a spacing of 6” - center to center). The nipple should protrude approximately 7/8” from the floor surface.
Fig 2: Apply thread sealant to the threads of the NIPPLE (1) and thread into fitting below the deck. Place ESCUTCHEON (2) over
NIPPLE (1). Attach Shut-off VALVE (3) to the other end of NIPPLE (1) and flush against ESCUTCHEON (2).
Fig 3: Attach the RISERS (4) to shut-off VALVES (3).
Fig 4: Discard ESCUTCHEONS (2a) provided with FAUCET (5). Thread FAUCET (5) to RISERS (4).
Fig 5: Attach HOSE (6) to FAUCET (5) and hand SHOWER (7). (Hand-tighten and secure each connection with a wrench ¼ turn.).
Turn on water supply. Check for leaks and make any final adjustments as necessary.
•
•
•
1
2
3
Fig. 3
Fig. 4
Fig. 5
7
6
5
3
4
4
2a
Fig. 2
*
*
Riser
4
•
•
•
Floor
Fig.1
1
2
Floor
Joist
2 x 4 Stud
Adhere to industry standards & local
regulations when securing water supply
under the finished floor.
The use of additional riser support
bracing (not included) at a location
above floor level is recommended.
*
6”
*
7/8”
2001 CARNEGIE AVE, SANTA ANA CA 92705
(949) 417-5207
WWW.NEWPORTBRASS.COM
NWP-3-196
EN-3750
REV -
11/16/18