
Installation Sheet


NWP-1-540
IV. Maintenance and Troubleshooting
The thermostatic valve has various screens that filter debris and unwanted particles that may
damage the valves' cartridge and operation. Though years of use these screens may build up
with impurities and limescale, restricting the flow of water through the cartridge and or
check valves. The following steps describe removal and cleaning procedure.
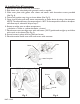
Cartridge
(Reference Fig. 7 or Fig. 7a based on trim style)
1. Carefully remove the handle, bonnet, stop ring, cover plate and sleeve.
2. Shut off the water to cartridge by tightening center screw on each check valve, 7 turns max-
imum.
3. Unscrew the cartridge using 1-3/16” or adjustable wrench; gently remove cartridge from
housing.
4. Clean the screens by rinsing the cartridge under running water. If necessary, soak in a 50/50
mix of white vinegar and water to remove limescale.
5.Wipe cartridge and housing with wet cloth and apply a thin film of non-petroleum grease to
o-rings. Do not use Vaseline.
6. Carefully install cartridge into housing and tighten to 10 ft-lbs.
7. Fully open check valves and inspect for leaks.
8. Check operation and flow. If improved, proceed to step 9, otherwise see checkvalve section
below.
9. Reinstall trim and set temperature per section III.
Fig. 7
Sleeve
Coverplate
Stop ring
Bonnet
Handle
Check valve
Cartridge
O-rings
Screens
Fig. 7a
O-rings
Screens
Sleeve
Coverplate
Stop ring
Bonnet
Handle
Check
valve
Cartridge