
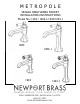
Installation & Assembly

Recommended Installation by a Professional Plumbing Contractor
Note: The use of petroleum base plumbers putty on our products will nullify the war-
ranty. We recommend the use of clear silicone sealing materials. Recommended
deck thru hole Ø 1-3/8” to 1-5/8”.
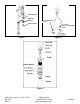
1.
Insert hoses through deck hole one at a time, and secure spout into place with
MOUNTING STUD, MOUNTING BRACKET and MOUNTING NUT. See Figure 1.
2. Attach hot/cold spout supply hoses to valves in the wall. See Figure 2.
3.
Drain assembly not included with 1203-1. Remove FLANGE, RUBBER WASHER,
STEEL WASHER, and discard drain CAP COVER from drain assembly. Place RUBBER
WASHER into FLANGE. Then, place FLANGE through the sink hole (Clear silicone
may be used in place of RUBBER WASHER). From underside of sink, install CONE
WASHER, STEEL WASHER, and LOCK NUT into FLANGE. Thread LOCK NUT
firmly. Thread TAILPIPE to FLANGE assembly and assemble TAILPIPE to existing P-
Trap. See Figure 3.
4. Remove aerator from spout using key supplied. Turn on water supply, and flush sys-
tem until water is clear. Check for leaks and make any final adjustments required.
Re-attach aerator to the spout.
NWP-1203 / 1203-1 / 1233 / 1233-1
EN-3718
REV C